If you receive the Windows Update error 0x80070003 while trying to install updates on your Windows 10 PC, continue reading below to solve the problem.

This tutorial contains step by step instructions to resolve the error 0x80070003 in Windows 10 Update: “There were some problems installing updates, but we “ll try again later. If you keep seeing this and want to search the web or contact support for information, this may help: (0x80070003)”.
How to Solve Error 0x80070003 in Windows 10 Update.
If you having problems to install Windows 10 updates, then before trying anything else, apply the following actions:
- Ensure that you have enough free space on your disk. Windows 10 requires at least 32 GB of free space to upgrade.
- Run Disk Cleanup and delete all the useless files.
- Download and install the latest ServicingStackUpdate according your Windows 10 version and try to update your system again.
Step 1. Scan your computer for viruses.
Important: Many viruses or malicious programs can cause problems with Windows update. So before you continue to the troubleshooting steps below, use this Malware Scan and Removal Guide to check and remove viruses or/and malicious programs that may be running on your computer.
Step 2. Check if the Windows Update Service is Running.
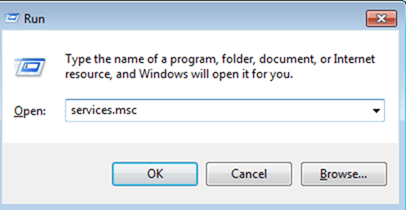
1. Open Windows Services control panel: To do that:
- Press Windows
 + R keys to open the run command box.
 - In the Search box, type: services.msc & click OK.
- (Accept the UAC warning if appears).
2. At the right-pane make sure that the ‘Status’ of following services is Running. *
- Background Intelligent Transfer Service (BITS)
- DCOM Server Process Launcher
- Remote Procedure Call (RPC)
- Windows Defender Firewall
- Windows Update
![image_thumb[11] image_thumb[11]](https://qnet88.com/wp-content/uploads/2021/12/image_thumb11_thumb.png)
* Note: If any of the above services is not running then:
a. Right-click on the service and choose Properties.
b. At General tab, set the Startup type to Automatic.

c. At Log On tab make sure that the Local System Account is checked.
d. Hit OK to apply changes.

3. Restart your computer.
8. After restart, check that the above mentioned services are up and running.
8. Proceed and Check for Updates. If you still receive the error 0x80070003 on Windows Update, then continue to the next step.
Step 3. Run the Windows Update Troubleshooter.
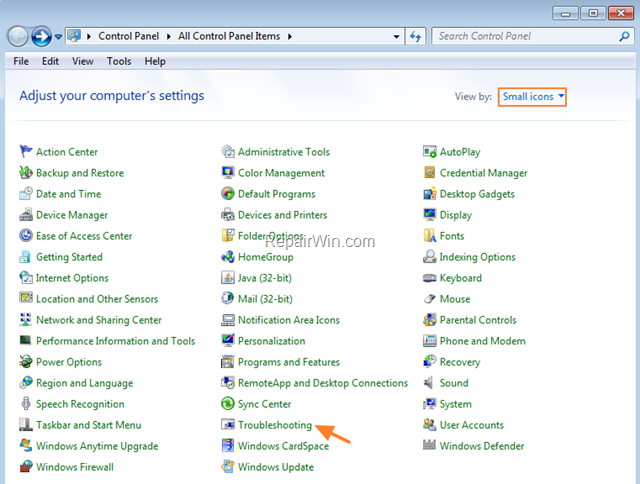
1. Navigate to Windows Control Panel, set the ‘View By’ to Small icons and open Troubleshooting.
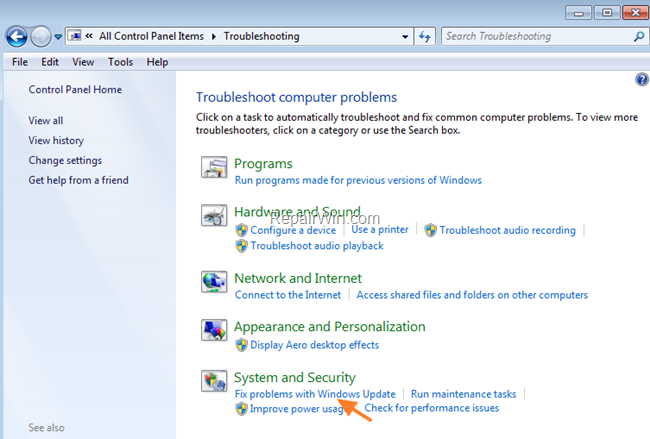
2. In Troubleshooting options, click Fix problems with Windows Update.
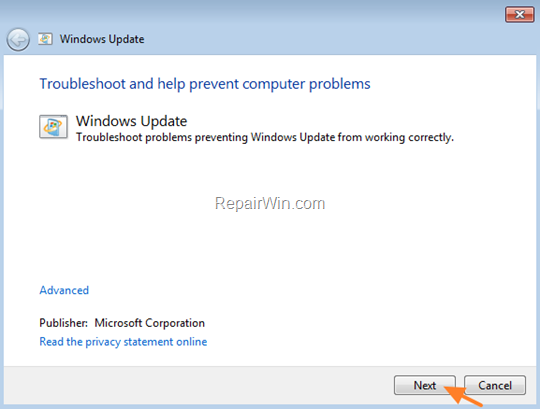
3. Click Next to troubleshoot Windows update problems.
5. When the troubleshooting process is complete, close the troubleshooter and restart your PC.
6. Check for updates.
Step 4. Fix Windows Update Service in Registry.
1. Open Notepad application.
2. Select and copy the below text (in green letters) and paste it into the notepad:
Windows Registry Editor Version 5.00
[HKEY_LOCAL_MACHINESYSTEMCurrentControlSetServiceswuauserv]
“DependOnService”=hex(7):72,00,70,00,63,00,73,00,73,00,00,00,00,00
“Description”=”@%systemroot%\system32\wuaueng.dll,-106”
“DisplayName”=”@%systemroot%\system32\wuaueng.dll,-105”
“ErrorControl”=dword:00000001
“FailureActions”=hex:80,51,01,00,00,00,00,00,00,00,00,00,03,00,00,00,14,00,00,
00,01,00,00,00,60,ea,00,00,00,00,00,00,00,00,00,00,00,00,00,00,00,00,00,00
“ImagePath”=hex(2):25,00,73,00,79,00,73,00,74,00,65,00,6d,00,72,00,6f,00,6f,00,
74,00,25,00,5c,00,73,00,79,00,73,00,74,00,65,00,6d,00,33,00,32,00,5c,00,73,
00,76,00,63,00,68,00,6f,00,73,00,74,00,2e,00,65,00,78,00,65,00,20,00,2d,00,
6b,00,20,00,6e,00,65,00,74,00,73,00,76,00,63,00,73,00,20,00,2d,00,70,00,00,
00
“ObjectName”=”LocalSystem”
“RequiredPrivileges”=hex(7):53,00,65,00,41,00,75,00,64,00,69,00,74,00,50,00,72,
00,69,00,76,00,69,00,6c,00,65,00,67,00,65,00,00,00,53,00,65,00,43,00,72,00,
65,00,61,00,74,00,65,00,47,00,6c,00,6f,00,62,00,61,00,6c,00,50,00,72,00,69,
00,76,00,69,00,6c,00,65,00,67,00,65,00,00,00,53,00,65,00,43,00,72,00,65,00,
61,00,74,00,65,00,50,00,61,00,67,00,65,00,46,00,69,00,6c,00,65,00,50,00,72,
00,69,00,76,00,69,00,6c,00,65,00,67,00,65,00,00,00,53,00,65,00,54,00,63,00,
62,00,50,00,72,00,69,00,76,00,69,00,6c,00,65,00,67,00,65,00,00,00,53,00,65,
00,41,00,73,00,73,00,69,00,67,00,6e,00,50,00,72,00,69,00,6d,00,61,00,72,00,
79,00,54,00,6f,00,6b,00,65,00,6e,00,50,00,72,00,69,00,76,00,69,00,6c,00,65,
00,67,00,65,00,00,00,53,00,65,00,49,00,6d,00,70,00,65,00,72,00,73,00,6f,00,
6e,00,61,00,74,00,65,00,50,00,72,00,69,00,76,00,69,00,6c,00,65,00,67,00,65,
00,00,00,53,00,65,00,49,00,6e,00,63,00,72,00,65,00,61,00,73,00,65,00,51,00,
75,00,6f,00,74,00,61,00,50,00,72,00,69,00,76,00,69,00,6c,00,65,00,67,00,65,
00,00,00,53,00,65,00,53,00,68,00,75,00,74,00,64,00,6f,00,77,00,6e,00,50,00,
72,00,69,00,76,00,69,00,6c,00,65,00,67,00,65,00,00,00,53,00,65,00,44,00,65,
00,62,00,75,00,67,00,50,00,72,00,69,00,76,00,69,00,6c,00,65,00,67,00,65,00,
00,00,53,00,65,00,42,00,61,00,63,00,6b,00,75,00,70,00,50,00,72,00,69,00,76,
00,69,00,6c,00,65,00,67,00,65,00,00,00,53,00,65,00,52,00,65,00,73,00,74,00,
6f,00,72,00,65,00,50,00,72,00,69,00,76,00,69,00,6c,00,65,00,67,00,65,00,00,
00,53,00,65,00,53,00,65,00,63,00,75,00,72,00,69,00,74,00,79,00,50,00,72,00,
69,00,76,00,69,00,6c,00,65,00,67,00,65,00,00,00,53,00,65,00,54,00,61,00,6b,
00,65,00,4f,00,77,00,6e,00,65,00,72,00,73,00,68,00,69,00,70,00,50,00,72,00,
69,00,76,00,69,00,6c,00,65,00,67,00,65,00,00,00,53,00,65,00,4c,00,6f,00,61,
00,64,00,44,00,72,00,69,00,76,00,65,00,72,00,50,00,72,00,69,00,76,00,69,00,
6c,00,65,00,67,00,65,00,00,00,53,00,65,00,4d,00,61,00,6e,00,61,00,67,00,65,
00,56,00,6f,00,6c,00,75,00,6d,00,65,00,50,00,72,00,69,00,76,00,69,00,6c,00,
65,00,67,00,65,00,00,00,00,00
“ServiceSidType”=dword:00000001
“Start”=dword:00000003
“SvcHostSplitDisable”=dword:00000001
“SvcMemHardLimitInMB”=dword:000000f6
“SvcMemMidLimitInMB”=dword:000000a7
“SvcMemSoftLimitInMB”=dword:00000058
“Type”=dword:00000020
[HKEY_LOCAL_MACHINESYSTEMCurrentControlSetServiceswuauservParameters]
“ServiceDll”=hex(2):25,00,73,00,79,00,73,00,74,00,65,00,6d,00,72,00,6f,00,6f,
00,74,00,25,00,5c,00,73,00,79,00,73,00,74,00,65,00,6d,00,33,00,32,00,5c,00,
77,00,75,00,61,00,75,00,65,00,6e,00,67,00,2e,00,64,00,6c,00,6c,00,00,00
“ServiceDllUnloadOnStop”=dword:00000001
“ServiceMain”=”WUServiceMain”
[HKEY_LOCAL_MACHINESYSTEMCurrentControlSetServiceswuauservSecurity]
“Security”=hex:01,00,14,80,78,00,00,00,84,00,00,00,14,00,00,00,30,00,00,00,02,
00,1c,00,01,00,00,00,02,80,14,00,ff,00,0f,00,01,01,00,00,00,00,00,01,00,00,
00,00,02,00,48,00,03,00,00,00,00,00,14,00,9d,00,02,00,01,01,00,00,00,00,00,
05,0b,00,00,00,00,00,18,00,ff,01,0f,00,01,02,00,00,00,00,00,05,20,00,00,00,
20,02,00,00,00,00,14,00,ff,01,0f,00,01,01,00,00,00,00,00,05,12,00,00,00,01,
01,00,00,00,00,00,05,12,00,00,00,01,01,00,00,00,00,00,05,12,00,00,00
[HKEY_LOCAL_MACHINESYSTEMCurrentControlSetServiceswuauservTriggerInfo]
[HKEY_LOCAL_MACHINESYSTEMCurrentControlSetServiceswuauservTriggerInfo]
“Type”=dword:00000005
“Action”=dword:00000001
“Guid”=hex:e6,ca,9f,65,db,5b,a9,4d,b1,ff,ca,2a,17,8d,46,e0
[HKEY_LOCAL_MACHINESYSTEMCurrentControlSetServiceswuauservTriggerInfo1]
“Type”=dword:00000005
“Action”=dword:00000001
“Guid”=hex:c8,46,fb,54,89,f0,4c,46,b1,fd,59,d1,b6,2c,3b,50
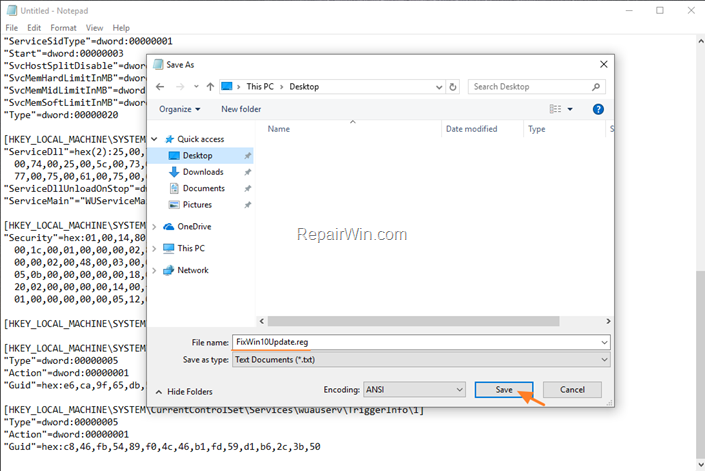
3. When done, go to File > Save as and save the file at your Desktop with the name: FixWin10Update.reg
4. Close Notepad.
5. Double click at FixWin10Update.reg, accept the UAC warning message and click Yes.

6. Reboot your computer and check for Updates.
Step 5. Update Windows 10 by using the Update Assistant.
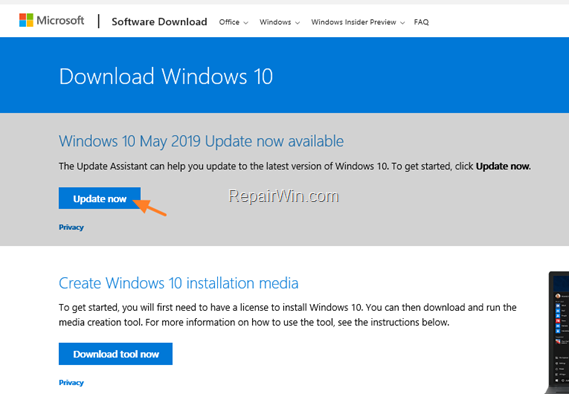
1. Navigate to Windows 10 download site and click the Update now button.
2. Save the “Windows10Upgrade9252.exe” file on your desktop.
3. Double click at the downloaded file to open the Windows Upgrade Assistant.
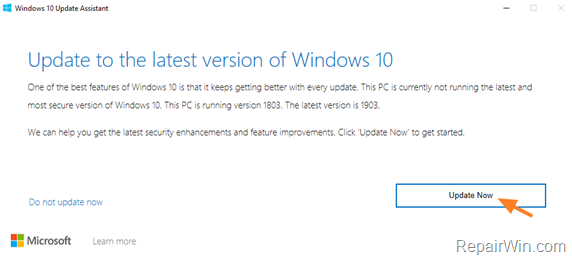
4. Click Update Now to start the update.
5. Let Windows to finish the downloading and the verification.
6. When the verification is reaches 100%, disconnect your computer from the Internet, (or set it to “Airplane mode” if you own a laptop).
7. Wait until Windows updating your system.
8. When prompted, restart your system to install the update.
Step 6. Update Windows 10 from ISO or USB.
The final method to solve the error 0x80070003 in Windows 10 Update, is to update Windows, from the Windows ISO file. To do that:
1. Navigate to Windows 10 download page and download the Media Creation Tool.

2. Run the ‘Media Creation Tool’ and Accept the License Terms at the first screen.
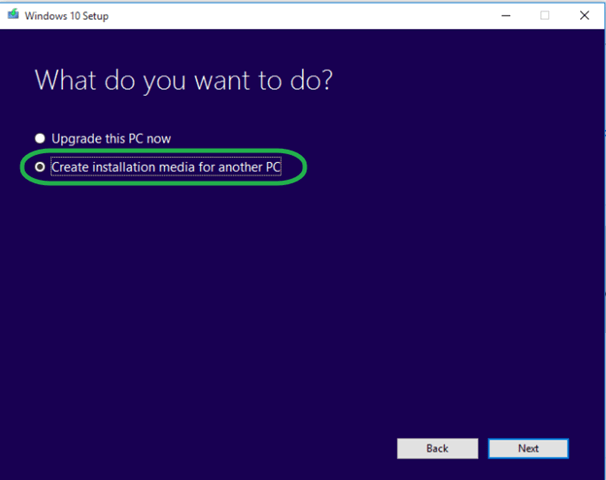
3. Select Create installation media for another PC.
4. At ‘Language, architecture and edition’ screen click Next.
5. Select ISO file and click Next.

6. Save the ‘Windows.iso’ file to your desktop.
7. The Media Creation Tool will now begin to download the Windows 10 in an ISO format.
8. When the download is completed, close the Media Creation Tool.
10. Double-click at the Windows.ISO file on your desktop.
11. Open File Explorer and explore the contents of the new drive letter created after opening the ISO file.
12. Double click at setup.exe and then click Next to install Windows 10.

13. Accept the License Terms and then click Install.

14. Now wait the update process to complete. *
* Note: If the update fails again, burn the Windows ISO file to a USB drive and then try to repair and upgrade Windows 10 from USB.
That’s all folks! Did it work for you?
Please leave a comment in the comment section below or even better: like and share this blog post in the social networks to help spread the word about this solution.

