If you receive the Windows 11 update error 0x80070643, continue reading below to fix the problem. Several users have reported that they cannot install the updates “2021-10 .NET 5.0.11 Security Update for Windows 11 for x64 Client (KB5007051)” & “2021-10 .NET Core 3.1.20 Update for Windows 11 for x64 Client (KB5007050)” on Windows 11 due to error 0x80070643.
The Windows 11 Update error 0x80070643, is related to problems with Microsoft .NET Runtime platform technologies. At such cases, the easy fix is to uninstall the previous version of .NET Runtime and install the latest one.
In this guide you’ll find several methods to fix the Windows 11 Update error 0x80070643.
How to FIX: Error 0x80070643 in Windows 11 Update.
Method 1. Manually Install the Failed Updates.
The first method to fix the error 80070643 on Windows 11 update, is to download and install manually the updates. To do that:
1. According the .NET version that you cannot install, download the corresponding SDK installer package from the following links: *
- Download .NET 6
- Download .NET 5
- Download .NET 3.1
* For example: If you cannot install the .NET 5.0.1, click “Download .NET 5”, and then download/install the “5.0.11 .NET SDK installer” or a more recent version. (e.g. “5.0.12”)

2. Double-click on the downloaded file to Install Microsoft .NET SDK on your system.

3. Restart your PC and navigate to Windows Update center. Click Check for Updates. The error 0x80070643 should be gone.
Method 2. Uninstall Previous Versions of .Net Runtime.
1. Click the Start menu and type control in the search box. Click to open Control Panel.

2. Click Program and Features. *
* Note: If you don’t see the “Programs and Features” item, set the View By: to Small icons.

3. Select and Uninstall the Microsoft .NET Runtime

4. Restart your PC.
5. After restart, download the .NET 6.0.101 SDK installer and install it, or navigate to Windows Update center and check & install updates.
Method 3. Update Windows 11 with Visual Studio Installer.
If you have Visual Studio 2022 or Visual Studio 2019 installed, proceed and update your system by running the Visual Studio Installer.
Method 4. Repair .NET Framework.
Another method to resolve the error 0x80070643 in Windows 11 update, is to repair the .NET Framework. To do that:
1. Download and Run the Microsoft .NET Framework Repair Tool.
2. At the first screen Accept the License terms and click Next.
3. Click Next again, at “”Recommended changes” screen.

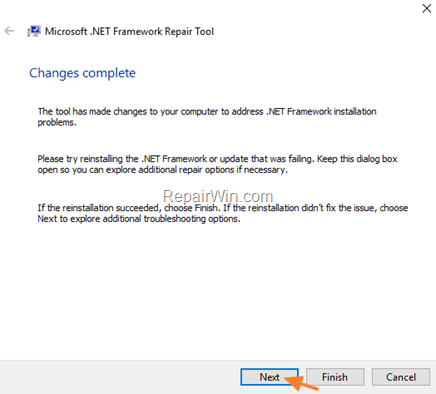
4. Do not close the ‘ Changes complete’ window, and proceed as follows:

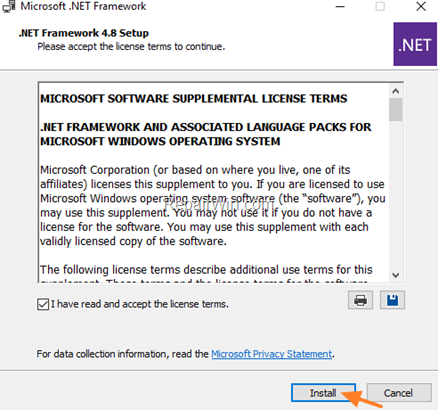
5. Download and install the latest .NET Framework version. (.NET Framework Runtime)

6. When the .NET Framework installation is completed, try to update Windows. If the problem persists, click Next at ‘NET Framework Repair Tool’ to try to resolve the problem.

Method 5. FIX Windows 11 Update Error 0x80070643 with DISM & SFC Tools.
1. Open Command Prompt as Administrator.
2. In command prompt give the following command and press Enter:
- DISM /Online /Cleanup-Image /StartComponentCleanup
![image_thumb[6] image_thumb[6]](https://qnet88.com/wp-content/uploads/2022/01/image_thumb6_thumb.png)
3. When the process is completed, give the following command:
- DISM.exe /Online /Cleanup-image /Restorehealth

4. When the DISM operation is completed, type the following command and hit Enter:
- sfc /scannow

5. Now wait until the System File Checker (SFC), repairs the Windows System Files.
6. When this done, restart your computer.
7. Open Windows Update and try to install the failed update(s).
That’s all folks! Did it work for you?
Please leave a comment in the comment section below or even better: like and share this blog post in the social networks to help spread the word about this solution.


