This article contains instructions fix the BSOD error 0x000000F in Windows 7,8 or 10 OS. Problem in details: Windows cannot boot and stuck on a blue screen with “Error 0x000000f – Boot configuration data for your PC is missing or contains errors. File:BootBCD” or “File:EFIMicrosoftBootBCD” on EFI based systems.
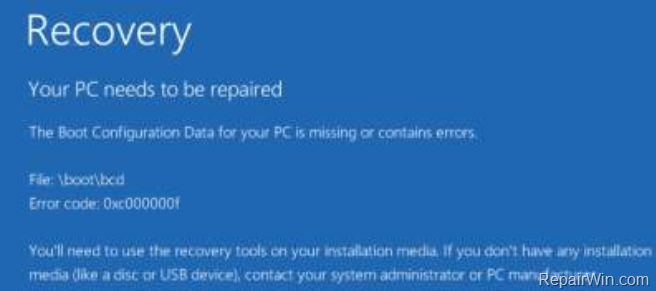
How to fix: Boot Configuration Data is Missing – 0x000000F.
The solution to resolve the “Boot Configuration Data Missing, Error 0x000000F”, is to repair the boot configuration data (BCD) on the OS disk. For that task, follow the instructions below according your OS and your system architecture (UEFI or Legacy).
Requirements: In order to fix the “Boot Configuration Data Missing” problem, by following the methods below, you will need to boot you computer from a Windows installation media. If you don’t own a Windows Media then you can create one by using Microsoft’s Media Creation tool.
- Related articles:
- How to create a Windows 10 USB installation media.
- How to create a Windows 10 DVD installation media.
Windows 7 or Vista (LEGACY Based Systems) *
* Note: The below steps to repair the boot configuration data, commonly works on oldest PC’s, that don’t support UEFI. (e.g. PC’s with Windows Vista or Windows 7 OS) and some newer PC’s with Windows 8, 8.1 or 10 OS that installed in Legacy Mode. If your system supports UEFI, then read the instructions for UEFI based systems below.
1. Boot your computer from the Windows recovery media.
2. Press Next at Language options screen.
3. Choose Repair your computer.
4. Then choose Troubleshoot -> Advanced Options –> Command Prompt.
5. In command prompt give the following commands in order:
- bootrec /fixmbr
- bootrec /fixboot
- bootrec /rebuildbcd
6. If after executing the last command, you receive that “Total Windows installations: 0” then continue to the next step, otherwise skip to step 8.
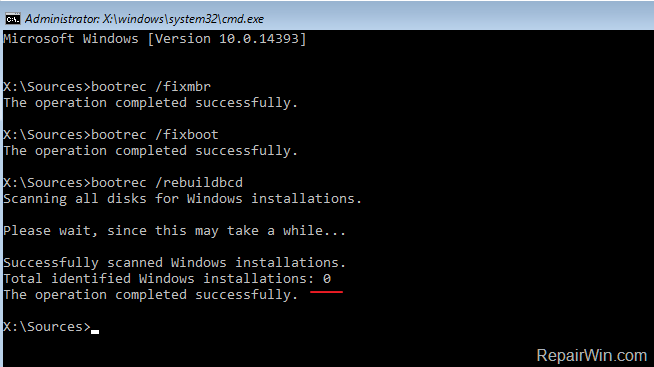
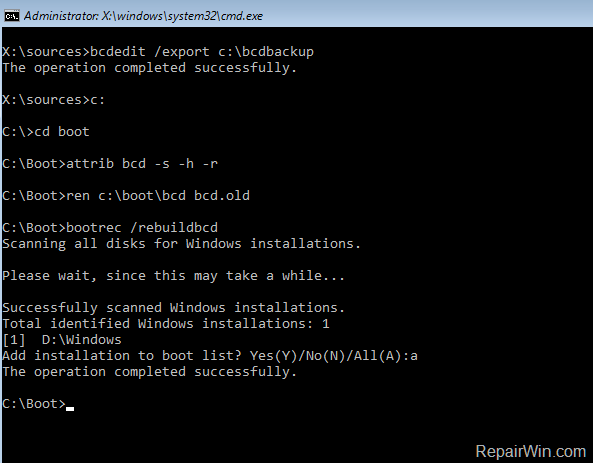
7. If you receive that”Total Windows Installations=0” then give the following commands in order:
- bcdedit /export C:bcdbackup
- C:
- cd boot
- attrib bcd -s -h –r
- ren C:bootbcd bcd.old
- bootrec /rebuildbcd
8. Press “A” to add the installation to boot list and press Enter. Then restart your system.
9. Close command prompt window.
10. Restart your computer and if the boot problem persists, then follow the next method.
Windows 10 or 8/8.1 OS (UEFI Based Systems) *
* Note: The below steps, to repair the boot configuration data, usually works on UEFI based systems, with Windows 10, 8 or 8.1 OS installed. If your system doesn’t support UEFI, or this method does not work for you, then follow the steps for LEGACY based systems (above).
1. Boot your computer from the Windows recovery media.
2. Press Next at Language options screen.
3. Choose Repair your computer.
4. Then choose Troubleshoot -> Advanced Options –> Command Prompt.
5. In command prompt type: diskpart & press Enter.
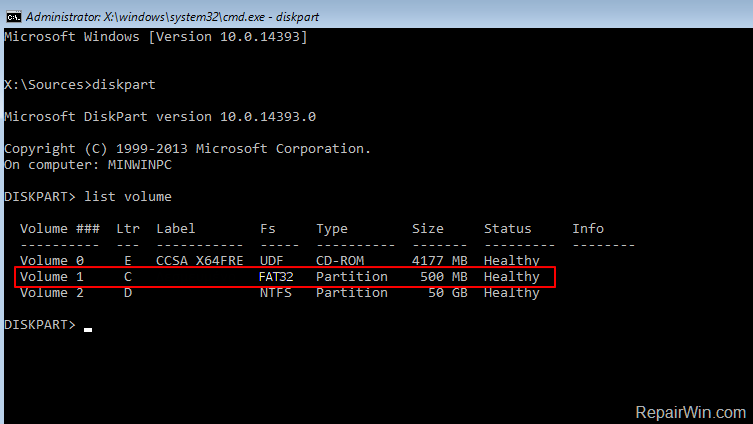
6. In “DISKPART” prompt, type: list volume & press Enter.
7. Now find out the Volume number of the FAT32 * partition and the drive letter of the OS volume.
* Notes:
1. The FAT32 partition, with size 100-500MB, is also known as “EFI” volume (System Volume) because it contains the Boot Configuration Data on UEFI based systems.
2. If you own a legacy based system, then find out the Volume number of the “System Reserved” volume (FS=NTFS & Size=100–500MB).
3. The OS (Operating System) Volume is usually the biggest in size (GB) and contains the Windows folder.e.g. From the picture below, we can understand that the FAT32 partition located at “Volume 1” and the OS volume has the drive letter “D“.
8. Now select the System Volume, by typing select volume 1 & press Enter. *
* Note: Replace “1” with whatever volume number is your System drive.
9. Then assign the drive letter “Z” at the selected volume by typing assign letter=Z & press Enter.
10. Type exit & press Enter, to close DISKPART utility.
![image_thumb[3] image_thumb[3]](https://qnet88.com/wp-content/uploads/2021/12/image_thumb3_thumb-2.png)
11. At command prompt type: bcdboot D:windows /s Z: /f ALL & press Enter. *
* Note: Replace “D:” with whatever drive letter it is for your OS Volume.
![image_thumb[7] image_thumb[7]](https://qnet88.com/wp-content/uploads/2021/12/image_thumb7_thumb-9.png)
12. Type exit & press Enter to close command prompt.
13. Remove the recovery media and Restart your PC.
That’s all folks! Did it work for you? Please leave a comment in the comment section below or even better: like and share this blog post in the social networks to help spread the word about this solution.

