The “APC_INDEX_MISMATCH” BSOD error in Windows, usually occurs after updating Windows or indicates a problem with a device driver. In other cases the “APC INDEX MISMATCH” blue screen is due to memory problem.
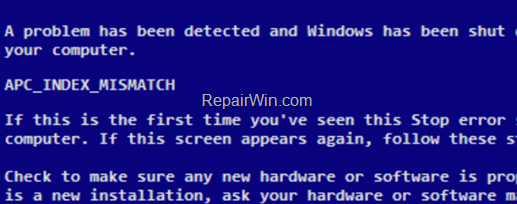
This guide contains step-by-steps instructions on how to resolve “APC INDEX MISMATCH” BSOD error in Windows 10, 8 or 7 OS.
How to FIX APC_INDEX_MISMATCH blue screen error in Windows 10.
Method 1. Uninstall Latest Update.
If the APC_INDEX_MISMATCH error occurred after installing a Windows Update, then proceed a remove the update from your PC.
A. If you can login to Windows:
1. Go to Start ![]() menu choose Settings
menu choose Settings ![]() and click Update & security.
and click Update & security.
2. Click View Update History and then click Uninstall Updates.
3. Sort the updates by the “Installed On” date and then locate and uninstall the latest update.
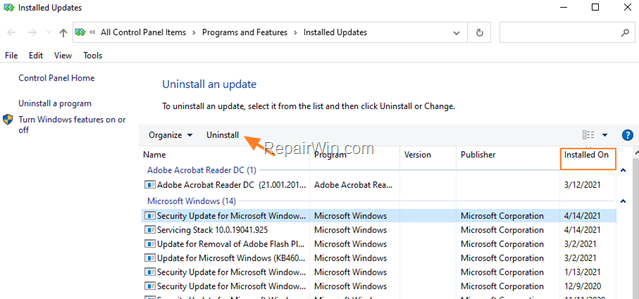
4. When the uninstall process is completed, restart your PC and see if the PC_INDEX_MISMATCH has resolved. If the problem is resolved and you believe that the Windows update is the culprit, navigate to Windows 10 Update History website and download and install the latest available update for your PC.
* Note for Windows 7 Users: To prevent the update to be installed again on your PC, navigate to Windows Update center and click Important Updates available link. Then right-click on the problematic update and click Hide update.
B. If you cannot log in to Windows:
1. Click See advanced repair options at the recovery screen. *
* Note for Windows 7 Users: Restart your computer and hit the F8 key while your computer is starting up and in ‘Advanced Options’ menu, choose Repair your Computer. Choose a Keyboard layout (e.g. “US”), select your account and then type your password (in case you have one).
At the ‘System Recovery options’ window, choose System Restore. Finally, proceed and select a previous restore point to restore your computer on it.
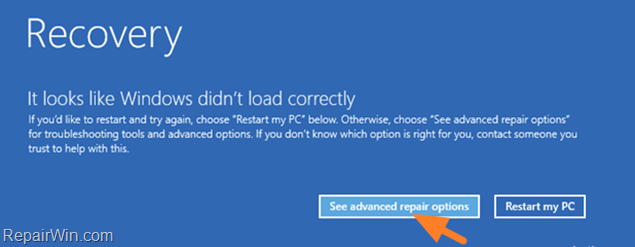
2. Then click Troubleshoot -> Advanced options -> Uninstall Updates -> Uninstall latest feature update.
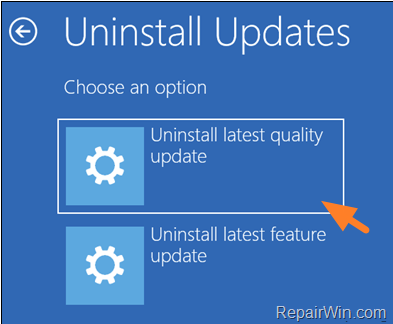
3. When the uninstall process is completed, restart your PC and see if the PC_INDEX_MISMATCH has resolved. If the problem is resolved and you believe that the Windows update is the culprit, navigate to Windows 10 Update History website and download and install the latest available update for your PC.
* Note for Windows 7 Users: To prevent the update to be installed again on your PC, navigate to Windows Update center and click Important Updates available link. Then right-click on the problematic update and click Hide update.
Method 2. FIX APC_INDEX_MISMATCH by re-installing Realtek Audio Adapter.
Another method to resolve the APC_INDEX_MISMATCH error is to uninstall and reinstall the Realtek Audio adapter because in some cases the problem occurs because of a damaged driver.
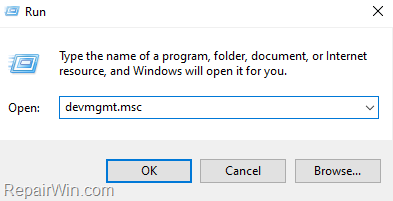
1. Open Device Manager. To do that:
1. Press Windows
+ R keys to open the run command box.
2. In the “Open” box, type: devmgmt.msc & click OK.
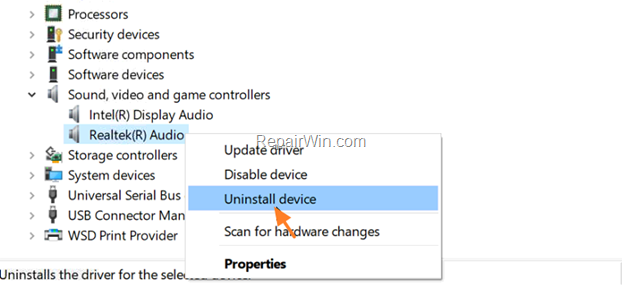
2. In device manager, expand the Sound, video and game controllers.
3. Right click on the Realtek Audio adapter and choose Uninstall device.
4. Check to Delete the driver software for this device and click Uninstall.
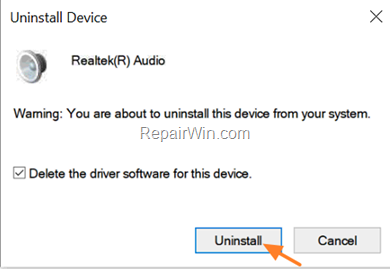
5. Restart you PC, and let Windows to install automatically the audio drivers.
6. Now check of the problems persists and if yes, proceed and update the Video and Network adapter’s drivers.
Method 3. Check Memory (RAM) and Hard Disk (HDD) for problems.
Blue Screen Problems, may be due to a damaged RAM module or a bad hard drive. To test and diagnose your RAM and HDD components for problems, follow the instructions in these guides:
- How to Diagnose Computer Memory problems with Memtest86+
- Best Hard Drive Test & Diagnostic Tools to Check Hard Disk’s Health
Method 4. Solve APC_INDEX_MISMATCH error by Analyzing Minidump file.
When Windows crashes with a blue screen, stores the details of the BSoD screen to small file(s), which called “MiniDump“. The analysis of the Minidump file(s) can help you to troubleshoot and resolve the blue screen problem. To accomplish this task follow the instructions in this article: How to Analyze MiniDump Files with BlueScreenView.
That’s all! Did it work for you?
Please leave a comment in the comment section below or even better: like and share this blog post in the social networks to help spread the word about this solution.

