The error message on Remote Desktop Connection “Your computer could not connect to another console session on the remote computer because you already have a console session in progress”, appears because the local and the remote computer has the same IP Address. The problem usually occurs when you try to connect remotely to another computer via a VPN connection, and you have “received” the same IP address from your local router, as the remote computer. To fix the problem, follow the instructions below.
How to FIX RDP error: Remote Desktop could not connect to another console session because already have a console session in progress.
The problem in Remote Desktop Connection “Could Not Connect to another console session because you already have a console session in progress” commonly occurs when the local computer receives randomly (from the DHCP server), the same IP address as the IP Address of the remote computer that you want to connect through RDP.
The only way to fix, the above problem, is to disable Auto Assign IP Address from DHCP Server, in the local computer and to specify manually an IP Address. To do that:
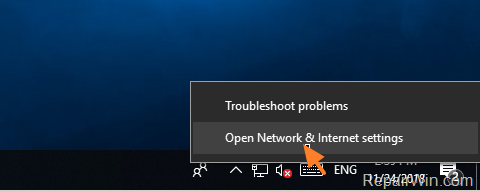
1. Right click on the Network icon ![]() in Taskbar and click Open Network and Sharing Center. *
in Taskbar and click Open Network and Sharing Center. *
2. Select Ethernet (or Wi-Fi) on the left, and then at ‘Related settings’ section, click Change adapter options.
3. Double click at the active Network Adapter (Ethernet or Wi-Fi) and click Details.
4. Note down the IP Address details on the following fields and then click Close:
- IPv4 Address
- IPv4 Subnet Mask
- IPv4 Default Gateway
- IPv4 DNS Server
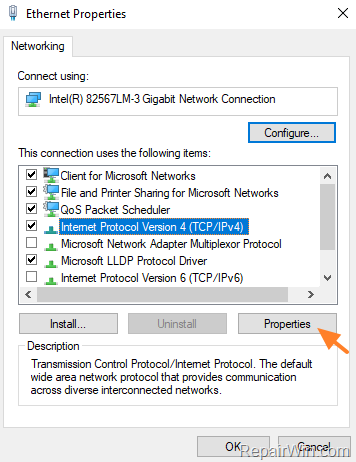
5. Now, click Properties.
6. Select the ‘Internet Protocol Version 4 (TCP/IPv4)‘ and click Properties
7. At Internet Protocol Version 4 (TCP/IPv4) properties, apply the following settings:
A. Select Use the following IP Address:
1. At IP Address field, type a different IP Address than the IP Address you noticed before. (Change only the last number to a higher value).
2. At Subnet mask filed, type the same Subnet IP Address as the one you noticed before.
3. At Default Gateway, type the same Default Gateway as the one you noticed before.
B. Select Use the following DNS server addresses:
1. At Preferred DNS Server, type the DNS Address you noticed before.
C. When done, click OK twice and Close to close the Adapter’s properties.
8. Now, try to connect to the Remote Desktop computer. The problem should be resolved.
That’s all folks! Did it work for you?
Please leave a comment in the comment section below or even better: like and share this blog post in the social networks to help spread the word about this solution.


