If you are using the XPS Viewer to view XPS (XML Paper Specification) files, you may have probably realized that XPS Viewer is not installed by default in Windows 10. This tutorial contains two methods to install XPS viewer on Windows 10.
How to Install XPS Viewer in Windows 10.
Method 1. Install XPS Viewer from Optional Features.
The standard procedure to install XPS viewer in Windows 10, is the following:
1. From the Start ![]() menu click Settings
menu click Settings ![]() and then click Apps.
and then click Apps.
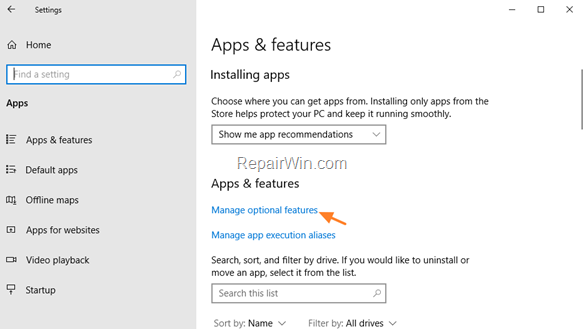
2. In Apps & features, click Manage optional features.

3. Click ![]() Add a Feature.
Add a Feature.
![image_thumb[7] image_thumb[7]](https://qnet88.com/wp-content/uploads/2021/12/image_thumb7_thumb-8.png)
4. Scroll down, click the XPS Viewer and click Install. *
* Note: IF the XPS Viewer is not listed continue to method-1 below.
![image_thumb[12] image_thumb[12]](https://qnet88.com/wp-content/uploads/2021/12/image_thumb12_thumb-2.png)
5. When the installation is completed click the back button.
6. If XPS Viewer is installed, you ‘ll see it in Manage optional features list. If XPS Viewer is not listed, continue below to troubleshoot the problem.
![image_thumb[13] image_thumb[13]](https://qnet88.com/wp-content/uploads/2021/12/image_thumb13_thumb-2.png)
Method 2. Install XPS Viewer by using the DISM command.
The second method to install the XPS Viewer, is by using the DISM command. To do that:
1. Open Command Prompt as Administrator.
2. In command prompt, give the following command and press Enter.
- dism /Online /Add-Capability /CapabilityName:XPS.Viewer~~~~0.0.1.0

3. When the Dism operation is completed, close command prompt window.
That’s all folks! Did it work for you?
Please leave a comment in the comment section below or even better: like and share this blog post in the social networks to help spread the word about this solution.


