.single .post-author, .post-date {
text-transform: none;
}
,
Last updated: January 15th, 2025
This comprehensive guide will walk you through the steps to uninstall or disable Copilot in Windows 11, tailored for all editions, including Home, Pro, and Enterprise.
Windows Copilot is a built-in AI assistant integrated into Windows 11, offering features like task automation, app suggestions, and integration with Microsoft services. Despite its usefulness, many users want to remove it due to resource usage or a preference for a minimalist interface.
Why Remove or Disable Microsoft Copilot?
- Privacy Concerns: Copilot may send data to Microsoft servers, raising privacy issues.
- Performance Impact: Copilot can consume system resources, slowing down your PC.
How to Disable or Uninstall Copilot on Windows 11.
The method to disable Copilot depends on your Windows 11 edition. Follow the steps below based on your edition and requirements.
Method 1: Disable Copilot Using Group Policy Editor (Windows 11 Pro).
If you’re using Windows 11 Pro or Enterprise you can disable Copilot using the Group Policy Editor.
1. Press Windows + R to open the Run dialog box.
2. Type gpedit.msc and press Enter.
2. In Group Policy Editor navigate to this key:
- User Configuration > Administrative Templates > Windows Components > Windows Copilot
4a. Double-click to open the Turn off Windows Copilot policy.


4b. Select Enabled to turn off Copilot and click Apply and then OK.


5. Close Group Policy and restart your PC to apply the change.
Method 2: Disable Copilot via Registry Editor (Home Edition)
Windows 11 Home does not include Group Policy Editor, but you can turn off Copilot through the Registry Editor.
Warning: Modifying the registry can cause system issues if not done correctly. Follow these steps carefully.
1. Press Windows + R, type regedit in Run dialog box, and press Enter to open the Registry Editor.
2. Navigate to this key:
- HKEY_CURRENT_USERSoftwarePoliciesMicrosoftWindows
3a. Right-click the Windows folder and select New > Key
3b. Rename the “New Key #1” to “WindowsCopilot“
and press Enter.
4a. Right-click on WindowsCopilot folder and select New > DWORD (32-bit) Value
4b. Rename the “New Value #1” to “TurnOffWindowsCopilot” and press Enter.
4c. Finally open the TurnOffWindowsCopilot REG_DWORD, set its Value data to 1 and click OK.


5. Close the Registry Editor and reboot your system to apply the change and disable the Microsoft Copilot.
Method 3. Uninstall Copilot on Windows 11.
If case you want to completely remove Copilot from your system, then you can simply uninstall it from the Installed Apps.
1. Go to Start > Settings > Apps > Installed apps.
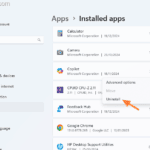
2. Find Copilot on the list, click on three dots menu next to it and select Uninstall. Then click Uninstall again to remove Copilot from your PC.


3. That’s it! If you change your decision in the future and want to add Copilot back to your computer, then you can download and install it from the Microsoft Store using the link below.
- Microsoft Copilot – Free download and install on Windows
By following the above methods, you can effectively disable or uninstall Copilot in Windows 11 and prevent it from interfering with your workflow.
That’s all folks! Did it work for you?
Please leave a comment in the comment section below or even better: like and share this blog post in the social networks to help spread the word about this solution.

- Author
- Recent Posts
- How to Uninstall or Disable Copilot on Windows 11. – January 15, 2025
- How to Fix error 0x80070035 on Windows 11 24H2 (Network Path Not Found) – January 10, 2025
- Fix Network Connectivity Issues After Windows 11 24H2 Update – January 9, 2025


