If you’re getting the Outlook error “Your server does not support the connection encryption type you have specified” when trying to connect to your mail servers using a secure connection in Windows 7, continue reading below to resolve the issue.
Problem in details: In older Windows 7 PC’s with Outlook 2007/2010/2013/2016/2019, users face the following error(s) in Send/Receive, if the mail server only supports TLS 1.1 or TLS 1.2 encryption.
Log onto incoming mail server (POP3):Your Server does not support the connection encryption type you have specified. Try changing the encryption method. Contact your mall server administrator or Internet service provider (ISP) for additional assistance.
Send email message (SMTP): Your Server does not support the connection encryption type you have specified. Try changing the encryption method. Contact your mall server administrator or Internet service provider (ISP) for additional assistance.


FIX Outlook error “Your Server does not support the connection encryption type you have specified” in Windows 7.
The “server does not support the connection encryption type you specified” error, occurs on Windows 7 computers, in applications built using WinHTTP such as Microsoft Outlook, Word, etc. which only support TLS 1.0. To fix the error you should enable the TLS 1.1 & TLS 1.2 support on Windows 7 as descripted below. *
* Note: The mentioned error does not appear if you are using Mozilla Thunderbird as your email client program.
Step 1. Install Windows update KB3140245.
1. According your OS architecture (32 bit or 64bit), download and install KB3140245 from the Microsoft Update Catalog.
2. Restart your PC.
Step 2. Enable TLS 1.1 & TLS 1.2 support in Windows Registry.
1. Open the Registry Editor. To do that:
- Press Windows

 + R keys to open the run command box.
 - Type regedit & click OK.
2. Navigate to the following path in registry:
- HKEY_LOCAL_MACHINESOFTWAREMicrosoftWindowsCurrentVersionInternet SettingsWinHttp
3a. At the right pane, right-click on an empty space and select New > DWORD (32-bit Value).
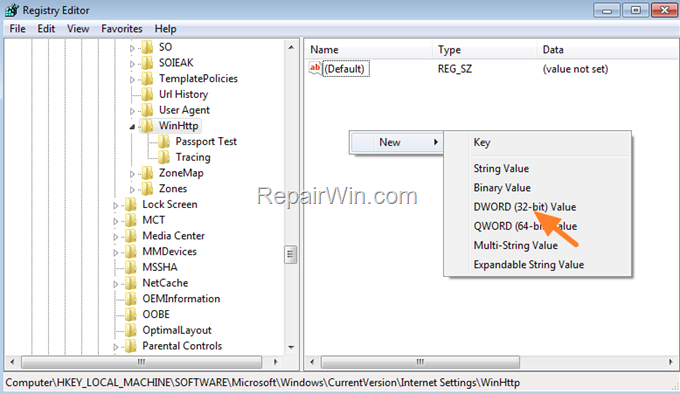

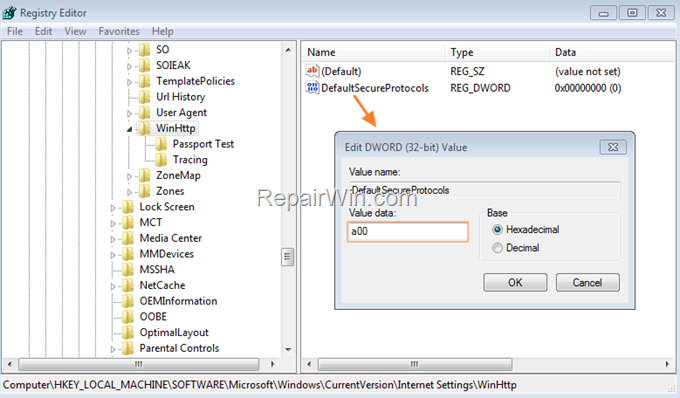
3b. Name the new value as: DefaultSecureProtocols
3c. Now open the DefaultSecureProtocols value, type at value data a00 and click OK.

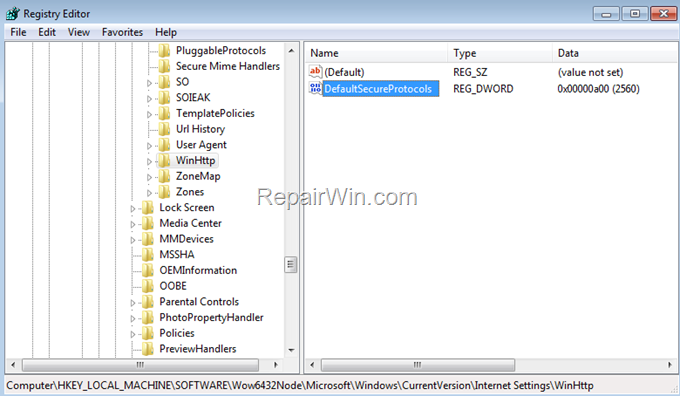
4. Next, and only if you’re using an 64-bit OS, repeat steps 3a, 3b & 3c and create again the DefaultSecureProtocols REG_DWORD (32-bit) with value a00 at the following registry location:
- HKEY_LOCAL_MACHINESOFTWAREWow6432NodeMicrosoftWindowsCurrentVersionInternet SettingsWinHttp

5. Now, navigate to the following registry path to enable TLS 1.1 & TLS 1.2 on Windows 7:
- HKEY_LOCAL_MACHINESYSTEMCurrentControlSetControlSecurityProvidersSCHANNELProtocols
6a. On the left pane, right-click at Protocols key and select New > Key
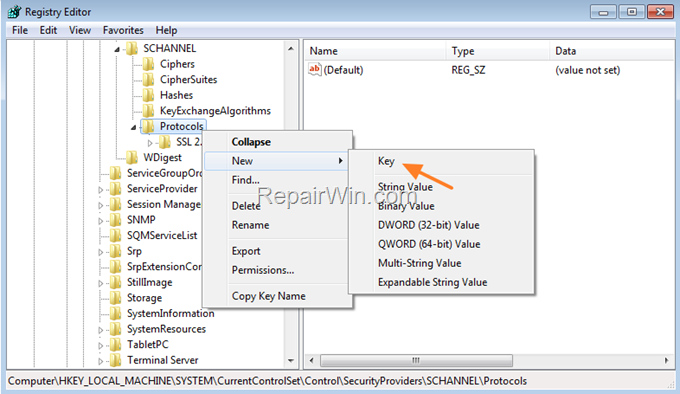

6b. Name the new key as: TLS 1.1
6c. Then right-click at TLS 1.1 and select again New > Key.
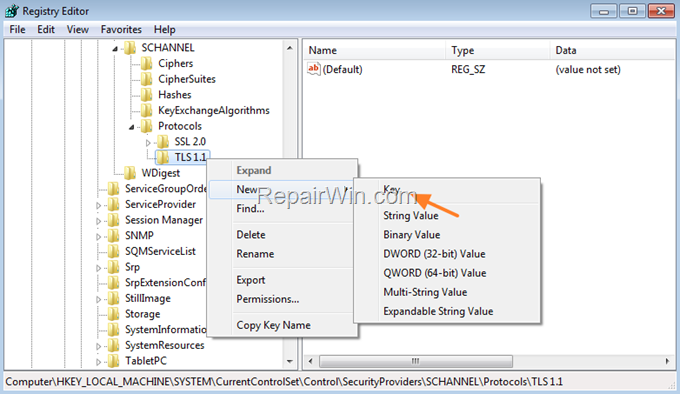

6d. Name the new key as: Client
6e. Now, select the Client key and then at the right pane, right-click at an empty space and select New > DWORD (32-bit Value).
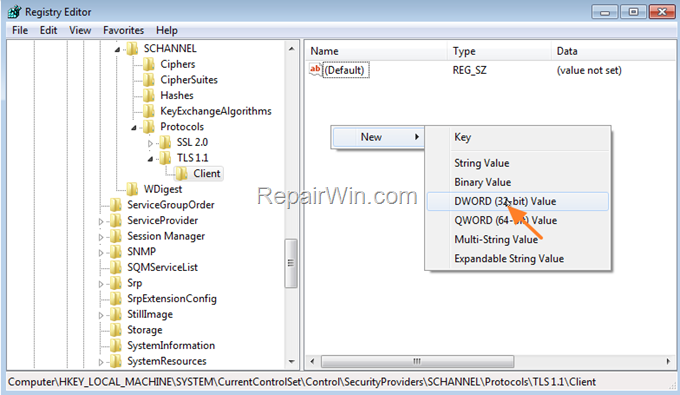

6f. Name the new value as: DisabledByDefault
6g. Finally, open the DisabledByDefault REG_DWORD, enter 0 in the Value Data text box and click OK.


7. Now, right-click again at the Protocols key on the left and select New > Key.
7a. Name the new key as: TLS 1.2
7c. Repeat the steps 6c – 6g to create the Client key and then to create the DisabledByDefault REG_DWORD with value 0.
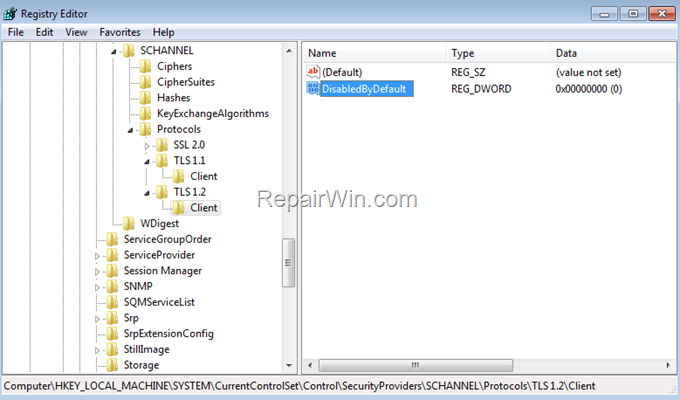

8. When done, close the Registry Editor and restart the PC.
9. After restart open Outlook and test the connection to the mail servers.
That’s all folks! Did it work for you?
Please leave a comment in the comment section below or even better: like and share this blog post in the social networks to help spread the word about this solution.


![image_thumb[27] image_thumb[27]](https://qnet88.com/wp-content/uploads/2023/04/image_thumb27_thumb-2.png)
