The “checking for updates” forever problem & the SVCHOST 100% usage problem (on Memory or CPU) during Windows Update, can happen even on fresh or old installed Windows 7 based computers:
Problem description: After installing the latest update agent, Windows Update cannot find any new updates, stacks forever in “checking for updates” screen or displays the error code 8007000E or C80003F3. During this problem, the “svchost.exe” process cause the CPU or Memory to work at 100% and Windows hangs or becomes very slow.
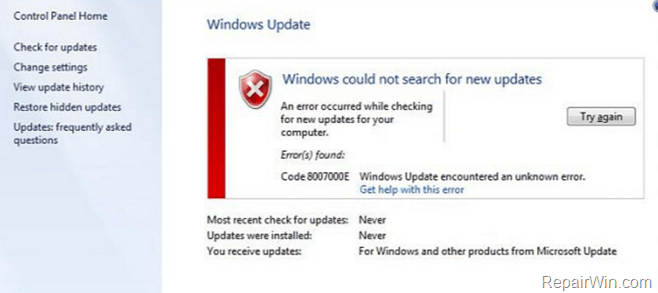
In the last years I have seen many Windows-based computers where the Windows Update “checking for updates” process takes forever and never finishes. During these years I have applied several different solutions to resolve problems with Windows Update that causes Memory or CPU 100% usage issues during updates checking. In this guide you can find the most used methods to fix the following problems:
- SVCHOST.EXE / WINDOWS UPDATE process causes Memory to work at almost 100%.
- Windows cannot find new updates.
- Windows is checking for updates for ever.
How to fix Windows Update problems & svchost.exe high usage memory (Windows 10, 8, 7 or Vista).
Method –1: Install Windows Update KB3102810.
Microsoft has released the KB3102810 standalone update to resolve the high CPU usage problem, while searching for updates. To install the update:
1. Make sure that you have the Internet Explorer 11 installed on your system.
2. Download and install the KB3102810 and restart your computer (if the installation hangs, then restart your computer and – immediately after restart- try to install it again).
3. Restart your computer and delete the “SoftwareDistribution” folder by following the instructions in method 3 below.
4. Navigate to Windows Update center and check for updates.
Method 2. Install the latest Windows Update Client.
Download and install the latest version of Windows Update Client for your system. *
* Note : The below links are for the Windows Update Client program, which released on March 2016. If you want to find and install the most recent (latest) version of the Windows Update Client for your system, just open Google and at the search field type the words “Windows Update Client” followed by the current Month and Year. (e.g. for March 2016 version, type: “Windows Update Client March 2016”).
- Windows Update Client for Windows 7 and Windows Server 2008 R2: March 2016
- Windows Update Client for Windows 8.1 and Windows Server 2012 R2: March 2016
Method 3. Delete the Windows Update Store folder (SoftwareDistribution).
Note: The detailed instructions for that task (with screenshots) can be found in this tutorial:
1. From services Stop the Windows Update service.
2. Using Windows explorer delete the SoftwareDistribution folder from C:Windows.
4. Restart your computer.
5. Check for updates.
Method 4. Change Windows Update settings.
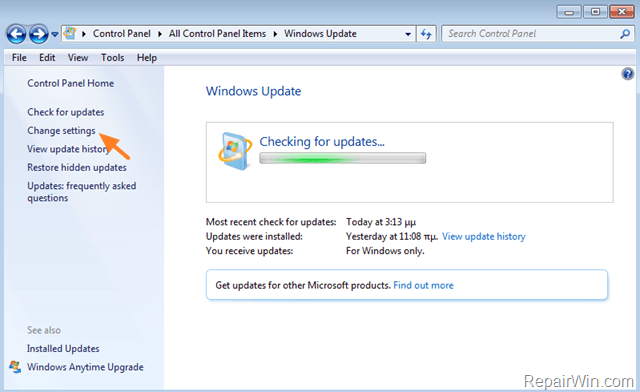
1. Open Windows Update center and click Change Settings.
2. Change the setting from Install updates automatically (recommended) to:
- Check for update but let me choose whether to download and install them
- Or to:
- Download updates but let me choose whether to install them.
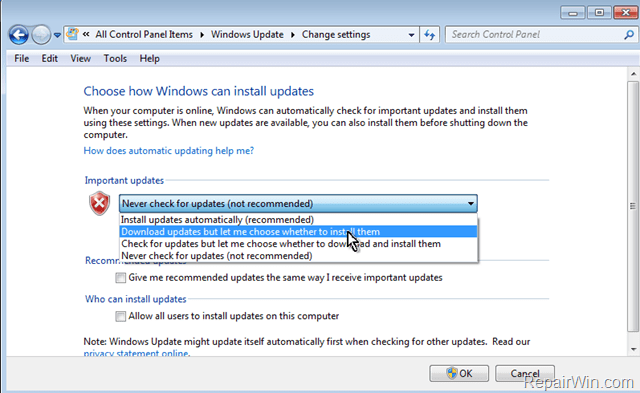
3. Click OK and then check for updates again.
Method 5. Use the Windows Update Troubleshooter.
1. Navigate to Windows Control Panel, set the ‘View By’ to Small icons and open Troubleshooting.
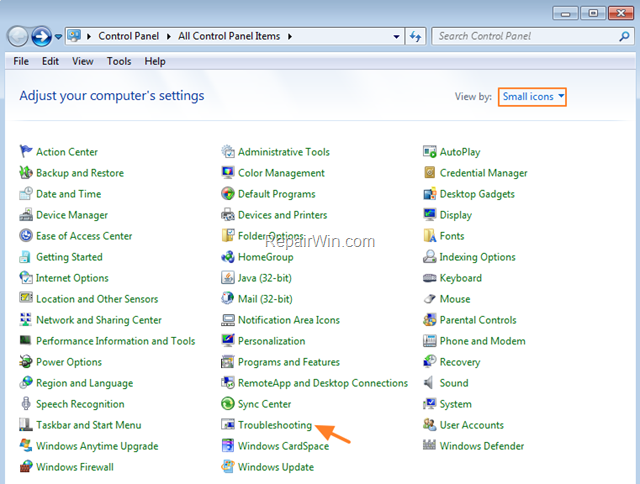
2. In Troubleshooting options, click Fix problems with Windows Update.

3. Click Next to troubleshoot Windows update problems.

5. When the troubleshooting process is complete, close the troubleshooter and restart your PC.
6. Check for updates.
Method 6. Change DNS Settings.
1. Open Network and Sharing Center -> Change Adapter Settings.
2. Right click on your active Network Adapter and select Properties.
3. Select the ‘Internet Protocol Version 4 (TCP/IPv4)’ and click Properties
4. Check the “Use the following DNS server addresses:” radio button.
5. Type the following DNS server addresses (Google’s public DNS Servers):
- 8.8.8.8
- 8.8.4.4
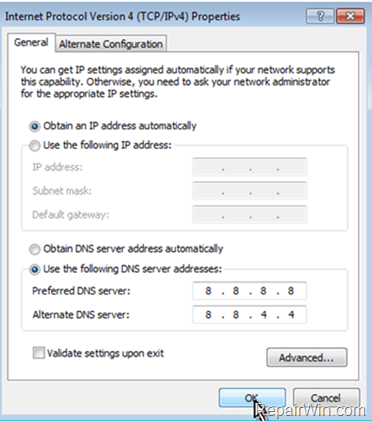
6. Press OK twice to exit Network properties.
7. Restart you computer and check for updates again.
That’s all! Did it work for you?
Please leave a comment in the comment section below or even better: like and share this blog post in the social networks to help spread the word about this solution.

