Whether you are downloading large files or playing online games, slow download speed is an annoying problem. If you are facing a similar problem, in this guide you will find instructions and tips on how to increase the download speed on your Windows computer.
How to Improve Download & Internet Speed in Windows 10/11.
Method 1. Restart your Router.
If the download speed is slower than usual, try restarting your Internet router and then your computer and see if that resolves the problem.
Method 2. Check Internet Connection Speed.
One of the most common causes of slow download speeds is a poor Internet connection. So, before proceeding further, proceed and check the download speed in your Internet Connection.
To test you Internet connection, navigate to speedtest.net or to testmy.net, and measure the download speed.
If the download speed is lower than what your Internet provider (ISP) promised, restart your router and measure the speed again. If the problem remains, contact your Internet provider (ISP) and report the problem.
Method 3. Change Wi-Fi Channel or Band.
If you are connected to the Internet wirelessly, changing the Wi-Fi channel or the Wi-Fi band ( 2.4GHz – 5 GHz), can increase the download speed dramatically. So if you have a 5 GHz band available and your laptop supports it, try connecting to it and see if it changes anything.
A Wi-Fi channel is a frequency band used for wireless communication between your device and the router. When your computer connects to your wireless network, it uses the Wi-FI channel that the router has chosen to transmit. However, if the same channel is used by multiple devices or other routers in the area, it can slow down your network and download speed.
So, proceed to change the Wi-Fi channel as follows:
1. Open a browser and type in the address bar your Router’s IP Address. (e.g. “192.168.1.1”). Then hit Enter.
2. Type the router’s login credentials (Commonly the credentials can be found on router device or in its manual).
3. On Router’s settings page, go to Wireless (Wi-Fi) settings and select a different Wi-Fi channel using the drop-down menu. When done, click Apply or Save. (After doing this, the router may reboot.)
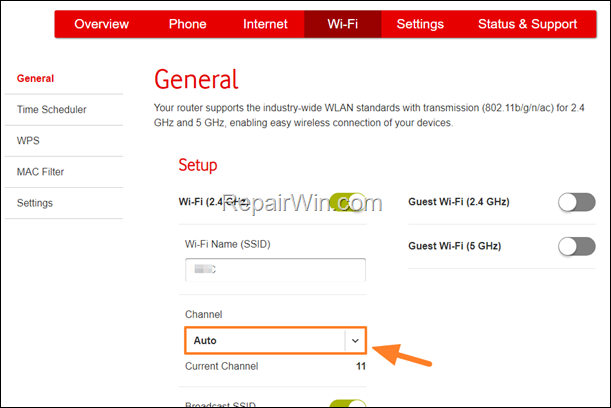

4. Finally, disconnect and reconnect to your Wireless and check the download speed.
Method 4. Connect to Internet Wired.
If you’re using a wireless connection, make sure your signal is strong and that the device is in close proximity to the router.
Also, if you’re using Wi-Fi, the effective method to boost the Internet and download speed, is to connect to the network via an ethernet (LAN) cable. *
* Note: If you’re already connected wired, then try to replace the network cable and see if that fixes the problem.
Method 5. Close Background Running Programs.
If you have other programs running that can use your Internet bandwidth then close them. For example, if a torrent client or a cloud storage application is running on your computer, it may cause download delays. So…
1. Close all other programs that can use your internet bandwidth (e.g. torrent clients, OneDrive, Drobox, etc.).
2. Reduce the number of programs running in the background, by doing the following:
1. Press CTRL + SHIFT + ESC to open the Task Manager.
2. In Startup tab, select and disable any program that don’t needed to run in the background.
3. When done, restart your computer and check if the problem is solved.
![image_thumb[4] image_thumb[4]](https://qnet88.com/wp-content/uploads/2023/04/image_thumb4_thumb-2.png)
![image_thumb[4] image_thumb[4]](https://qnet88.com/wp-content/uploads/2023/04/image_thumb4_thumb-2.png)
Method 6. Increase Internet Speed by Clearing Browser’s Cache
If you face slow download speeds when downloading using your browser, try to clear your browser’s cache. To do that:
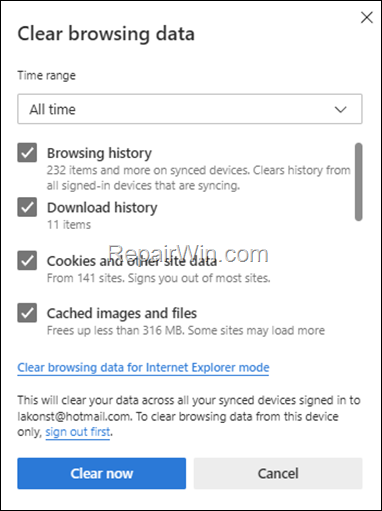
1. While in your browser, press simultaneously the CTRL + SHIFT + DELETE keys.
2.Set the Time range to All time.
3. Uncheck all other boxes, except the History & Cache.
4. Click the Clear button.

Method 7. Check your PC for Malware/Viruses.
If after following the above steps you still face slow downloads speeds in Windows 10/11, ensure that your system is virus/malware free. For that task follow the instructions in this guide: How To Scan Your Computer for Viruses and other Malicious Programs.
Method 8. Improve Internet Speed by Clearing Windows DNS Cache.
Another method to boost the download speed, is to clear the DNS cache.
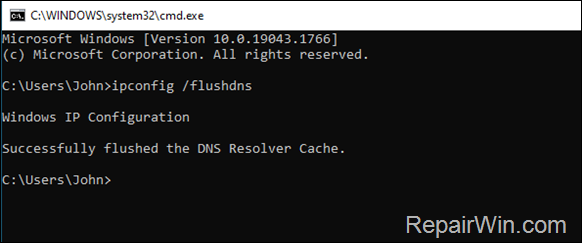
1. Type cmd in search box and hit enter to open Command Prompt:
2. Give the following command to clear the cache:
- ipconfig /flushdns

Method 9. Change DNS Servers.
The next method to increase the download and internet speed, is to change the DNS Servers and to use Google’s Public DNS Servers. To do that:
1. Right click on the active Network icon in Taskbar (or go to to Windows Control Panel) and click Network and Sharing Center
![image_thumb[14] image_thumb[14]](https://qnet88.com/wp-content/uploads/2023/04/image_thumb14_thumb-1-3.png)
![image_thumb[14] image_thumb[14]](https://qnet88.com/wp-content/uploads/2023/04/image_thumb14_thumb-1-3.png)
2. Select the active Network Card and then click Change adapter options.
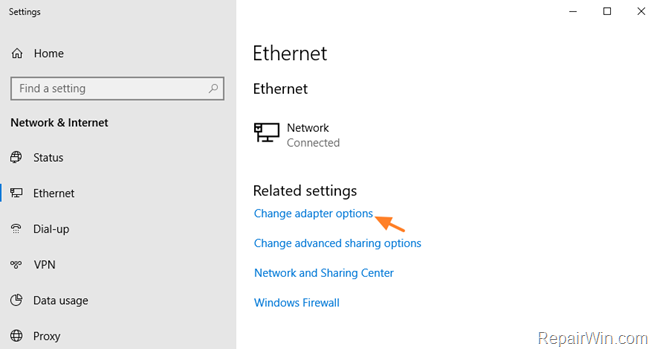

3. Right click on your active Network Adapter and select Properties.
4. Select the ‘Internet Protocol Version 4 (TCP/IPv4)‘ and click Properties
![image_thumb[18] image_thumb[18]](https://qnet88.com/wp-content/uploads/2023/04/image_thumb18_thumb-1-4.png)
![image_thumb[18] image_thumb[18]](https://qnet88.com/wp-content/uploads/2023/04/image_thumb18_thumb-1-4.png)
5a. Check the “Use the following DNS server addresses:” radio button.
5b. Type the following DNS server addresses (Google’s public DNS Servers) and click OK.
- 8.8.8.8
- 8.8.4.4
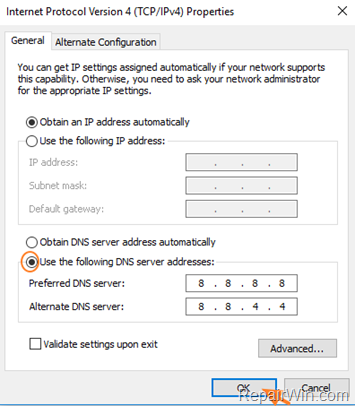

6. Restart your computer.
Method 10. Increase Download Speed by Disabling or Enabling the Window Auto-Tuning feature.
Window Auto-Tuning is a feature in Windows operating systems that dynamically adjusts the receive TCP Window size to optimize network performance. But in some cases, Windows Auto-Tuning can cause slow download speeds when it’s enabled, and in others when it’s disabled. So do the following:
1. Open Command prompt as Administrator.
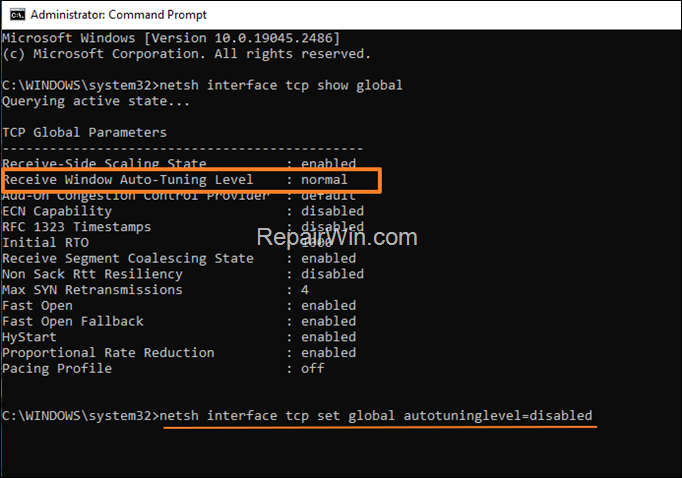
2. Give the following command and press Enter to see if the Windows Auto-Tuning feature is turned on or off on your machine:
netsh interface tcp show global


3. Now according the status of the Receive Window Auto-Tuning Level , proceed as follows:
A. If the status is normal, that means that the auto-tuning feature is enabled. At such a case, give the following command to disable it.
- netsh interface tcp set global autotuninglevel=disabled

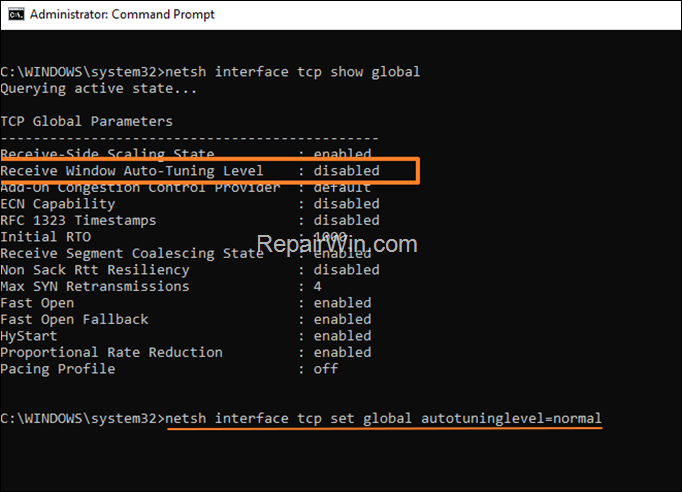
B. If the status is disabled, that means that the auto-tuning feature is turned-off. At such a case, give the following command to enable it.
- netsh interface tcp set global autotuninglevel=normal

4. Now proceed to test the speed of your Internet connection and also download a large file from the Internet to check whether the above action has improved the download speed or not. If nothing has changed, proceed to undo the change by enabling or disabling the Window Auto-Tuning feature, according your case.
Method 11. Uninstall & Re-Install Network Adapter.
The next method to resolve mentioned issue, is to uninstall and reinstall the Network adapter. To do that:
1. Navigate to Device Manager and expand Network Adapters.
2. Right-click on the wireless adapter (or on the Ethernet adapter if you’re connected wired to the network/internet), and select Uninstall device.
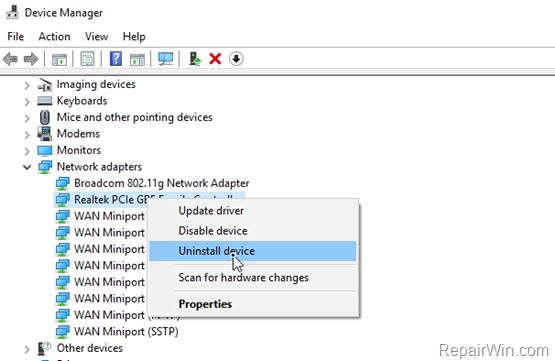

5. At the Uninstall Device – Warning window, click Uninstall.
6. Restart your computer, wait a few minutes for Windows to reinstall the network adapter, and then check if the problem is resolved.
Final Words.
If after following the above instructions the internet and download speed is low, then you have the following available options to fix your problem.
- Replace Internet Router.
- Use a Faster Internet Service Provider (ISP).
That’s all folks! Which method worked for you?
Please leave a comment in the comment section below or even better: like and share this blog post in the social networks to help spread the word about this solution.


