.single .post-author, .post-date {
text-transform: none;
}
,
Last updated: December 11th, 2023
Under normal circumstances, there is no reason why you would want to disable the laptop keyboard, but if you want to do so, keep reading below.
There can be several reasons why someone might want to disable a laptop keyboard. Here are a few common scenarios:
- External Keyboard: If you prefer using an external keyboard with your laptop, disabling the built-in keyboard can help prevent accidental keystrokes.
- Laptop’s keyboard is malfunctioning: When the built-in keyboard malfunctions, turning it off is a simple solution to avoid interference between the two keyboards.
- Security reasons: In some cases, you may need to disable the laptop’s keyboard to prevent unauthorized access. (e.g. if you have the laptop in a public place).
How to Disable Laptop’s Built-in Keyboard on Windows 10/11.
Method 1. Temporarily Disable Laptop’s Keyboard (Until Restart).
If you want to temporarily turn off only the laptop’s keyboard (until the laptop restarts), simply uninstall the Keyboard device from Windows. To do that:
1. Press Windows ![]()
![]() + R keys to open the run command box.
+ R keys to open the run command box.
2. Type devmgmt.msc and press Enter to open Device Manager.


3. In Device Manager expand Keyboards. Then right-click on Standard PS/2 Keyboard and click Uninstall device. Then click Uninstall.


4. When asked to restart your computer, click No and you’re done. Your laptop keyboard will not work until restarting your computer.


Method 2. Disable Laptop’s Built-In Keyboard & Touchpad by Changing Keyboard’s Driver.*
The next method to turn-off laptop’s built-in keyboard and touchpad on Windows 10/11, is to change the keyboard driver.
* Important: Keep in mind that this method will also disable the laptop’s touchpad, so make sure you have an external USB keyboard and mouse for your work.
1. Press Windows ![]()
![]() + R keys to open the run command box.
+ R keys to open the run command box.
2. Type devmgmt.msc and press Enter to open Device Manager.


3. In Device Manager expand Keyboards. Then right-click on Standard PS/2 Keyboard and click Update driver.


4. Click Browse my computer for drivers.


5. Choose Let me pick from a list from available drivers on my computer.


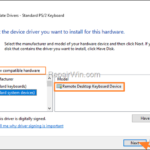
6. In “Select the device driver…” window:
a. Uncheck Show compatible hardware.
b. Under Manufacturer, select: (Standard system devices)
c. Then select on the right the Remote Desktop Keyboard Device and click Next.


7. Click Yes at the ‘Update Driver Warning’ message.


8. Close the “Update drivers” window.


9. Finally click Yes to restart your laptop.


10. After restart, check if you laptop still works or not. If yes, continue to the next method. If not, you’re done!
* Note: To re-enable your keyboard, open the Device Manager, uninstall the Remote Desktop Keyboard Device and restart your computer.


Method 3. Turn-off Laptop Keyboard & Touchpad using a command.
Another method to disable the laptop’s keyboard and the touchpad, is to prevent the keyboard driver, from starting. To do this:*
* Important: Keep in mind that this method will also disable the laptop’s touchpad, so make sure you have an external USB keyboard and mouse for your work.
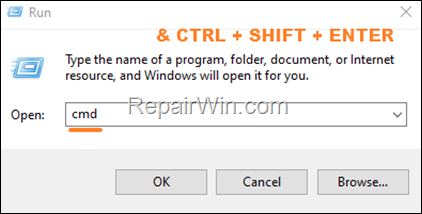
1. Open Command Prompt as Administrator. To do that:
1. Press the Windows
+ R keys to open the ‘Run’ command box
2. Type CMD and then press CTRL + SHIFT + ENTER.
2. In command prompt, type the following command and hit Enter:
- sc config i8042prt start= disabled


3. Restart the PC. After restart, the laptop keyboard shouldn’t work.
4. To enable the laptop keyboard again, open admin command prompt, type the below command and restart your PC:
- sc config i8042prt start= auto


That’s all folks! Did it work for you?
Please leave a comment in the comment section below or even better: like and share this blog post in the social networks to help spread the word about this solution.

- Author
- Recent Posts
- How to Disable Laptop’s Keyboard in Windows 10/11. – December 11, 2023
- FIX: LoadLibrary failed with error 1114 on Viber or other Applications (Solved) – December 6, 2023
- FIX: TEAMS Sign-in error on Mac ‘Selected user account does not exist in tenant Microsoft Services and cannot access the application’ (Solved) – December 4, 2023


