The following issue may appear on a Windows 10 based computer. The “SrTasks.exe” causes the disk to work at 100%. The “SrTasks.exe” (Microsoft System Protection Background Tasks) process, is a legitimate Windows process, and it used to start up the Volume Shadow Copy Service and the Microsoft Software Shadow Copy Provider service.
The “SrTasks.exe” process starts the related services needed to create restore points and normally should not affect the system performance continuously, and especially in systems where the “System Protection” is disabled.
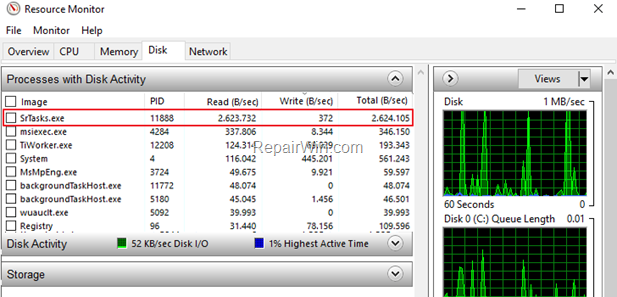
This tutorial contains instructions to resolve the SrTasks.exe 100% Disk Usage issue on Windows 10.
How to Fix SrTasks.exe High Disk Usage in Windows 10.
Method 1. Scan your computer for Malware & Viruses.
The first step to troubleshoot the “SrTasks.exe high disk usage” problem, is to ensure that your system is virus/malware free. For that task follow the instructions in this guide: How To Scan Your Computer for Viruses and other Malicious Programs.
Method 2. Disable System Protection.
The second method to resolve the high disk usage issue which caused from the “SrTasks.exe” process, is to disable the System Restore Protection on your PC. To do that:
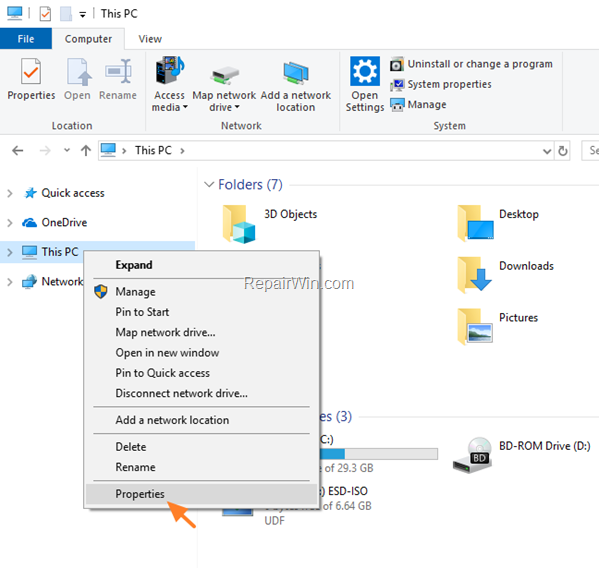
1. Open Windows explorer, right click at ‘This PC” and choose Properties.
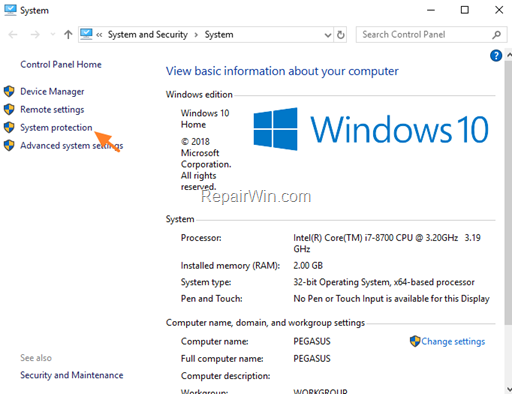
2. Choose System Protection at the left.
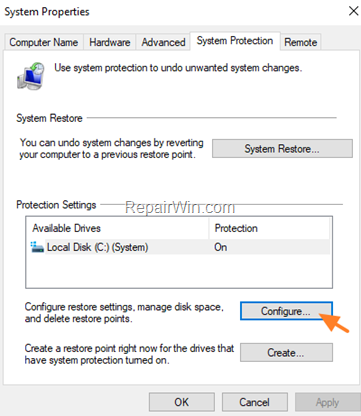
3. Highlight the Local Disk C: (System) and click Configure.
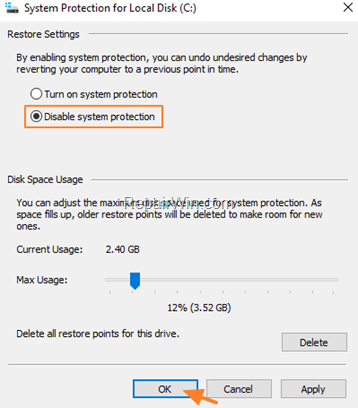
4. At System Protection options, select Disable system protection and click OK. *
* Note: If the “System Protection” is already disabled, then continue to next method.
5. Restart your PC and then check if the high disk usage issue has resolved. If the problem persists, re-enable the system protection and continue to next method.
Method 3. Disable Superfetch Service.
In many cases, the 100% disk usage issue, is resolved after disabling the Superfetch service. To disable the “Superfetch” service:
1. Press Windows ![]() + R keys to open the run command box.
+ R keys to open the run command box.
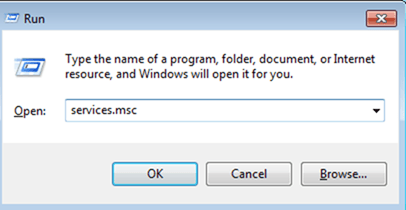
2. In the Search box, type: services.msc & click OK.
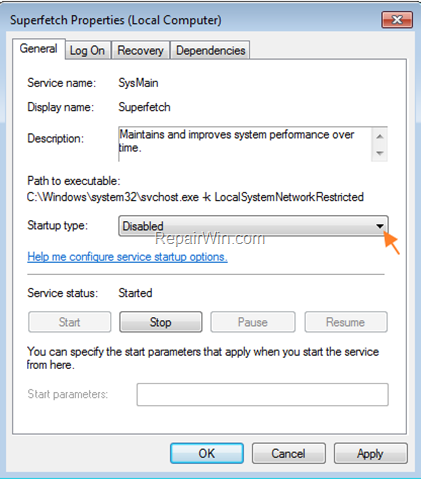
3. At the services list, double click at Superfetch service to open its properties.
4. Set the ‘Startup type’ to Disabled and then OK.
5. Restart your computer. If after restart the problem persists, re-enable the “SuperFetch” service and continue to the next method.
Method-4. Run Check Disk to Find and Fix Hard Disk Errors.
1. Open Command Prompt as Administrator. To do that:
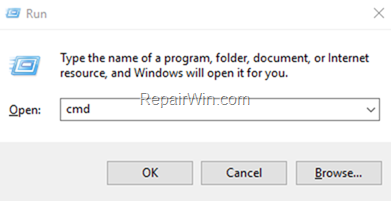
1. Press the Windows ![]() + R keys to open the ‘Run’ command box
+ R keys to open the ‘Run’ command box
2. Type CMD and then press CTRL + SHIFT + ENTER.
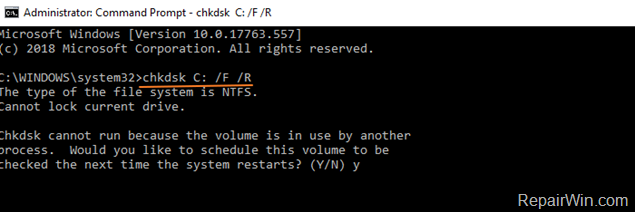
2. At command prompt give the following command to repair your disk and press Enter.
- chkdsk C: /F /R
3. Press the Y key to schedule the checking at the next restart.
4. Restart your computer.
5. Now wait for the disk check process to finish. (it will take several hours).
6. When the check disk process is completed, check if the “SrTasks.exe High Disk Usage” has resolved.
Method 5. Troubleshoot Windows problems by Running the Maintenance Tasks.
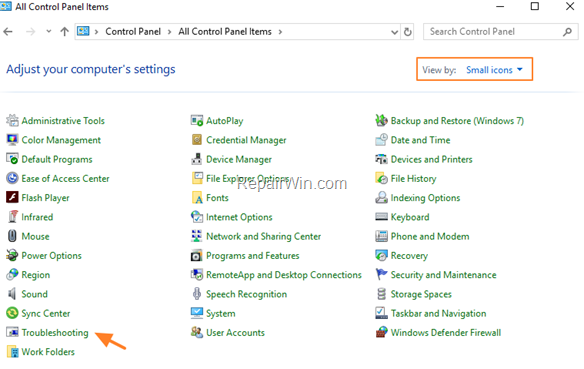
1. Navigate to Control Panel and open Troubleshooting. *
* Note: If you don’t see the Troubleshooting option, set the ‘View by’ to Small icons.
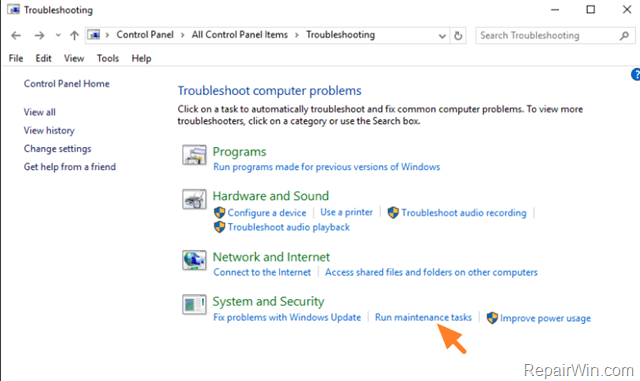
2. Under ‘System and Security’, select Run Maintenance Tasks.
3. Press Next and then wait until the System Maintenance utility detecting problems.
4. Follow the on screen instructions to fix the problems found.
Method 6. Repair Windows System Files.
Another method to resolve the SrTasks.exe high disk usage issue in Windows 10, is to repair Windows by using the DISM and SFC commands.
1. Open Command Prompt as Administrator.
2. In command prompt give the following command and press Enter:
- DISM.exe /Online /Cleanup-image /Restorehealth

3. When the DISM operation is completed, type the following command and hit Enter:
- sfc /scannow

4. Now wait until the System File Checker repairs the Windows System Files.
5. When this done, restart your computer.
That’s all folks! Did it work for you?
Please leave a comment in the comment section below or even better: like and share this blog post in the social networks to help spread the word about this solution.

