In this tutorial I will show you how to configure Windows 10 to automatically create copies and snapshots of your files by using the File History backup tool, in order to be able to restore them (if needed), by using the “Restore previous Versions” feature.
As you may have already noticed, by default, the Windows 10 doesn’t keep previous versions of your files or folders, like in Windows 7. This is happening, because Windows 10 doesn’t use anymore the ‘Volume Shadow Copy” service to take snapshots of your files, but instead it uses only the ‘File History’ back-up tool.
The “File History” is an excellent built-in backup tool in Windows 10, that can be configured to take copies and snapshots of your files to an alternate storage location than the main drive (e.g. to a USB Drive, Network, etc.). *
* Note: The only limitation of the “File History” tool, is that doesn’t allow you to choose the C: drive as an alternate backup destination. if you don’t own a secondary drive available for the backup, then continue reading this tutorial to find out how to bypass this limitation…
- Related article: How to Create Shadow Copies of your Files with Task Scheduler in Windows 10.
How to Backup your Personal Files with File History Backup tool in Windows 10.
1. As I mentioned above, in order to backup your files with the File History backup tool, you need to have an available storage drive connected to your PC (e.g. a USB drive), or a network location (e.g. another computer on your Network, or a NAS storage device). *
* Note: If you don’t own an alternate storage device, then you have the following options:
A. To shrink the size of your main drive C: and with the available free space to create a new drive to store the backup, or…
B. To store the backup on the main drive C:. At this case, create a new folder on the C: drive, and name it “FileHistory’ (or whatever you want) and continue below…
2. Navigate to Windows Control Panel and under System and Security, click Save backup copies of your files with File History.
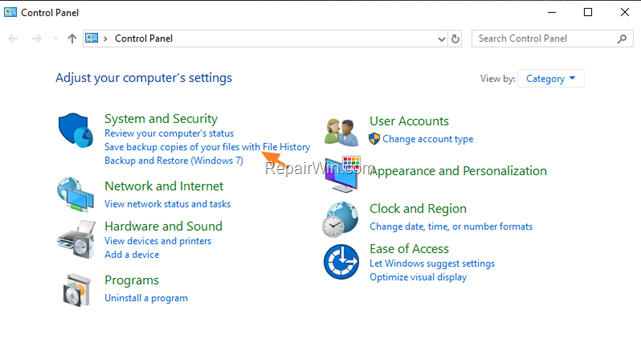
3. Now according your case, perform the following:
- Case A. If you own an available drive for the backup, then:
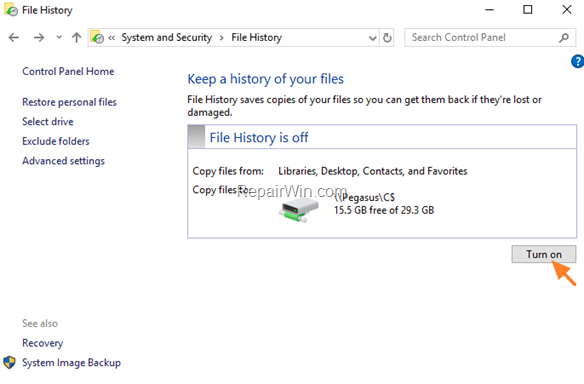
a. Click the Turn on button at the screen to enable the ‘File History’.
b. Continue to step-4 below to configure the ‘File History’ backup settings.
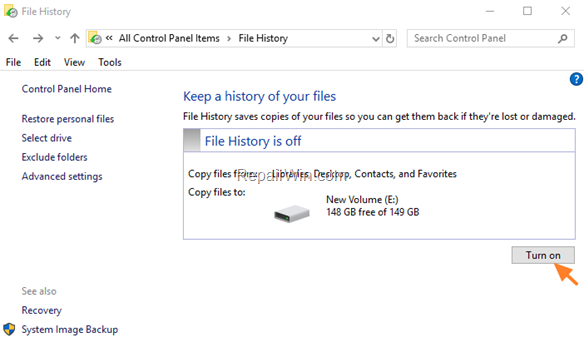
- Case B: If you don’t own an available drive for the File History backup or if you want to store the backup on network, then:
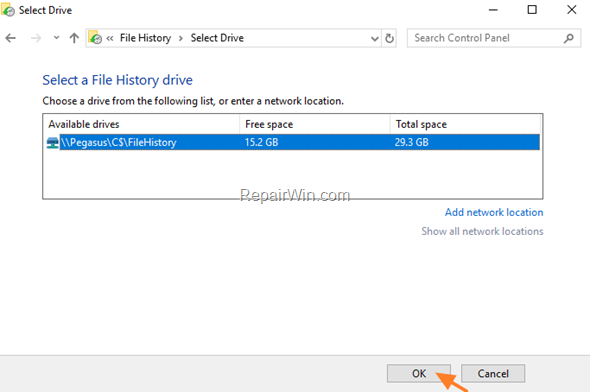
a. Click Select a network location.
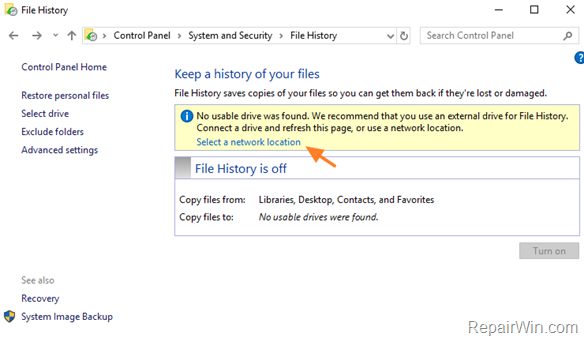
b. At the next screen:
1. If you want to save the backup on the Network, type the full network path of the backup storage location and click Select Folder.
2. If you want to save the backup on your main drive C:, then type the full network path to the local backup folder on the drive C:, at this form: *
- \Computer-NameC$FileHistory
* Notes:
1. Replace the “Computer-Name” value with the name of your PC. (To find your computer’s name, right click at “This PC” icon in Windows Explorer).
2. Keep in mind, that saving the backup of your personal files at the same drive where they already stored is not a reliable solution. To be safe, always store the backup to another storage device.
e.g.: if the computer’s name is “Pegasus” then type: “\PegasusC$FileHistory”
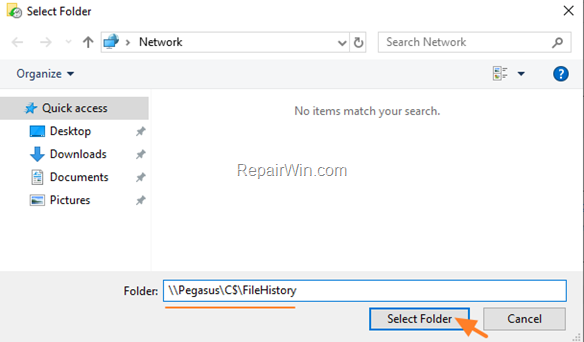
c. At the next screen, click OK.
d. Now click the Turn on button to enable the File History backup tool, and then continue bellow to configure the backup settings.
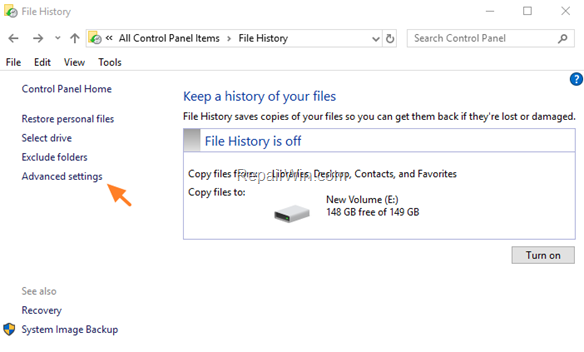
4. To configure the ‘File History’ backup options, click Advanced Settings on the left.
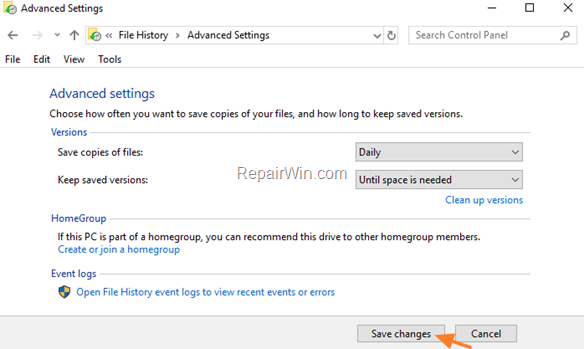
4a. Then at Advanced Settings options, set how often to backup your files and how long to keep the saved versions. When done, click Save changes.
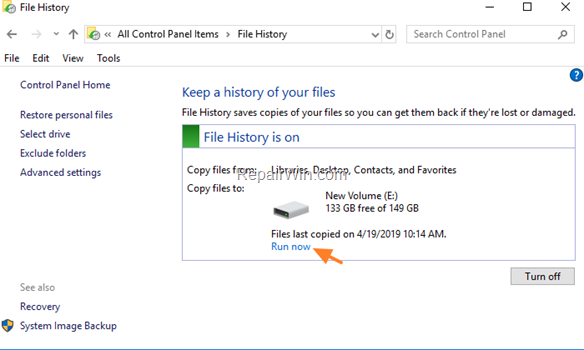
5. Finally click Run now to take your first backup. *
* Additional Help – Notes:
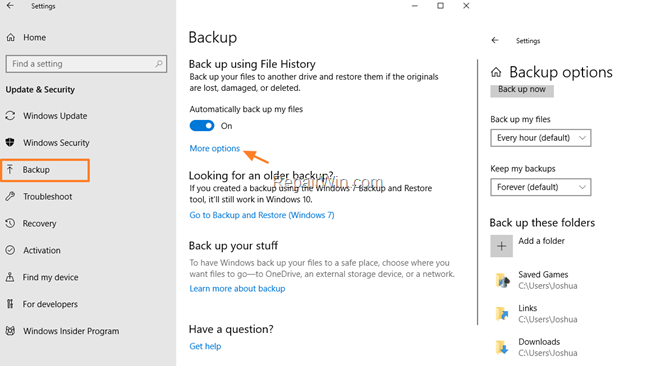
1. By default the ‘File History’ takes a backup of the ‘Libraries’ folders (Desktop, Documents, Favorites, Music, OneDrive, Pictures & Videos). If you want to exclude one of these folders from the backup, to include other folders, or to review all the File History backup options, then navigate to:
- Settings
 > Update & Security > Backup > More Options.
2. To restore your files from the ‘File History’ backup, navigate to one of the following locations:
- Control Panel > File History > Restore Personal Files.
- Settings
 > Update & Security > Backup > More Options > Restore files from a current backup.
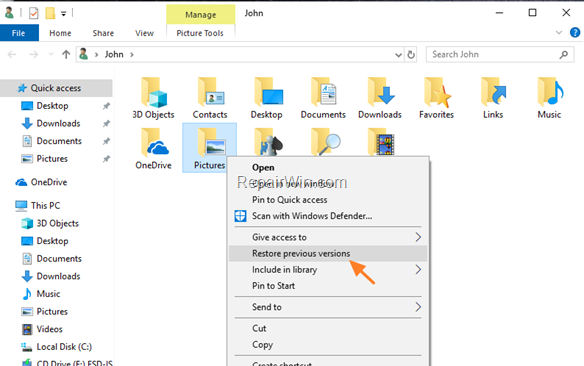
3. To selective restore a file or folder to its previous version, right click on the file (or folder) and select Restore Previous Versions.
That’s all! Did it work for you?
Please leave a comment in the comment section below or even better: like and share this blog post in the social networks to help spread the word about this solution.


