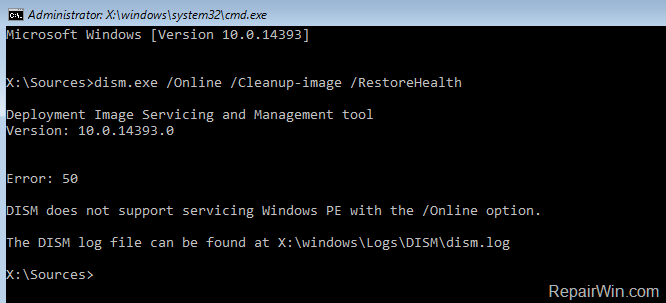
This tutorial contains instructions to resolve the following error when running the DISM command “Dism.exe /Online /Cleanup-Image /Restorehealth” from the Windows Recovery Environment: “Error 50, DISM does not support servicing Windows PE with the /Online option”.
The above error is occurred, because in WinRE the operating system is not running, so the /Online switch is useless at this case. In fact the /Online switch in DISM tool, specifies that the action is to be taken on the operating system that is currently running.

How to fix: Error 50 DISM does not support servicing Windows PE with the /Online option. (Windows 10)
1. After booting your computer from the Windows 10 installation media, press SHIFT + F10 keys at the first install screen to launch Command Prompt.
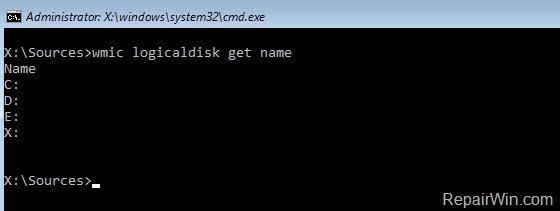
2. Inside the WinRE command prompt window, get a list of all available drives, by giving this command:
- wmic logicaldisk get name

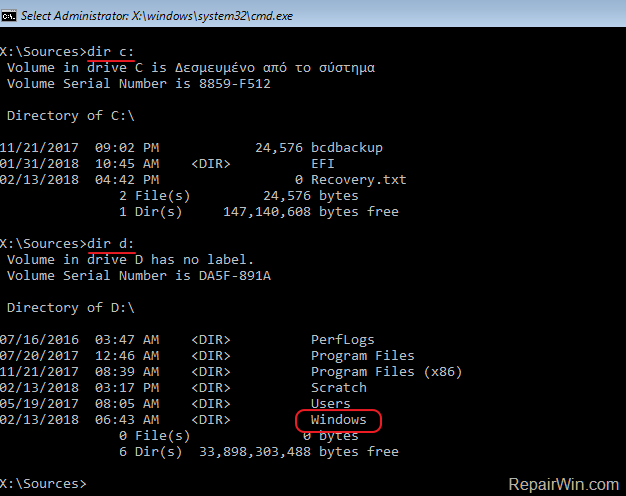
3. Then find out which drive contains the “Windows” folder, by typing this command: *
- dir drive-letter:
* e.g. To see the contents of the C: drive, type: “dir C:” (without quotes). If you cannot see the “Windows” folder on the C: drive, then continue to the next drive (e.g. “dir D:”, “dir E:”, etc.), until see the “Windows” folder.
[As you can see at the screenshot below, the Windows folder (at this case) is located at the D: drive.]

4. Once you find the “Windows” drive (e.g. the “D” in this example), give this command to repair the offline Windows image:
- dism.exe /Image:D: /Cleanup-Image /Restorehealth
* Notes:
1. Where D = the Windows drive. (Change it according your situation)
2. There is space between / (“…/Image:D: /Cleanup-Image…”)
3. If after executing the above command, you receive the “Error 0x800f081f: The source files could not be found”, then perform a repair upgrade. To do that: **
a. Boot from the Windows 10 installation media.
b. At Windows Setup wizard, press ‘Next‘ and then click ‘Install Now‘.
c. Accept the ‘License agreement’.
d. When asked, select Upgrade: Install Windows and keep files, settings, and applications.** If you able to start your Windows 10 in Safe Mode with networking , then run the following command (in Admin Command Prompt):
- DISM /Online /Cleanup-Image /RestoreHealth

5. When the DISM operation is completed, give the following SFC command to complete the repairs. *
- SFC /SCANNOW /OFFBOOTDIR=D: /OFFWINDIR=D:Windows
* Notes:
1. Where D = the Windows drive. (Change it according your situation).
2. There is space between / (“…/OFFBOOTDIR=D: /OFFWINDIR…”)

6. When the operation is completed, reboot your computer.
Did it work for you?
Please leave a comment in the comment section below or even better: like and share this blog post in the social networks to help spread the word about this solution.


