In this guide you’ll find all the different ways to take screenshots on Windows 10/11.
A screenshot, also known as a snapshot or screen capture, is a image of what is displayed on a computer monitor or on a smartphone. Screenshots can be used for various reasons, such as writing tutorials, sharing information, or to capture an error message on your screen.
n Windows 10/11 you can take snapshots by pressing specific keys on your keyboard and then using the built-in software or other third-party tools you can save them as an image or embed them in documents. (e.g. to Word, PowerPoint, etc.).
Taking screenshots is a great way to save an image of your screen or part of your screen for whatever reason you want, and Windows 10/11 has many built-in tools that can help you take screenshots with ease.
How to Take Screenshots in Windows 10/11.
Method 1. Use the Print Screen key (PrtScn).
The simplest way for taking screenshots in Windows 10/11, is by using the Print Screen (PrtScn) Key.
1. Just press the Print Screen (PrtScn) key on your keyboard, and Windows will capture an image of your entire screen and save it to the clipboard.


2. Open an image editing program such as Paint or Photoshop and press CTRL + V to paste and save it.
Method 2. Press Alt + Print Screen key (PrtScn).
This method is similar to the Print Screen key, but instead of capturing the entire screen, it captures only the active window.
1. Press Alt + Print Screen and the screenshot will be saved to the clipboard.
2. Open an image editing program such as Paint or Photoshop and press CTRL + V to paste and save it.


Method 3. Press Windows + Print Screen Keys (PrtScn).
This method is similar to the first one, but instead of saving the screenshot to the clipboard, it saves it directly to the Pictures > Screenshots folder on your computer as a PNG file.
1. Press the Windows ![]()
![]() + Print Screen key on your keyboard.
+ Print Screen key on your keyboard.
2. Then navigate to Pictures > Screenshots folder to find and see the captured image.


Method 4. Take Screenshots with the Snipping Tool.
The Snipping Tool is a built-in Windows program that allows you to capture a custom portion of your screen. To take a screenshot using the snipping tool:
1. At Search box, type “Snipping Tool” and then open the “Snipping Tool” app from the results.
2. Click the Mode menu and select the type of snip you want to capture (Rectangular screenshot, Free-form snip, Window capture, or Full-screen screenshot).
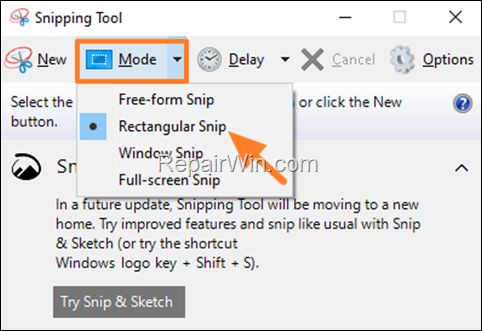

3. Then select on the screen the area/window you want to capture by clicking on it using your mouse, or by drawing the shape you want by clicking and dragging your mouse. (if you have selected the rectangular or free-form snip.)
4. After realizing the mouse button, you’ll see the captured image inside the Snipping tool.
5. When done, you can then save, copy, or email the screenshot.
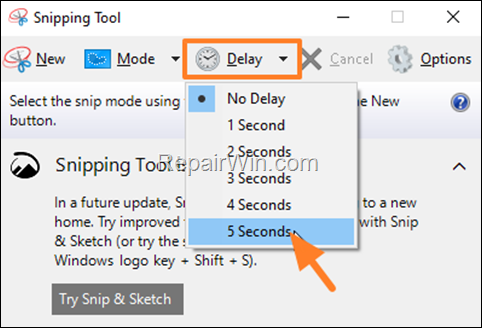
* Note: If you don’t want to take the screenshot immediately, click on Delay menu to set a delay time.

Method 5. Take a Screenshot using the Windows + Shift + S Key.
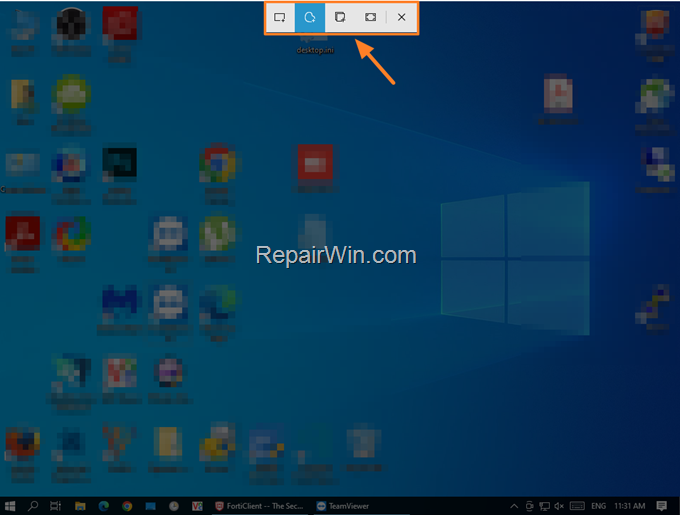
This method opens the Snipping Tool capture options at the top of the screen and allows you to capture a specific area, the full screen or to draw with your mouse the area you want to take to a screenshot.
1. Press Windows ![]()
![]() + Shift + S key to view the capture options at the top of the screen (center) and select the one you want (Rectangular snip, Free-form snip, Window snip, or Full-screen screenshot).
+ Shift + S key to view the capture options at the top of the screen (center) and select the one you want (Rectangular snip, Free-form snip, Window snip, or Full-screen screenshot).


2. Then click on the area that you want to capture to take a screenshot, or draw the area you want using your mouse if you have selected the Free-form snip.
3. When done, open an image editing program such as Paint or Photoshop and press CTRL + V to paste and save the captured image.

Method 6. Take Snapshots with Snip and Sketch.
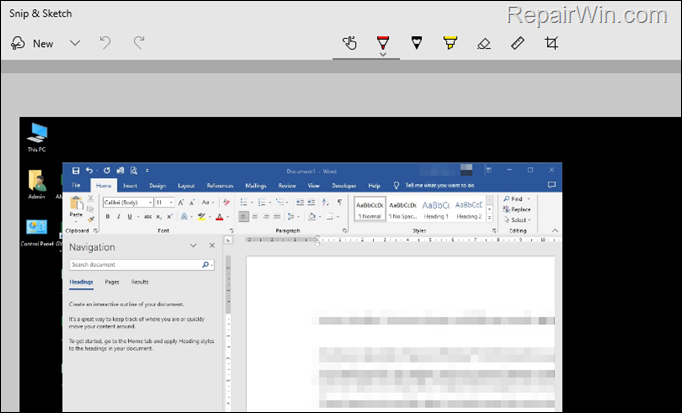
Windows 10 also has a feature called Snip and Sketch, which allows you capture your entire screen to an image and then to add notes and sketches, using your mouse, a pen tablet or your finger (touchpad).
1. Press Windows ![]()
![]() + W keys to open the Snip and Sketch bar in the bottom-right corner of your taskbar.
+ W keys to open the Snip and Sketch bar in the bottom-right corner of your taskbar.


2. Then click the Fullscreen snip whenever you want to take a screenshot.


3. The screenshot will open in the Snip and Sketch app, where you can annotate, highlight, crop, save or share.

Method 7. Use Gamer Bar to Take Screenshots in Windows 10/11
Windows 10/11 includes the Game Bar (aka “Xbox Game Bar”) feature that allows you to take screenshots, record gameplay, and access various gaming-related settings and tools while playing games on your PC.
Xbox Game Bar it’s essentially a quick access toolbar that you can open while playing games or at other times, without having to leave the game or what you’re working on, to capture screenshots or video of your screen
1. Press Windows ![]()
![]() + G keys, to open the Game Bar. This will bring up a small overlay with some options.
+ G keys, to open the Game Bar. This will bring up a small overlay with some options.


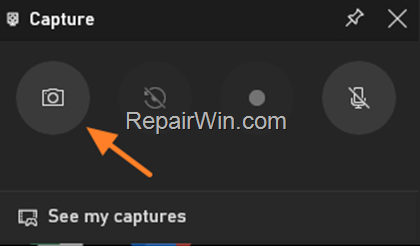
2. To take a screenshot of your screen, press the Camera icon in the “Capture” window, or press the Windows ![]()
![]() + Alt + Print Screen keys. *
+ Alt + Print Screen keys. *
3. The screenshot will be saved in the “My VideosCaptures” folder.

* Notes:
1. If you want you can change the Game Bar shortcuts, by going to Settings > Gaming > Game bar. From there, you can change the keyboard shortcuts for taking screenshots, the recording, etc..
2. To record your gameplay click on the Start Record button in the Game Bar. The recording will be saved in your “Videos” folder.
Method 8. Use Third-party Screenshot Tools.
There are many third-party screenshot tools available, each with their own unique features and options. Some popular options include Greenshot, PicPick, and Lightshot. These tools can be especially helpful if you need to take screenshots frequently and want more options for saving, sharing, and annotating the images.
In conclusion, there are several ways to take screenshots on Windows 10, and the method you choose will depend on your specific needs and preferences.
That’s all folks! Did it work for you?
Please leave a comment in the comment section below or even better: like and share this blog post in the social networks to help spread the word about this.
