If your computer’s camera shows black and white in Skype, MS Teams or other apps, continue reading below to fix the problem.
Many users report the following strange problems with their camera on Windows 10:
- Camera working fine on any other app (e.g. Zoom, WebEx, etc.), but showing black and white on Skype or Microsoft TEAMS.
- Camera shows color in preview window, but in other participants shows black and white.
This tutorial contains instructions to fix the following problem in Windows 10: The web camera displays only black and white in videoconferencing programs (Zoom, Skype, Teams, etc.).
How to FIX: Camera Black & White issue on Skype, MS Teams, Zoom or other apps.
If you camera is not showing colors except black and white, use one of the methods below to solve the problem. *
* Note: If you face the camera BW issue on MS TEAMS, open settings and Disable GPU hardware acceleration. Then close and restart TEAMS and see if the problem persists.
Method 1. Reset Camera Settings to Default using Skype.
1. Download and install Skype for Desktop. (if you don’t own Skype already)
2. After installation, login to Skype and from the menu ![]() go to Settings.
go to Settings.

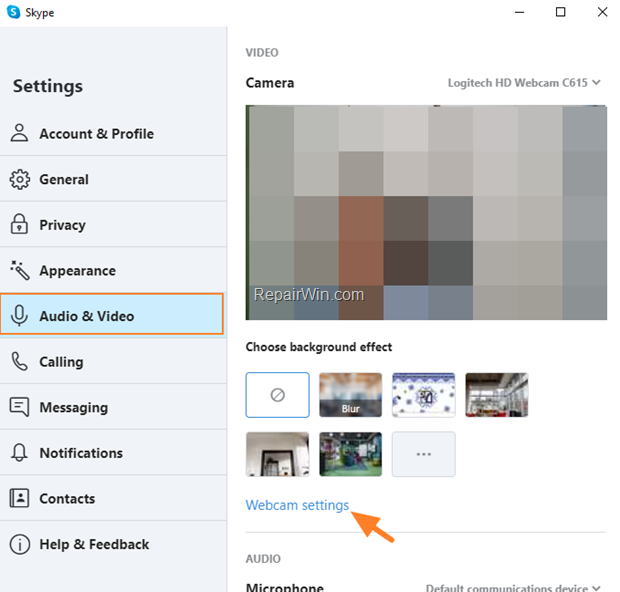
3. Select Audio & Video on the left and then open Webcam settings.
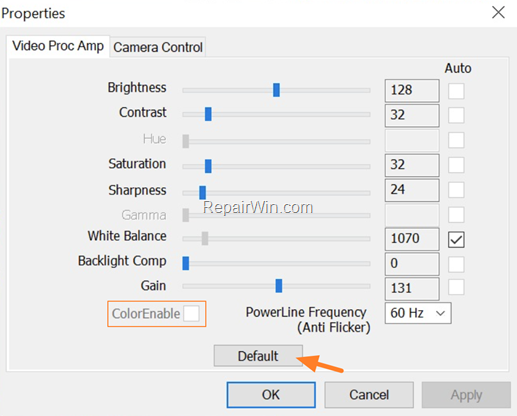
4. In camera Properties (‘Video Proc Amp’ tab) ensure that ColorEnable is checkmarked. If this option is inactive (like in screenshot below) click Default to restore the default camera settings and click OK.
5. Close the Skype setting and test your camera. Normally, your camera will change back from black & White to color in Skype and in all other apps where you use it.
Method 2. Rollback Camera Driver.
The black and white issue on camera, sometimes occurs after updating Windows 10. So, proceed and revert the previous version of camera driver.
1. Navigate to Device Manager. To do that:
1. Press Windows
+ R keys to open the run command box.
2. In the “Open” box, type: devmgmt.msc & click OK.
2. Expand the Imaging and Other Devices (or Cameras).
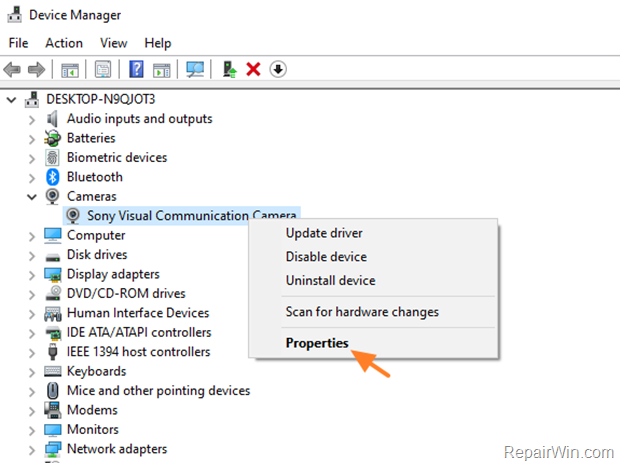
3. Right-click on your camera and select Properties.
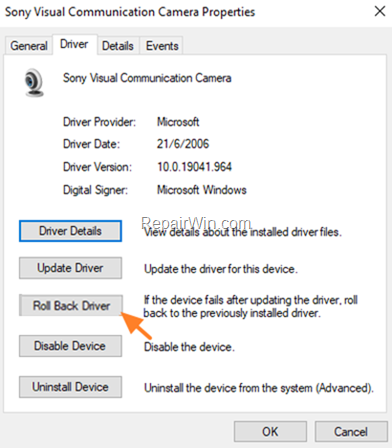
4. At Driver tab, click Roll Back Driver button. *
* Note: If the ‘Roll Back Driver’ button is inactive, continue to the next step.
5. Select a reason for the driver package rollback and click Yes.

6. When the driver rollback is completed, restart your computer.
7. After restart, proceed and test your camera.
Method 3. Uninstall and Re-install Camera Device.
Another method to fix the problem if your camera is not displaying color is to reinstall the camera drivers.
1. Navigate to Device Manager
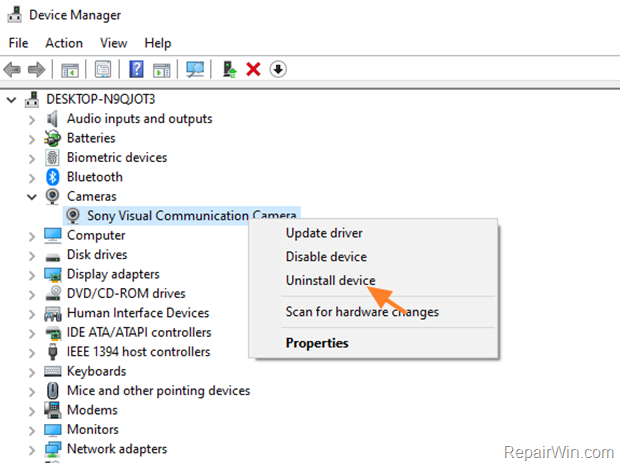
2. Right-click on the camera and click Uninstall device.
4. At the warning message, click Uninstall.

5. Now, perform one of the following:
a. If prompted to restart your PC, press Enter.
b. If you don’t receive the restart prompt, press the Windows
+ X keys and then press the U and R keys on your keyboard to restart the PC manually.
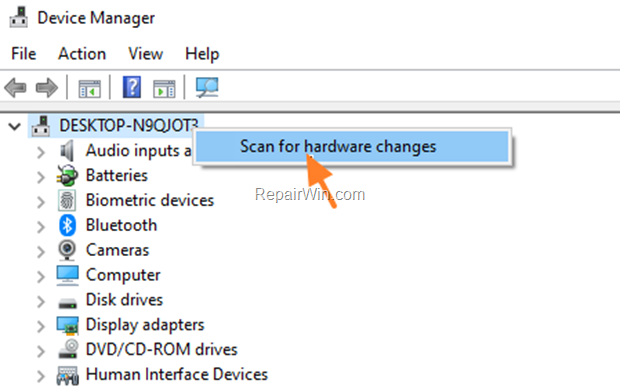
6. After restarting, navigate to device manager again and check if the Camera driver is installed again. If not, right-click on he computer name (on the top) and click Scan for hardware changes.
7. Finally open your video conferencing program and check if your camera is working normally. If not, go to your laptop or camera manufacturer’s support site and install the drivers from there.
Method 4. Rollback NVIDIA Video Drivers. *
* Note: This method only applies to computers with an NVIDIA graphics card installed.
Because some users reported that the B&W issue on camera, appeared after updating NVIDIA drivers, rollback to the previous version of NVIDIA Video drivers. To do that:
1. Navigate to Device Manager and expand Display Adapters.
2. Right-click on NVIDIA display adapter and select Properties.
3. At Driver tab, click the Roll Back Driver button.
4. Follow the onscreen instructions to install the previous driver version.
5. Restart your PC and test your camera. *
* Note: If the problem is not fixed, proceed and install manually the latest or a previous NVIDIA driver version for your display adapter.
That’s all folks! Did it work for you? Please leave a comment in the comment section below or even better: like and share this blog post in the social networks to help spread the word about this solution.

