If Windows 10 KB5007186 Update constantly fails to install with error 0x800f0922, continue reading below to fix the problem.
Problem in details: After downloading KB5007186 Update, Windows 10 prompt to restart the machine to install it. But on restart, Windows 10 informs that “We were unable to complete the updates. Undoing changes” and display the following error in Windows Update: “Failed to install update KB5007186 – 0x800f0922″

This tutorial contains several methods to fix the Windows 10 Update error 0x800f0922.
How to FIX 0x800f0922 Update Error in Windows 10.
Important: Before installing proceeding to the methods below, perform the following actions:
- Ensure that you have enough free space on your disk. Windows 10 requires at least 32 GB of free space to upgrade.
- Run Disk Cleanup and delete all the useless files.
- Download and install the latest Servicing Stack update according your Windows 10 version.
Method 1. Re-Download the Windows Update(s).
The first step to troubleshoot Windows 10 update problems, is to force Windows to download the updates from scratch. To do that:
Step 1: STOP the Windows Update Service.
1. Open Windows Services control panel: To do that:
- Press Windows
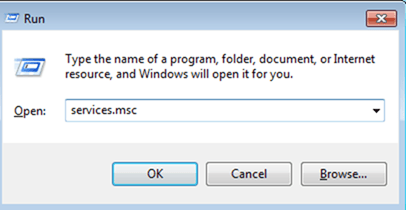
 + R keys to open the run command box.
 - In the Search box, type: services.msc & click OK.
- Press Windows
2. In Services control panel locate the “Windows Update” service.
3. Right-click on Windows Update service and select “Stop“.

Step 2: Delete the SoftwareDistribution folder.
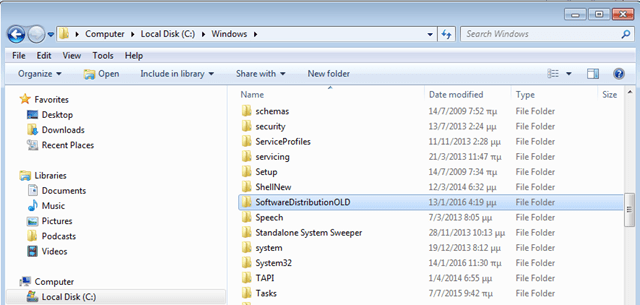
1. Open Windows Explorer and navigate to: C:Windows folder.
2. Find and Delete the “SoftwareDistribution” folder (or rename it. e.g. to “SoftwareDistributionOLD”) . *
* Note: If you cannot delete the folder, start Windows in Safe Mode.
Step 3: START the Windows Update Service.
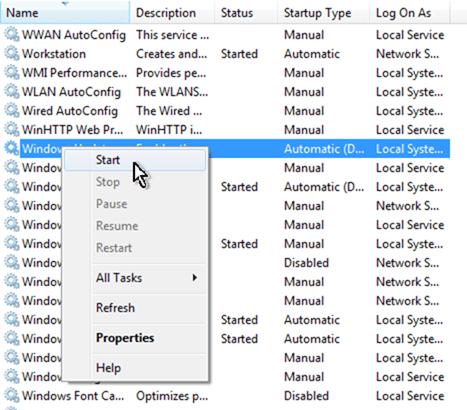
1. Open Windows Services control panel.
2. Right-click on Windows Update service and select “Start“.
Step 4. Check & Install Updates.
1. Finally, go to Settings -> Update and Security -> and click Check for Updates.
Method 2. Fix 0x800f0922 error by Installing Microsoft Edge.
Error 800f0922 in the Windows 10 update may occur on computers from which Microsoft Edge has been removed. So, if you have previously uninstalled Edge from your machine, perform one of the following actions:
A. Re-install Microsoft Edge browser on your computer and try to install the update again.
B. Proceed to delete the “Edge” folder at this location on your disk before installing the failed update:
- C:Program Files (x86)MicrosoftEdge
Method 3. Fix Error 0x800f0922 by Activating .NET Framework.
1. Launch Programs and features. To do that
- Press Windows
 + R keys to open the run command box.
 - In the Search box, type: appwiz.cpl & click OK.
- Press Windows

2. Click Turn Windows features on or off.

3. Check the .Net Framework 3.5 and click OK.

4. Then select Download Files from Windows update.
5. Let Windows to download and install Net Framework 3.5. *
* Note: If you cannot install Framework 3.5 by using the above steps, then follow the instructions in this tutorial: FIX: Net Framework 3.5 0x800f081f Installation Error.
6. After Framework installation restart your computer.
7. Try to update Windows again.
Method 4. Install Windows Update Manually.
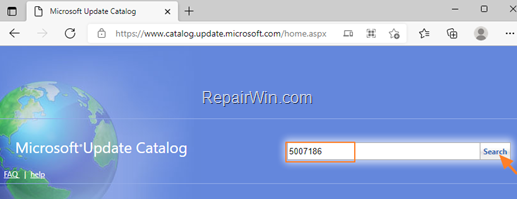
1. Navigate to Microsoft Update Catalog.
2. On the search box type the number of the failed update (e.g. “5007186”) and click Search.
3. Now according your Windows version, download the corresponding update.
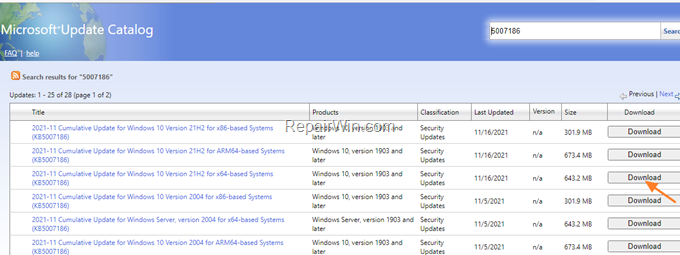
4. When the download is completed, double-click at the downloaded file to install the update.
Method 5. Repair Windows Component Store & System Files.
1. Open Command Prompt as Administrator.
2. In command prompt give the following command and press Enter:
- DISM /Online /Cleanup-Image /StartComponentCleanup
![image_thumb[6] image_thumb[6]](https://qnet88.com/wp-content/uploads/2021/12/image_thumb6_thumb-1.png)
3. When the process is completed, give the following command:
- DISM.exe /Online /Cleanup-image /Restorehealth

4. When the DISM operation is completed, type the following command and hit Enter:
- sfc /scannow

5. Now wait until the System File Checker repairs the Windows System Files.
6. When this done, restart your computer and try to install the update.
Method 5. Update Windows 10 by using the Update Assistant.
1. Navigate to Windows 10 download site and click the Update now button.

2. Save the “Windows10Upgrade9252.exe” file on your desktop.
3. Double click at the downloaded file to open the Windows Upgrade Assistant.
4. Click Update Now to start the update.

5. Let Windows to finish the downloading and the verification.
6. When the verification is reaches 100%, disconnect your computer from the Internet, (or set it to “Airplane mode” if you own a laptop).
7. Wait until Windows updating your system.
8. When prompted, restart your system to install the update.
That’s all folks! Did it work for you? Please leave a comment in the comment section below or even better: like and share this blog post in the social networks to help spread the word about this solution.

