I have seen the 100% disk usage issue in many Windows 10 and Windows 8 & 8.1 systems, and I have implemented different solutions to solve the problem because it can be due to various reasons.
In most cases, the 100% disk utilization problem in Windows 10, appears in systems with Serial ATA (SATA) hard drives (and not with SSD disks), and in other cases the problem may appear after a virus/malware attack or because of a problematic Windows service or other reasons.
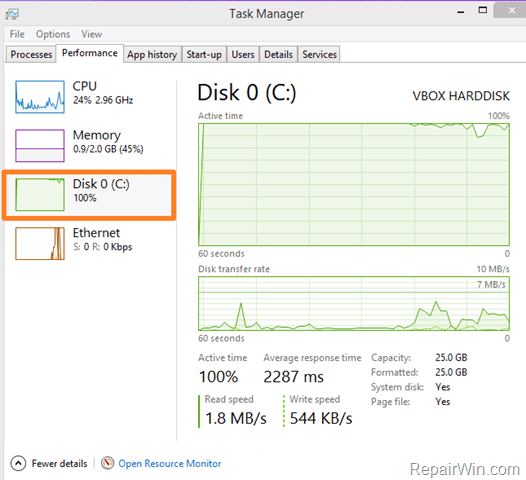
In this tutorial you can find several methods to fix the high Hard Disk Usage (100%) issue in Windows 8, 8.1 & 10 based computers.
- Related article: FIX High CPU and DISK Usage issues on Windows 10
How to Resolve the Disk High Usage (95-100%) issue in Windows 10.
Solution 1. Scan your computer for viruses.
Solution 2: Disable Windows notifications.
Solution 3. Disable the MSI mode in Storage Controller.
Solution 4. Locate & Terminate the process which causes the hard disk’s 100% usage.
Solution 5. Run Windows Maintenance Tasks.
Solution 6. Rebuild Index.
Method 1. Scan your computer for viruses.
Important: Many viruses or malicious programs can cause your Hard disk to work at 100%. So, before you continue to troubleshoot the hard disk’s 100% usage issue, use this Malware Scan and Removal Guide to check and remove viruses or/and malicious programs that may be running on your computer.
Method 2: Disable Windows notifications.
I have tried this solution several times in Windows 10 systems with successful results, but I haven’t test it in Windows 8 or 8.1 systems.
– To disable notifications on Windows 10. (For Windows 8, 8.1 instructions click here).
1. Click on the Windows flag (Start menu) and open Settings.

2. At settings window, select System.

3. Select Notifications & actions at the left and then set the Show me tips about Windows notifications to OFF.
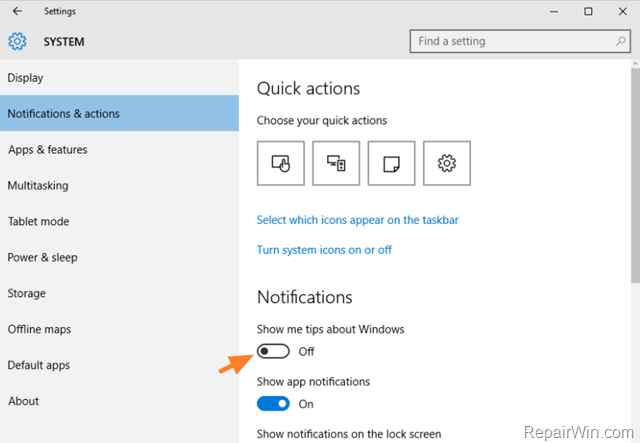
4. Close settings window and check if the HDD 100% usage problem persists. If persists, then try to turn off all other notifications.
– To disable notifications on Windows 8 & 8.1.
1. Press Windows ![]() + C keys simultaneously.
+ C keys simultaneously.
2. Select Settings and then click Change PC Settings.
3. On the left click Search and Apps and then select Notifications.
4. Set the Show app Notifications to OFF

Method 3. Disable the Message Signaled Interrupt (MSI) mode in Storage Controller.
In many cases, the 100% disk utilization is occurred in systems where the Message Signaled Interrupt (MSI) mode is enabled in the inbox StorAHCI.sys driver.
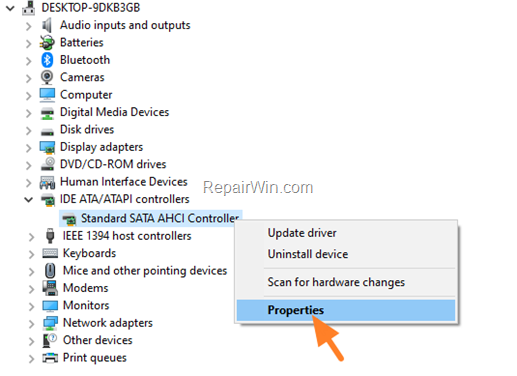
1. Open Device Manager Manager & expand the IDE ATA/ATAPI Controllers.
2. Right-click on the SATA AHCI controller and select Properties.
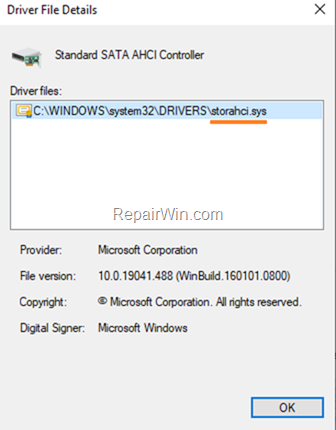
3. At Driver tab, click Driver Details.
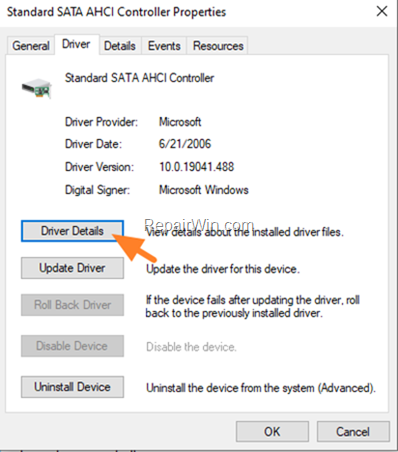
4. If you see the “StorAHCI.sys” in the list of Driver files, click OK and continue to next step, otherwise, (if you don’t see the “StorAHCI.sys”), close all windows and continue to the next method.
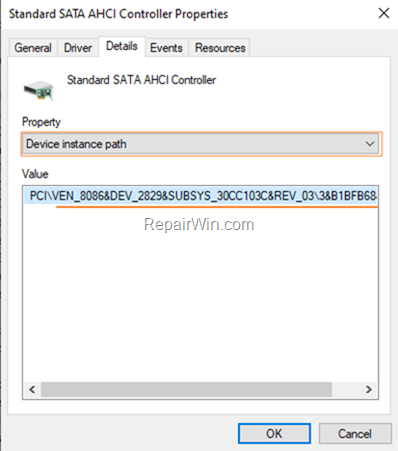
5. Now select the Details tab and select the Device instance path from the Property drop-down menu.
6. Notice the path in value box and leave that window open.
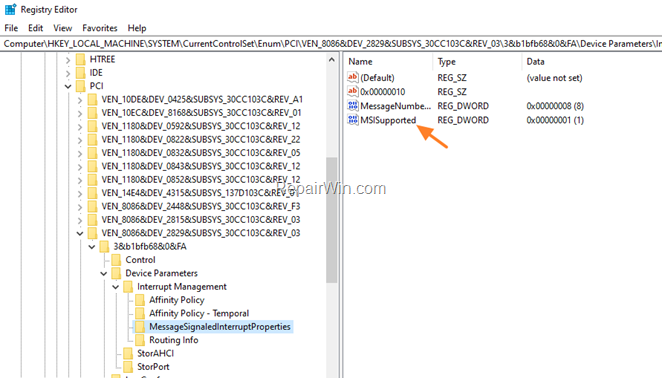
7. Open the Registry Editor and navigate to this location:
- HKEY_LOCAL_MACHINESystemCurrentControlSetEnumPCI <Device instance path>Device ParametersInterrupt ManagementMessageSignaledInterruptProperties
* Note: Where <Device instance path> = the path you noted in the previous step. (e.g. in this example: “VEN_8086&DEV_2829&SUBSYS_30CC103C&REV_033&B1BFB68&0&FA”
8. At right pane, double click at MSISupported REG_DWORD value.
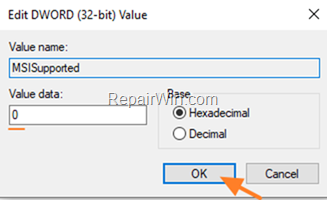
9. Change the value data from 1 to 0 and click OK.
10. Close the Registry Editor and reboot the PC.
11. After restart, check if high disk usage problem is solved.
Method 4. Locate & Terminate the process which causes the high hard disk usage.
In this method I ‘ll show to you, how you can find and terminate the process that makes your disk to work at 100%.
1. Right click on Start menu ![]() and select Task Manager.
and select Task Manager.
2. Click the More details option if the Task Manager is in default (simple) view.
3. At Performance tab click Open Resource Monitor.
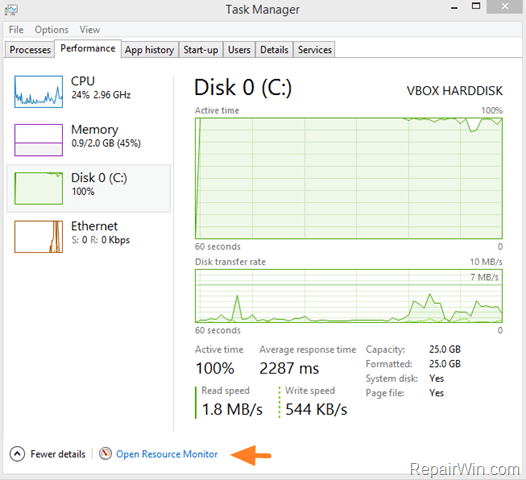
4. At Resource monitor select the Disk tab.

5. Now put the two open Windows {Resource Monitor: Disk & Task Manager: Performance}, side by side on your screen. as in the screenshot below.
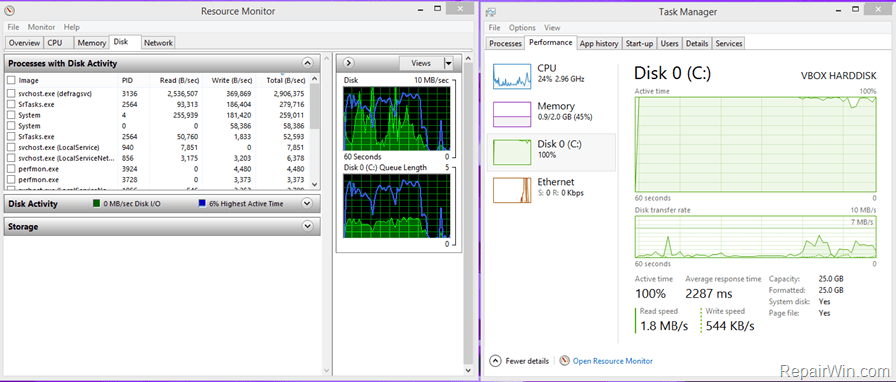
6. At the Resource Monitor window, right click on the first listed process and select Suspend Process.
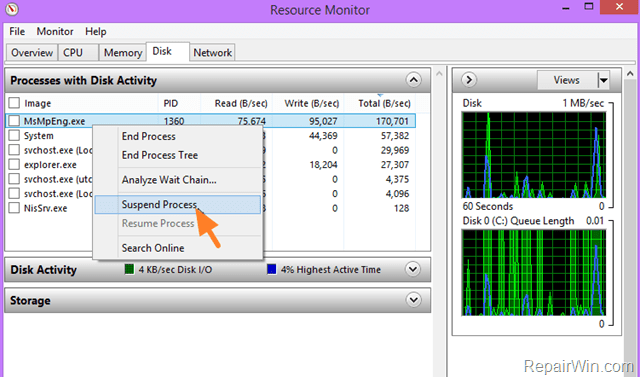
7. After you have suspended the process, wait a few seconds (e.g. 10 sec) and then look if the Disk utilization percentage at the other open window has dropped down (Task Manager: Performance).
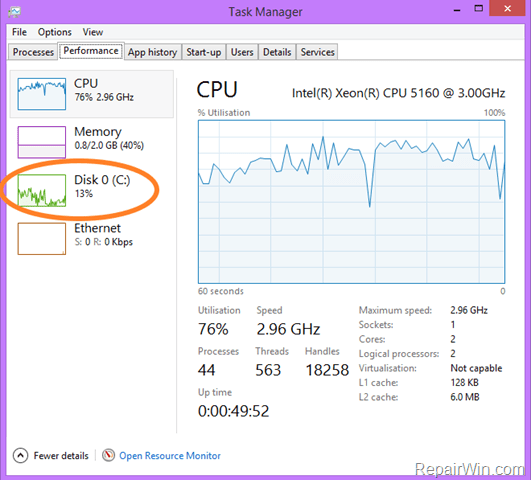
8. If Disk utilization percentage has decreased, then the next step is to troubleshoot the suspended process or to prevent it from running. If the disk usage is not decreased, then suspend the next process on the list, until you find out which one causes your hard disk to work at 100%.
Bellow is a list of services that can cause your system’s CPU, Memory or Hard Disk to work at 100%.:
- Windows Update
- BITS (Background Intelligent Transfer Service)
- Windows Search
- Superfetch
Try to disable the above services, one-by-one at a time and then restart your computer, until you find out which of them causes your system components (Hard Disk, CPU or Memory) to work at 100%.
Note: To Disable a Windows service:
1. Press Windows ![]() + R keys to open the run command box.
+ R keys to open the run command box.
2. In the Search box, type: services.msc & click OK.
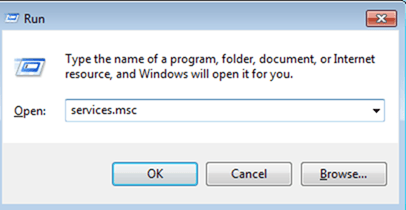
3. Locate at the services list, the service that you want to disable. (e.g. the “Windows Update” service).
4. Right-click on the service and select “Stop”.

5. Restart your computer.
Method 5. Troubleshoot Windows problems by Running the Maintenance Tasks.
– On this method you can learn how to Troubleshoot several problems on your computer in order to decrease the usage of your hard disk.
1. Right click to Start menu ![]() and select Control Panel.
and select Control Panel.
2. Open Troubleshooting.
* If you don’t see the Troubleshooting option, set the View (View by) to Small icons.
3. Under System and Security select Run Maintenance Tasks.

3. Press Next and then wait until the System Maintenance utility detecting problems.
4. Follow the on screen instructions to fix the problems found.
Method 6. Rebuild Index.
– Another solution to resolve the 100% high usage issue on your hard disk, CPU or Memory is to rebuild the Index.
1. Navigate to Windows Control Panel and open Indexing Options.*
* If you don’t see the Indexing Options, set the View (View by) to Small icons.
2. At Indexing Options click Modify.
3. Uncheck Offline Files* and press OK.
4. Then click Advanced.
5. At Troubleshooting section, click the Rebuild button.

6. Press OK to rebuild the Index.
7. Wait until the index rebuilding is completed and then restart your computer.
That’s all! Did it work for you?
Please leave a comment in the comment section below or even better: like and share this blog post in the social networks to help spread the word about this solution.


