.single .post-author, .post-date {
text-transform: none;
}
,
Last updated: March 27th, 2025
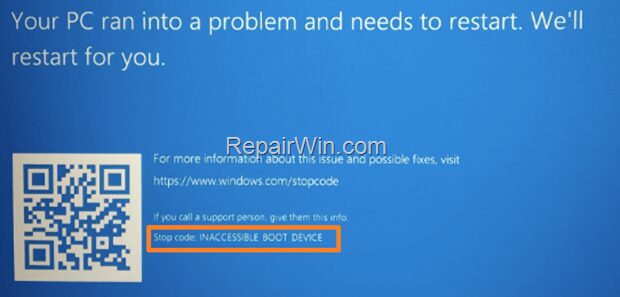
The “Inaccessible Boot Device” BSOD issue may appear after updating BIOS or Windows 10/11. The “Inaccessible Boot Device” Blue Screen of Death (BSOD) is a common error that occurs in Windows operating systems, indicating that the system cannot access the primary hard drive to boot from.


Common Causes of the “Inaccessible Boot Device” BSOD error.
- Incorrect Boor Order configuration
- Incorrect Disk Controller Configuration.
- Damaged Drive.
- Damaged File System.
This article contains step-by-step instructions to fix the Inaccessible Boot Device BSOD error in Windows 10/11 (stop code 0x0000007b).
How to FIX: Inaccessible Boot Device error after updating/upgrading Windows 10/11 or BIOS.*
* Note: The problem may also occur after resetting the BIOS/UEFI settings to their defaults.
1. Check Boot Order in BIOS/UEFI.
Enter in your system’s BIOS or UEFI settings and verify that the correct drive is set as the Primary Boot device.
1. Power On your system and press the corresponding key* to enter into BIOS/UEFI SETUP
* Usually is the DEL or F1 or F2 or F10 key. (depends on device/motherboard manufacturer).
2. Go to the Boot Order settings and make sure that the drive with the operating system is set as the first boot device in the list.*
* Note: In UEFI systems, set as first boot device the “Windows Boot Manager”.
3. Save and exit the BIOS settings and let Windows boot normally. If you get the “Inaccessible Boot Device” BSOD again, continue to the next solution.
2. Disable RAID mode in BIOS/UEFI.
The next method to fix the “Inaccessible Boot Device” BSOD problem, is to disable the RAID Mode in BIOS settings.
1. Power On your system and into BIOS /UEFI SETUP.
2. After entering in BIOS/UEFI settings, do one of the following:
- If you have a pre 6th Gen/Series CPU (e.g. Intel i5 5xxx), find and change the SATA Mode setting from RAID to AHCI or disable* the Intel Rapid Storage controller (Intel RST).
- If you own a CPU from 6th Gen/Series and above (e.g. Intel i5 6xxx), find and disable* the Intel VMD controller under Advanced settings > VMD Setup menu (or VMD Configuration).
* Note: If you have installed Windows with RAID mode enabled, then change the ‘SATA Mode’ from ‘AHCI’ to ‘RAID’ or enable the VMD Controller.
3. Fix Hard Disk Errors with CHKDSK.
Requirements: A Windows Installation Media on a USB disk.
In order to perform the below steps, you will need to boot you computer from a Windows USB installation media. If you don’t own a Windows 10/11 USB Media, you can create one using these instructions:
- How to Create a Windows 10 USB Installation Media.
- How to Create a Windows 11 USB Installation Media.
1. Boot your computer from the USB Windows Installation media.
2. Press Next at Language options screen.
3. Choose Repair your computer.
4. Then choose Troubleshoot -> Advanced Options –> Command Prompt.


5. In command prompt type: diskpart & press Enter.
6. In “DISKPART” prompt, type: list volume & press Enter.
7. Now find out the Drive letter of the Operating System (OS) volume.
* Note: The OS Volume is usually the biggest volume in size (GB) and contains the Windows Operating System.
e.g. At the example screenshot below, the OS volume is located at drive “D“.


8. Type exit to close the DISKPART tool.
9. Then give the following command to repair the OS drive and press Enter. *
- chkdsk X: /R
* Note: Replace the letter “D”, according your case. (e.g. In this example the command is: “chkdsk D: /R”.
10. Now wait for the disk check process to finish. (it will take several hours).
11. When the check disk process is completed, close all open windows and restart your computer. If Windows fails to boot again, then continue to the next step.
4. Repair System Files and Windows with the SFC & DISM Tools.
1. Boot your computer from the Windows Installation media.
2. Press Next at Language options screen.
3. Choose Repair your computer.
4. Then choose Troubleshoot -> Advanced Options –> Command Prompt.
5. Give this command to repair the offline Windows image: *
- dism.exe /Image:D: /Cleanup-Image /Restorehealth
* Notes:
1. Where “D” = the Windows OS drive. (See method 2 above to find the OS drive letter, and change it according your situation).
2. Don’t forget the space between & /
3. If the above DISM command cannot run with “error 5: The scratch directory size might be insufficient to perform this operation”, then give the following commands:
- mkdir D:Scratch
- dism.exe /Image:D: /ScratchDir:D:Scratch /Cleanup-Image /Restorehealth


6. When the DISM operation is completed, give the following SFC command to complete the repairs. *
- SFC /SCANNOW /OFFBOOTDIR=D: /OFFWINDIR=D:Windows
* Notes:
1. Where “D” = the Windows OS drive. (Change it according your situation)
2. Don’t forget the space between & /


7. When the operation is completed, reboot your computer. If your system fails to boot again, proceed to next method.
5. Repair Boot Configuration Data (BCD).
The third method to fix the “Automatic Repair couldn’t repair your PC – SrtTrail.txt”, is to repair the BCD. To do that:
1. Boot your computer from the Windows recovery media.
2. Press Next at Language options screen.
3. Choose Repair your computer.
4. Then choose Troubleshoot -> Advanced Options –> Command Prompt.
5. In command prompt type: diskpart & press Enter.
6. In “DISKPART” prompt, type: list volume & press Enter.
7. Now, according your case…
a. If you see a FAT32 (FS) partition, then you own a UEFI based system.
At this case, follow the instructions at Case A. Repair BCD on UEFI Based Systems.b. If you don’t see a FAT32 (FS) partition, and all partitions are NTFS, then you own a BIOS/MBR/Legacy based system.
At this case, follow the instructions at Case B. Repair BCD on LEGACY Based Systems.
e.g. At the example screenshot below, the system is UEFI based.


Case A. How to Repair BCD on a UEFI Based System.
1. If your system is UEFI, then notice the Volume number of the FAT32 * partition and the drive letter of the Operating System (OS) volume.
e.g. At the example screenshot below, the FAT32 partition is located at “Volume 1” and the OS volume has the drive letter “D“.


2. Now select the FAT32 volume, with the following command and press Enter. *
- select volume 1
* Note: Replace the number “1”, with whatever volume number is your System drive.
3. Then assign the drive letter “Z” at the selected volume with this command:
- assign letter=Z
4. Type exit & press Enter, to close DISKPART utility.


5. Finally give the following command to fix the boot configuration data and press Enter. *
- bcdboot D:windows /s Z: /f ALL
* Note: Replace the letter “D” with whatever drive letter it is for your OS Volume.


6. Type exit & press Enter to close command prompt.
7. Remove the recovery media and Restart your PC.
8. Test if your system can boot to Windows normally. If your system still does not start, then continue to next method.
Case B. How to Repair BCD on a LEGACY Based Systems.
1. Type exit to close the DISKPART utility.
2. Then give the following commands in order:
- bootrec /fixmbr
- bootrec /fixboot
- bootrec /rebuildbcd
3. If after executing the last command, you receive that “Total Windows installations: 0”, then continue to the next step (4), otherwise skip to step 5.


4. If you receive that”Total Windows Installations=0” then give the following commands in order:
- bcdedit /export C:bcdbackup
- C:
- cd boot
- attrib bcd -s -h –r
- ren C:bootbcd bcd.old
- bootrec /rebuildbcd
5. Press “A” to add the installation to boot list and press Enter. Then restart your system.


6. Close command prompt window.
7. Restart your computer and if the boot problem persists, then continue to the next step.
6. Diagnose Hard Disk’s Health.
If none of the above methods work for you, then your hard disk probably is damaged and you should replace it. To diagnose your hard drive’s health, connect your hard disk to another working computer* and use the diagnostic utilities mentioned on this article to find out if it’s healthy: Best Hard Drive Test & Diagnostic Tools to Check Hard Disk’s Health.*
* Note: If you do not have another computer available to check the hard drive for problems, or if the hard drive is healthy, proceed to the next step.
7. Perform a Clean Windows Installation.
The final step to resolve the “Inaccessible Boot Device” issue is to back up your files and perform a clean install of Windows 10/11 using the instructions in one of the articles below.
- How to clean install Windows 10.
- How to clean install Windows 11.
That’s all folks! Which method worked for you?
Please leave a comment in the comment section below or even better: like and share this blog post in the social networks to help spread the word about this solution.

- Author
- Recent Posts
- FIX: Inaccessible Boot Device BSOD after Windows or BIOS Update. – March 27, 2025
- FIX: Adobe Acrobat does not allow connection to – March 11, 2025
- How to Change Local IP Address 0n Windows 11/10. – March 4, 2025


