Sometimes, you may find that there is no Internet connection after Windows Update. If this happens to you, don’t worry and read the instructions in this guide to fix the problem.
Although Windows Update is important to keep your computer protected from threats and free from operating system problems, sometimes it can cause problems that can make your computer less functional. For example, sometimes after Windows Update you may experience network and Internet connectivity issues, such as no Internet access, or limited Internet connectivity with slow speeds and disconnections.
In this guide you’ll find step-by-step instructions to fix the following problems after updating Windows 10/11.
- No Internet Connection after Windows Update.
- No Internet Access after installing Feature Update in Windows 10/11.
- Limited Network Connectivity after installing Windows Updates.
- Cannot Connect to the Internet after updating Windows 10/11 to its latest version..
How to FIX: Network and Internet Connectivity Problems after Windows Update on Windows 10/11.
Before you go the methods below to troubleshoot the “no Internet access after Windows Update” problem, perform first these easy steps:
1. Restart your PC. *
* Note: If after restarting your computer, the problem is not fixed and you are connected to the network wired, skip to Method 2 below.
2. If you’re disconnected from your Wireless Network after Windows Update, try to connect to it again:
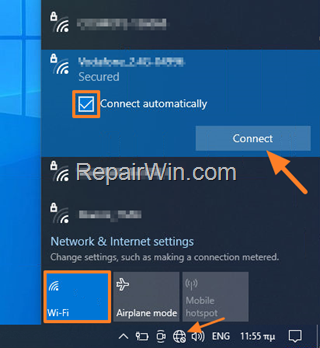
- Click the Network icon on the taskbar.
- Ensure that the Wi-Fi is active and the Airplane mode is disabled.
- Click on your Wireless network, select Connect automatically and click Connect. *
- Finally, type your Wi-Fi password to connect again to the wireless network.
* Note: If you don’t see any available wireless networks, proceed to Method 2 below:

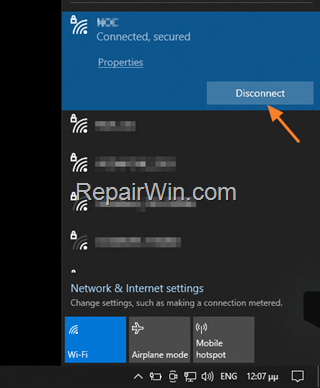
3. If you’re connected to a Wireless Network after Windows Update, but you haven’t Internet access:
- Click the Network icon on the taskbar.
- Click on your Wireless Network and click Disconnect.
- Wait few seconds, and then click Connect to re-connect to your wireless network again.
- If after, reconnecting to your wireless network you still cannot access the Internet, proceed to Method 2 below.

Method 1. Forget the Wireless Network.
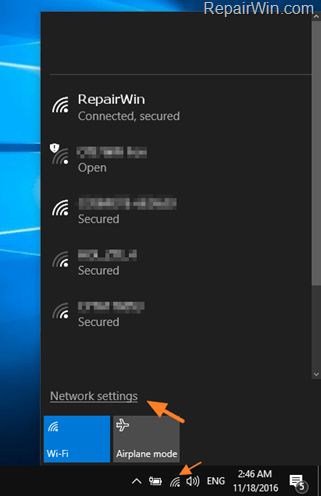
1. Click the Wireless icon on Taskbar and then select Network settings.

2. At Wi-Fi options, click Manage known networks.
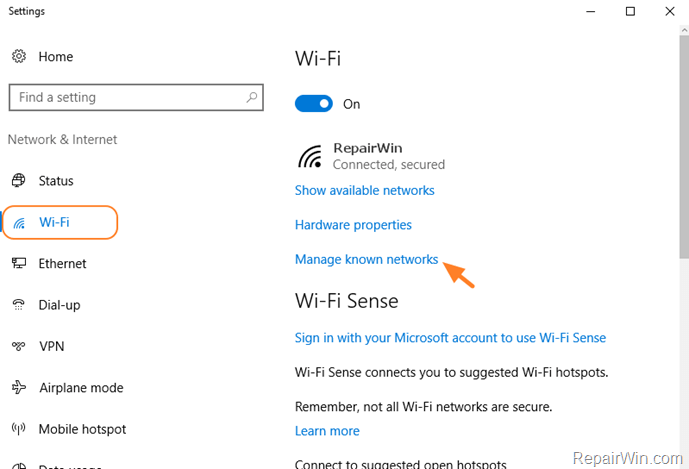

3. Select your Wi-Fi network and click Forget, to delete the selected network profile and the connections details for it.


4. Then, click on the Network icon on the taskbar, select your wireless network and connect to it again.
5. Check to see if your Internet connection has been restored, and if not, go to the next method.
Method 2. Disable and Re-Enable Network Adapter.
1. Press Windows ![]()
![]() + R keys to open the run command box.
+ R keys to open the run command box.
2. Type: control ncpa.cpl & click OK.
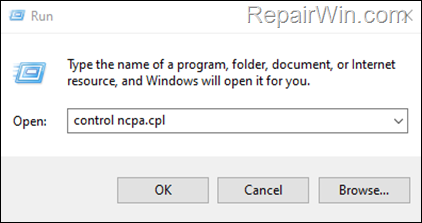

3. Right-click on your network adapter and select Disable.
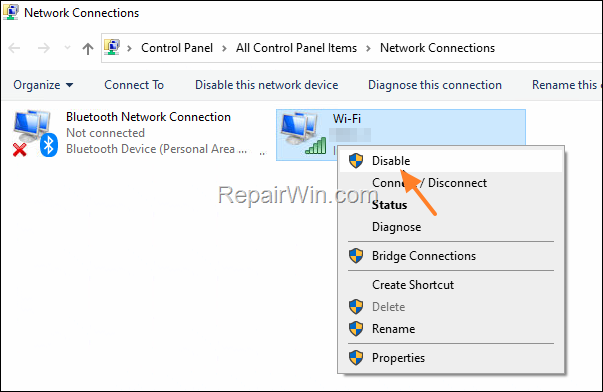

3. Now right-click on the network adapter again and select Enable.
4. Wait few seconds, and check if you can access the Internet.
Method 3. Go Back to an Earlier build Version of Windows 10/11.
Since the “no internet access” issue usually occurred after installing a Feature Update, the next method to resolve the issue is to restore Windows 10/11 to its previous version. To do that:
1. From the Start ![]()
![]() menu choose Settings
menu choose Settings ![]()
![]() and then click Update & security.
and then click Update & security.
2. Choose Recovery on the left and then press the Get started button, under the “Go back to an earlier build” section. *
* Note: If the “Get started” option is grayed out, like in screenshot below, skip to next method.


Method 4. FIX no Internet Connection by Uninstalling Latest Quality Updates.
1. From the Start ![]()
![]() menu choose Settings
menu choose Settings ![]()
![]() and then click Update & security.
and then click Update & security.
2. At Windows Update options, select Update history.
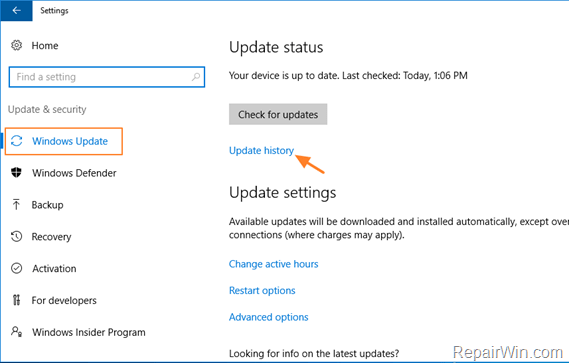

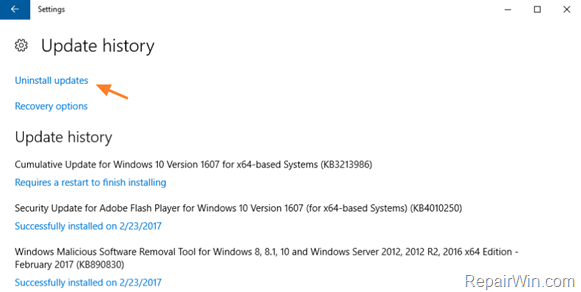
3. Then choose Uninstall updates.

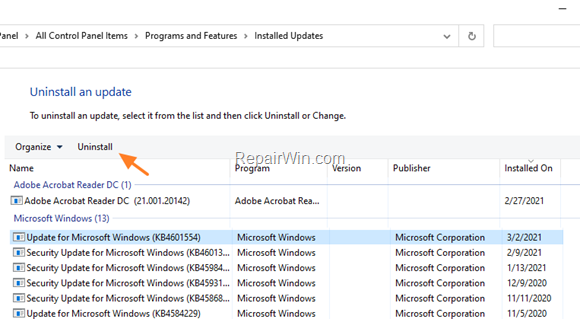
4. Select the latest installed update and click Uninstall.

5. Restart your PC and then check if the problem is fixed, and according the result proceed as follows:
- If the Internet connection/access has been restored, try to reinstall the update. Some times, the
- If you still can’t access the Internet, make sure you’ve removed all the latest Windows updates installed, and continue to the next method.
Method 5. Rollback Network Adapter’s driver.
1. Press Windows ![]()
![]() + R keys to open the run command box.
+ R keys to open the run command box.
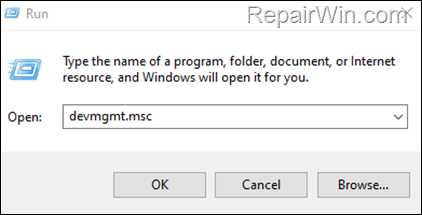
2. Type: devmgmt.msc & click OK.

3. In Device Manager expand Network Adapters.
4. Double-click on the wireless adapter (or on the Ethernet adapter if you’re connected wired to the network/internet), and select Properties.
5. At Driver tab, click the Roll back driver button if it is active. (if it is not, like in screenshot below, skip to next method).
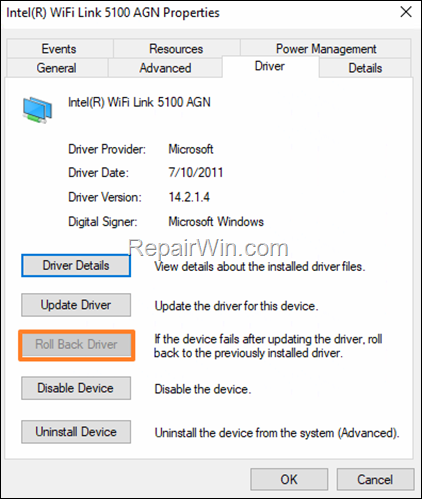

6. Select a reason for rolling back the driver and then click Yes and allow Windows to restore the previous version of the network driver.
7. Restart your PC and check if the problem is fixed.
Method 6. Uninstall & Re-Install Network Adapter.
The next method to resolve the no internet connection issue after installing Windows updates, is to uninstall and reinstall the Wireless/Network adapter. To do that:
1. Navigate to Device Manager and expand Network Adapters.
2. Right-click on the wireless adapter (or on the Ethernet adapter if you’re connected wired to the network/internet), and select Uninstall device.
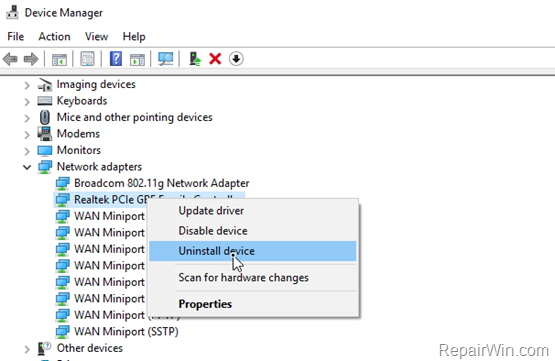

5. At the Uninstall Device – Warning window, click Uninstall.
6. Restart your computer, wait a few minutes for Windows to reinstall the network adapter, and then check if the problem is resolved.
Method 7. Perform a Network Reset.
1. From the Start ![]()
![]() menu choose Settings
menu choose Settings ![]()
![]() and then click Network & Internet.
and then click Network & Internet.
2. At Status page click Network reset.
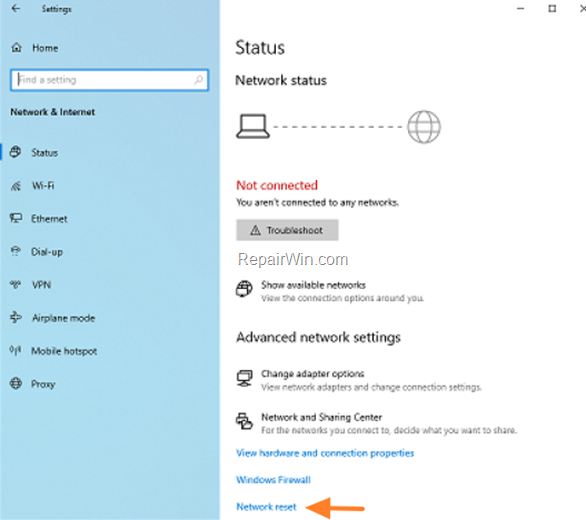

3. Now click the Reset now button, to remove and reinstall all the network adapters and to restore the networking components to their default state.


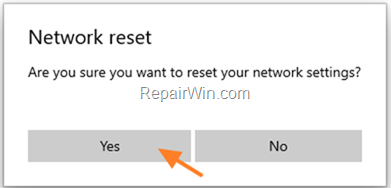
4. Click Yes to Reset the network settings

5. Click Close at “You’re about to be signed out…” message.


6. Restart your PC.
Method 8. Repair Windows Component Store & System Files.
1. Open Command Prompt as Administrator.
2. In command prompt give the following command and press Enter:
- DISM /Online /Cleanup-Image /StartComponentCleanup
![image_thumb[6] image_thumb[6]](https://qnet88.com/wp-content/uploads/2023/04/image_thumb6_thumb-5.png)
![image_thumb[6] image_thumb[6]](https://qnet88.com/wp-content/uploads/2023/04/image_thumb6_thumb-5.png)
3. When the process is completed, give the following command:
- DISM.exe /Online /Cleanup-image /Restorehealth


4. When the DISM operation is completed, type the following command and hit Enter:
- sfc /scannow


5. Now wait until the System File Checker repairs the Windows System Files.
6. When the repair is completed, restart your PC and check if the problem has resolved.
That’s all folks! Which method worked for you? Please leave a comment in the comment section below or even better: like and share this blog post in the social networks to help spread the word about this solution.


