The following error may occurred while trying to install Windows OS from a USB installation disk: “Select the driver to be installed. Load Driver. A required CD/DVD drive device is missing. II f you have a driver floppy disk, CD, DVD, or USB flash drive, please insert it now. Note: If the Windows installation media is in the CD/DVD drive, you can safely remove it for this step“.

The “Select the driver to installed” setup error message, is occurred during Windows 7 installation through a USB flash drive, by using a USB 3.0 port. This problem is caused because the Windows installer media doesn’t have a USB 3.0 driver to install Windows through the USB 3.0 port.
How to bypass the “Select the driver to be installed” error when you try to install Windows from USB.
Nội dung
In order to resolve the “Select the driver to be installed” USB Windows installation error:
Method 1. Remove and Reinsert the USB media.
1. When the “Select the driver to be installed” error, appears click Cancel. (This will bring you back to the first setup screen)
2. Remove and re-insert the USB installation media.
3. Now try to install Windows.
Method 2. install Windows from USB 2.0 Port or from DVD.
1. Shut down the computer.
2. Plug your USB flash drive that contains the Windows setup files to a USB 2.0 port on the computer and start the installation again. *
* Note: If your computer doesn’t have a USB 2.0 port then disable the USB 3.0 support in BIOS settings (if supported), or install Windows from a DVD media.
Method 3. Add USB 3.0 drivers to your Windows USB Media by using Gigabyte’s Windows USB Installation Tool.
The second method to resolve the “Select the driver to be installed” error, is to add USB 3.0 support (drivers) to your Windows 7 installation media.*
* Note: The process requires to have access to another working computer with Windows 8.1 or Windows 10 OS. Use this method if your computer doesn’t have USB 2.0 ports or if you cannot install Windows by using a Windows DVD media.
Step 1. Create a Windows USB Installation Media.
Create a Windows USB installation media by using Microsoft’s USB Creator Tool or by using the Rufus Creator utility.
Related Articles.
- How to create a Windows 10 USB installation media using Media Creation Tool.
- How to Create Windows 10 USB Installation Using RUFUS Creator Utility.
Step 2. Download the Windows USB Installation Tool.
1. Navigate to Gigabyte’s Support Site.
2. At the search box type “Windows USB Installation Tool” (without quotes).

3. Download the corresponding ‘Windows USB Installation Tool’ according to your motherboard series.
4. Unzip the downloaded file and then continue to next step.
Step 3. Add USB 3.0/3.1 Driver Support to Windows 7 USB.
1. Plug the Windows USB Installation Media on the computer.
2. From the extracted folder, double click to run the “WindowsImageTool.exe” application.
3. Now perform the following:
- Select None-Add USB drivers in Source Path.
- Choose the Windows 7 USB installation disk in the Destination Path.
- Finally click Start.
- When the process is completed click Close.

4. Eject the USB drive and use it to install Windows.
Method 4. Add USB 3.0 Support to Windows 7 by using Intel’s Windows 7* USB 3.0 Creator Utility. *
* Note: This method is no longer working because Intel has removed the ‘USB Creator utility’ from its website.
1. Download Intel’s Windows 7* USB 3.0 Creator Utility.
2. Extract the “Win7-USB3.0-Creator-V3.zip” file.
3. Plug the USB flash drive that contains the Windows installation files on the computer.
4. From the extracted “Win7-USB3.0-Creator-V3” folder, right-click at the “Installer_Creator.exe” and select Run as administrator.

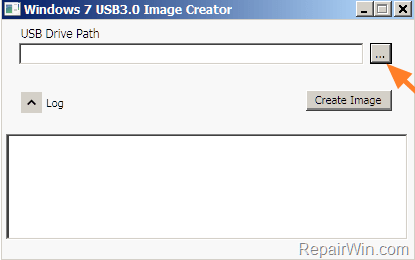
5. Click Browse {…} and select the USB drive letter (that contains the Windows installation files).

6. Finally press the Create Image button and wait until the process is completed.

7. Unplug the USB disk and use it to install Windows.
That’s all folks! Did it work for you?
Please leave a comment in the comment section below or even better: like and share this blog post in the social networks to help spread the word about this.
Bài liên quan
- FIX: Error 0x81000203 in System Restore. (Solved)
- Cannot Access Shared folder. User has not been granted the requested logon type at this computer. (Solved)
- FIX: Cannot clear TPM – 0x80284001, 0x80290300 or 0x80290304.
- Unable to Schedule Teams Meeting in 15 or 10 minutes slots (Solved)
- How to Share Folder without Username/Password on Windows 10/11.
- FIX: Thunderbird High CPU or Memory Usage issues.