This tutorial contains instructions to resolve the following error in Outlook 2016, 2013, 2010, 2007 & 2003: “The file Outlook.pst has reached its maximum size. To reduce the amount of data in this file,select some items that you no longer need, and then permanently delete them (shift +del)”.
The “Outlook.pst has reached its maximum size” error, appears because the Outlook PST data file, reached the limit of data that it can store, and you ‘re not permitted to store additional data on it. For example, if you ‘re using Outlook 2007 the size limit of the PST file is 20 GB, and in Outlook 2016, 2013 & 2010 is 50 GB.
To increase the size limit of Outlook message store (.PST file), follow the steps below:
How to increase the Outlook’s PST Size Limit (Outlook 2016, 2013, 2010, 2007 & 2003).
Step 1. Increase Outlook’s Message Store maximum size limit through Windows Registry.
1. Close Outlook.
2. Press the Windows ![]() + R keys to open the run command box.
+ R keys to open the run command box.
3. Type regedit and press Enter.
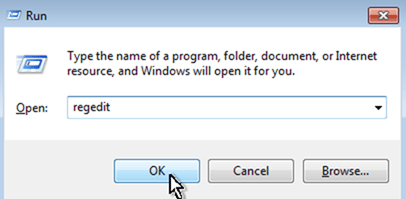
4. Inside Windows registry navigate (from the left pane) at the following path according your Outlook version: *
For Standard (Home) users:
- Outlook 2016: HKEY_CURRENT_USERSoftwareMicrosoftOffice16.0OutlookPST
- Outlook 2013: HKEY_CURRENT_USERSoftwareMicrosoftOffice15.0OutlookPST
- Outlook 2010: HKEY_CURRENT_USERSoftwareMicrosoftOffice14.0OutlookPST
- Outlook 2007: HKEY_CURRENT_USERSoftwareMicrosoftOffice12.0OutlookPST
- Outlook 2003: HKEY_CURRENT_USERSoftwareMicrosoftOffice11.0OutlookPST
For Domain Administrators: (Group Policy)
- Outlook 2016: HKEY_CURRENT_USERSoftwarePoliciesMicrosoftOffice16.0OutlookPST
- Outlook 2013: HKEY_CURRENT_USERSoftwarePoliciesMicrosoftOffice15.0OutlookPST
- Outlook 2010: HKEY_CURRENT_USERSoftwarePoliciesMicrosoftOffice14.0OutlookPST
- Outlook 2007: HKEY_CURRENT_USERSoftwarePoliciesMicrosoftOffice12.0OutlookPST
- Outlook 2003: HKEY_CURRENT_USERSoftwarePoliciesMicrosoftOffice11.0OutlookPST
* Note: If the “PST” key doesn’t exist, then right–click at Outlook key and select New > Key. Give at the new key the name: PST
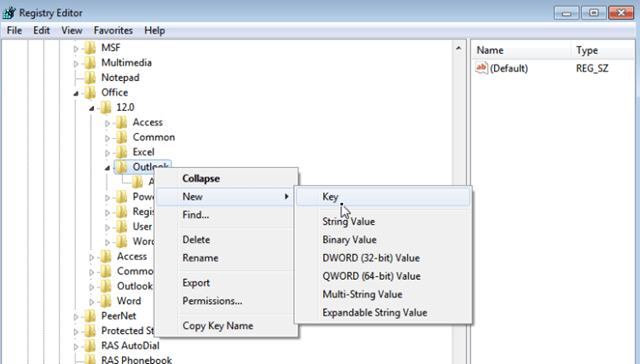
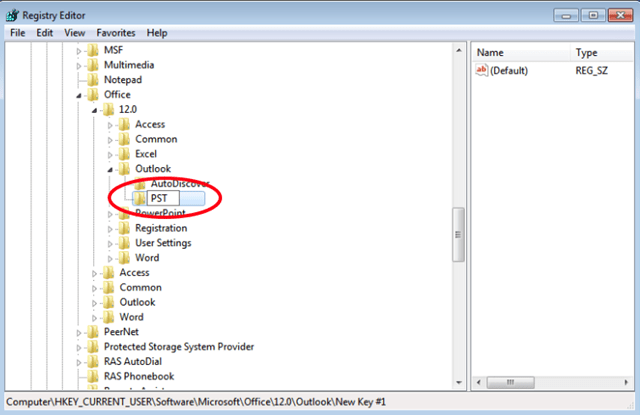
5. Click at PST key and look at the right pane to find these two (2) values: *
- MaxLargeFileSize
- WarnLargeFileSize

* Note: If the above two values doesn’t exist, then right–click at an empty space on the right pane and select New > DWORD Value. Give at the new DWORD Value the name MaxLargeFileSize & press Enter. Perform the same operation to create a new DWORD value with name: WarnLargeFileSize.

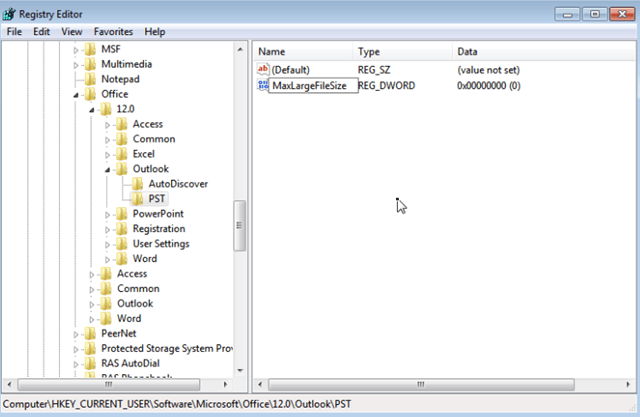
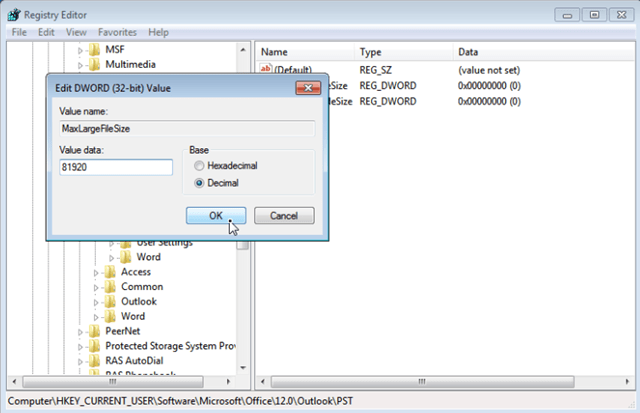
6. Double click to open MaxLargeFileSize value:
a. Select Decimal.
b. Then at the Value data: box type the new maximum size limit for the Outlook message store (PST file) according the following:
- The Outlook 2003 & 2007 default message store maximum limit is 20GB, so you have to specify a size over 20GB.
- The Outlook 2010 & 2013 default message store maximum limit is 50GB, so you must specify a size over 50GB.
- 1GB=1024MB, 10GB=10240MB, 20GB=20480, 40GB=40960MB, 80GB=81920MB, etc.
For example. If you use Outlook 2010 the maximum size limit is 50GB. So you have to specify a larger size e.g. 80GB. For accomplish this, you have to enter the number “81920” (without the quotes) in the Value data box.
c. Select OK.
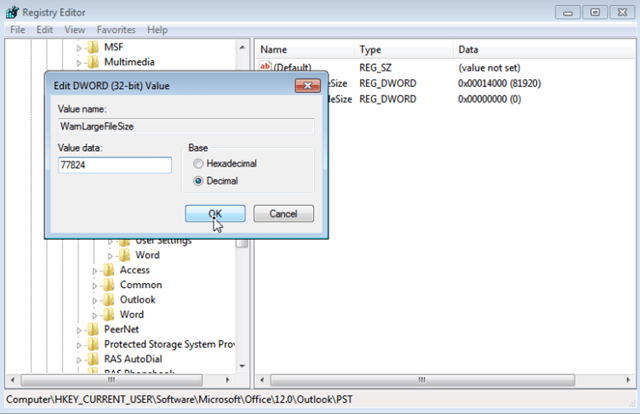
7. Then double click to open the WarnLargeFileSize value:
a. Select Decimal.
b. At the Value data: box type the new warning size limit for the Outlook message store (PST file) according the following:
- The Warning size should be the 95% of the MaxLargeFileSize value you entered before.
For example: If you entered the value “81920” at MaxLargeFileSize, then the WarnLargeFileSize value should be: 81920 X 95% = 77824.
c. Select OK.
8. Close Registry Editor.
9. Finally open Outlook. The “Outlook.pst has reached its maximum size..” error should be gone!
That’s all folks! Did it work for you?
Please leave a comment in the comment section below or even better: like and share this blog post in the social networks to help spread the word about this solution.
Bài liên quan
- FIX: Error 0x81000203 in System Restore. (Solved)
- Cannot Access Shared folder. User has not been granted the requested logon type at this computer. (Solved)
- FIX: Cannot clear TPM – 0x80284001, 0x80290300 or 0x80290304.
- Unable to Schedule Teams Meeting in 15 or 10 minutes slots (Solved)
- How to Share Folder without Username/Password on Windows 10/11.
- FIX: Thunderbird High CPU or Memory Usage issues.