.single .post-author, .post-date {
text-transform: none;
}
,
Last updated: March 14th, 2024
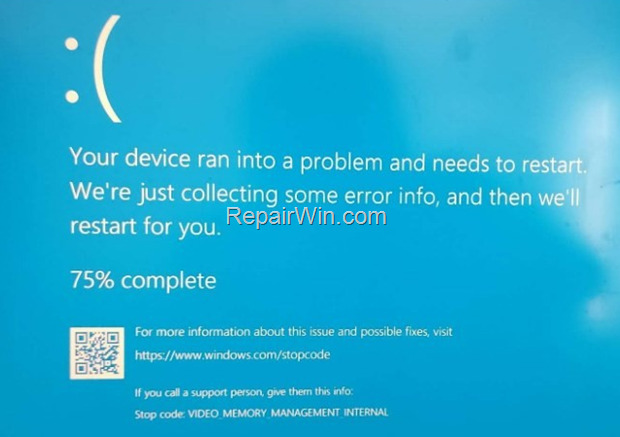
If you computer crashes with blue screen error “VIDEO MEMORY MANAGEMENT INTERNAL” and then restarts, continue below to fix the problem.
The error “Stop code: VIDEO MEMORY MANAGEMENT INTERNAL”, is usually caused by GPU drivers and in some other cases due to GPU overclocking or corrupted system files. To resolve to problem, read the instructions below.


How to FIX: BSOD ‘VIDEO MEMORY MANAGEMENT INTERNAL’ on Windows 10/11.*
* Important: Before you troubleshoot the reported problem using the methods below, remove any CPU or GPU overclocking as this may be the cause of the problem.
Method 1. Reinstall Graphics drivers.
The first method for solving the “VIDEO MEMORY MANAGEMENT INTERNAL” blue screen error, is to remove and re-install the drivers for your graphics adapter.
1. Press Windows ![]()
![]() + R keys to open the run command box.
+ R keys to open the run command box.
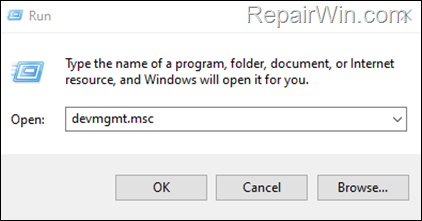
2. Type: devmgmt.msc & click OK to open the Device Manager.


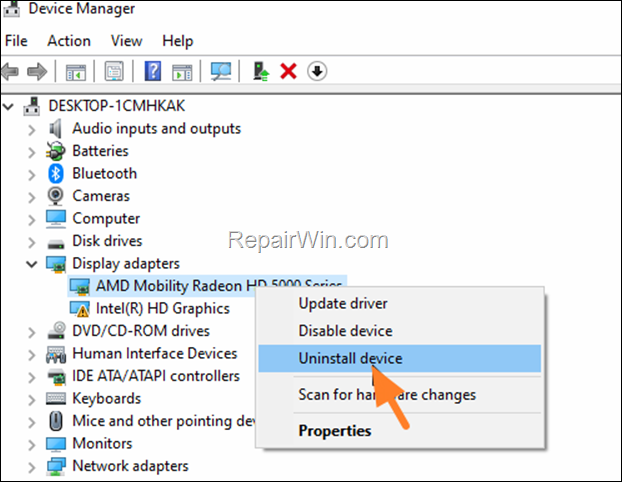
3. In Device Manager, double-click to expand the Display Adapters.
4. Right-click on the installed display adapter(s) and select Uninstall device. *
* Note: For laptops with two display adapters uninstall both the display adapters.


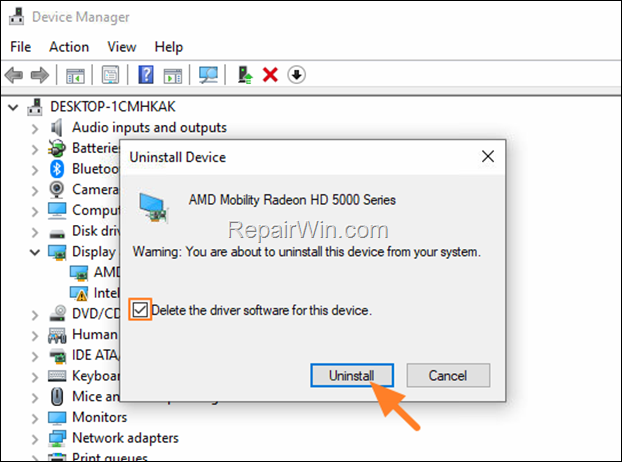
5. At the next window, check the option “Delete the driver software for this device” and then click Uninstall to completely remove the display drivers.


6. Restart your PC and go to Windows Update & Check for Updates. Then, let Windows to download and reinstall the display drivers and then check if the problem is fixed.
* Note: If Windows doesn’t automatically find the drivers, download and install them from the graphics adapter manufacturer’s website.
- NVIDIA drivers
- AMD drivers
- Intel drivers
Method 2. Reinstall an Oldest Video Driver.
If you start receiving the error “VIDEO MEMORY MANAGEMENT INTERNAL” after updating the graphics drivers, then proceed to install an earlier version of your graphics card driver.
Step 1. Uninstall Display Adapter Software.
1. Navigate to Control Panel and open Programs and features, or..
1. Press simultaneously the Windows
+ R keys to open the run command box.
2. Type: appwiz.cpl and click OK.
2. In Programs and Features, uninstall all the software from your graphics adapter.


3. When the uninstallation is complete, restart your PC.
Step 2. Install a Previous version of the Display driver.
After restart, navigate to GPU manufacturer’s support site and download and oldest driver for your Graphics card. To do that:
For NVIDIA based GPU’s.
- Go to NVIDIA advanced driver search page and search for the corresponding driver for your display adapter.
- In the search results page download a previous driver version.
- Install the driver you downloaded and restart your computer.
For AMD based GPU’s.
- Go to AMD (ATI) Driver Download and search for the corresponding driver for your display adapter.
- In the search results page, press the Previous Drivers and Software link at the right.
- Install the driver you downloaded and restart your computer.
Method 3. Disable Onboard Graphics Card. *
* Note: This method works only for laptops with two Display Adapters.
Some users reported that the bsod error “VIDEO MEMORY MANAGEMENT INTERNA” Lis resolved after disabling the onboard graphics adapter. For example, if you own a laptop with an Intel and an NVIDIA (or an AMD) display adapter, proceed and disable the onboard INTEL graphic adapter in device manager, with the instructions below:
1. Press Windows ![]()
![]() + R keys to open the run command box.
+ R keys to open the run command box.
2. Type: devmgmt.msc & click OK to open the Device Manager.


3. In Device Manager, double-click to expand the Display Adapters.
4. Right click on the Intel Display adapter and select Disable.


Method 4. FIX the Explorer Crash issue by Repairing Windows System Files.
Another method to fix blue screen problems, is to repair the Windows system using the below instructions.
1. Open Command Prompt as Administrator. To do that:
1. Press the Windows
+ R keys to open the ‘Run’ command box
2. Type CMD and then press CTRL + SHIFT + ENTER.


2. In command prompt give the following dism command and press Enter:
- DISM.exe /Online /Cleanup-image /Restorehealth


3. When the DISM operation is completed, type the following command and hit Enter:
- sfc /scannow


4. Now wait until the System File Checker repairs the Windows System Files.
5. When this done, restart your computer and check if the problem is fixed.
Method 5. Perform a Windows 10 Repair.
If after following the above methods your system keeps crashing, try to repair Windows by using the instructions mentioned in this article: How to repair-upgrade Windows 10.
Method 6. Clean Install Windows.
If none of the above method helped to fix the mentioned issue, your last option is to perform a clean installation of Windows.
* Note: Some users reported the “VIDEO MEMORY MANAGEMENT INTERNAL” error is gone after installing Windows to a new SSD drive.
* Important: The clean installation of Windows, means that all your files and settings will be lost during the installation process. So, proceed and backup all your important files and settings to another storage media (e.g. to an external USB drive) before you continue to clean install Windows.
To perform a clean installation of Windows (after backing up your files), follow the instructions on the following guides, according your Operating System:
- How to clean install Windows 10.
- How to clean install Windows 11.
That’s all folks! Did it work for you?
Please leave a comment in the comment section below or even better: like and share this blog post in the social networks to help spread the word about this solution.

- Author
- Recent Posts
- FIX: VIDEO MEMORY MANAGEMENT INTERNAL error on Windows 10/11. – March 14, 2024
- How to Show Email Size in Office 365 Outlook OWA. – March 12, 2024
- FIX: SQL Server Polybase .DMP files taking a lot of space. – March 7, 2024


