The following problem appears on a Windows 10 based computer after installing updates: Windows 10 not shutdown completely after choosing ‘Shutdown’ from ‘Power’ options menu. More specifically, the screen goes black, but the machine does not power off, with all the indicator lights (power, wifi, keyboard, etc.) remain on and the only option to fully shutdown the machine, is to press the power button for 5-7 seconds (force shutdown).
This tutorial contains several methods to fix the “Windows Not Fully Shutdown” issue on Windows 10, 8 or 8.1.
How to fix: Windows 10 Not Completely Shutdown .
Method 1. Disable Fast Startup.
The first method to resolve the “not shutdown” issue on Windows 10/8 OS, is to turn off the fast startup. To do that:
1. At the search box type: power
2. Click to open Power & Sleep settings.

3. Click Additional power settings

4. Select Choose what the power buttons do at the left.
5. Then click the Change settings that are currently unavailable option.

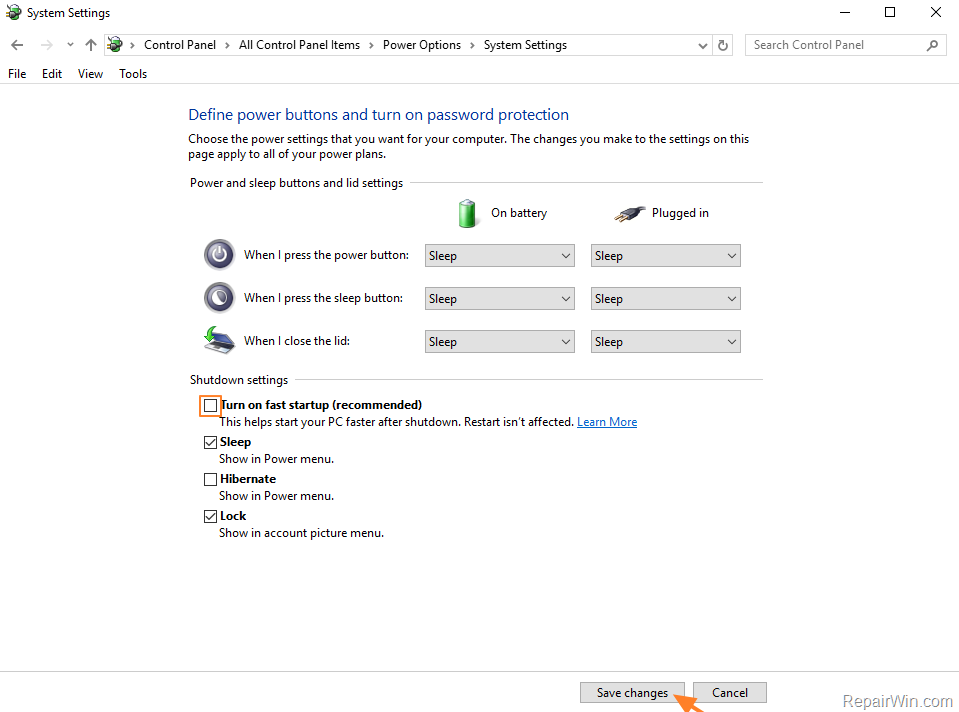
6. Uncheck the Turn on fast startup (recommended) option and click Save changes. *
* Note: If the fast start up option was already unchecked, then check it and restart your computer. After restart uncheck it and restart your computer again.

7. Restart your computer.
Method 2. Disable Hibernate.
The ‘Hibernate’ is a power feature, that uses less power than sleep and when you start up the PC again, you’re back to where you left off. In some cases, the hibernate feature cause your Windows 10 PC to not shutdown completely. To disable hibernate:
1. At the search box type: command prompt or cmd
2. Click to open Command Prompt.

3. At command prompt give the following command and press Enter.
- powercfg -h off
4. Now try to shutdown your computer.
Method 3. Roll Back the driver for the Intel Management Engine Interface.
If you own a laptop or motherboard with Intel chipset, then proceed and rollback the driver for the Intel Management Engine Interface.
1. Press Windows ![]() + R keys to open the run command box.
+ R keys to open the run command box.
2. Type: devmgmt.msc & click OK.
3. Expand System devices.
4. Right click on Intel Management Engine Interface and select Properties.

5. Select the Driver tab and click Roll Back Driver. *
* If the Roll Back Driver button is greyed out, then navigate to your laptop’s or motherboard’s manufacturer support site to download and install an older driver version for the Intel Management Engine Interface.

6. Restart your computer.
Method 4. Modify Power Settings on Network Adapter.
The final method to fix Windows 10 shutdown problems is to modify the power settings for the network adapter.
1. Open Device Manager.
2. Expand Network Adapters.
3. Right click at the installed network adapter and select Properties.
3. Select the Power Management tab.
4. Uncheck the ‘Allow this device to wake the computer‘ checkbox and click OK.

5. Try to shutdown your computer.
That’s all folks! Did it work for you?
Please leave a comment in the comment section below or even better: like and share this blog post in the social networks to help spread the word about this problem.


