.single .post-author, .post-date {
text-transform: none;
}
,
Last updated: March 4th, 2025
This guide contains various methods on how to change the local IP address on a Windows 10/11 based computer.
The local IP address is a unique address which assigned to any device (like a computer, printer, or smartphone) connected to a private network. This address is used for internal communication within the internal network and is not visible on the Internet.
The Local IP addresses on a private network are usually assigned dynamically by a DHCP (Dynamic Host Configuration Protocol) Server which, in most home and small office networks, is located on the ADSL modem/router. This type of IP Address is called Dynamic IP Address.
However, in some cases, eg when there is an IP address conflict or when you are required to have a static IP, there is a need to change the dynamic IP address on your device or to set a Static IP Address, and in this tutorial we will show you how you can do it.
How to Change IP Address on Windows 11/10.
Method 1. Change Dynamic IP Address assigned by the DHCP Server.
As mentioned above, each device connected wired or wirelessly on a private network usually receives dynamically a local IP address from the modem/router’s DHCP server. This IP address is called “Dynamic IP address” and can be changed by doing the following:
1. Open Command Prompt as Administrator. To do that:
1. At Search box, type cmd or command prompt
2. Right-click at Command Prompt result and select Run as Administrator. Then click Yes at the ‘User Account Control’ window.


2. In Command Prompt, give the following commands in order:
- ipconfig /release
- ipconfig /renew
3. That’s it. After giving the last command, your device will receive a new IP address from the DHCP server (e.g. “192.168.1.230” in this example).


Method 2. Set a Static IP Address in Windows 11/10 Settings.
A Static IP address is an IP address that is manually assigned to a device and remains constant, unlike a dynamic IP address which can change periodically as assigned by a DHCP server. To change from a Dynamic to a Static IP address on Windows 11/10, do the following:
Step 1. Find the current IP address settings.
To be able to change the Dynamic IP address to a Static, you should know the current IP, Gateway & DNS addresses given by the DHCP Server. To find out these details, do the following:
1. Open Command Prompt, type the following command and hit Enter:
- ipconfig /all
2. Then notice and write down the numbers shown next to the following labels:
- IPv4 Address (e.g. “192.168.1.230” in this example, which is the current IP address set by the DHCP server, “aka “Dynamic” IP Address)
- Subnet Mask (e.g. “255.255.255.0” in this example)
- Default Gateway (e.g. “192.168.1.1” in this example)
- DNS Server (e.g. “192.168.1.1” in this example)


Step 2. Change the Dynamic IP Address to a Static IP Address.
Once you know the current IP settings, you can set a Static IP by doing the following:
1. Right-click on the Start menu and select “Network Connections,” or, alternatively, go to Settings > Network & Internet.
2. Depending on the type of connection (Ethernet or Wi-Fi) click on the relevant option to open the adapter’s settings.


3. Click the Edit button next to IP assignment:


4. In Edit IP settings window change the setting from Automatic (DHCP) to Manual and then enable the IPv4 option.


5. Now, in the corresponding fields, enter the numbers you noticed in Step-1 above, and when you are done, click the Save button.


Method 3. Change IP Address in Network Connections.
Another method to change the IP address in Windows 11/10, is from Network connections. To do that:
1. Follow the instructions in Step-1 in Method-2 above to find out your current IP address settings.
2. Then, press the Windows ![]()
![]() + R keys to open the run command box.
+ R keys to open the run command box.
3. Type ncpa.cpl and press Enter or OK to open Network Connections.


4. Right-click on the connected network adapter and click Properties.


5. On the adapter’s Properties window, select the Internet Protocol Version 4 (TCP/IPv4) and then click Properties.


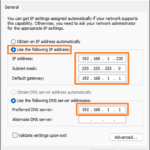
6. Here, select the Use the following address option and then type below (in the corresponding fields), the numbers you noticed after executing the “ipconfig /all” command before (Method-2, Step-1).
7. When done, click OK twice to save and apply the change.


That’s all folks! Which method worked for you?
Please leave a comment in the comment section below or even better: like and share this blog post in the social networks to help spread the word about this solution.

- Author
- Recent Posts
- How to Change Local IP Address 0n Windows 11/10. – March 4, 2025
- FIX: Network Printer Stopped Working after Windows 24H2 update. – February 25, 2025
- 2 Easy Ways to Reinstall Microsoft Store in Windows 11/10. – February 11, 2025


