If you use AnyDesk to remotely control your computer or other devices and want to reset your AnyDesk ID, continue reading below.
The AnyDesk ID is a unique number assigned to each computer when running the AnyDesk application to identify it on the AnyDesk network. If for any reason you want to change the AnyDesk ID on a Windows computer, read the instructions below. *
* Note: Keep in mind that in the AnyDesk Free Version you can change the ID but you cannot change or assign a nickname. You must purchase a corporate or professional version of the program to be able to assign names to computers.
How to Reset AnyDesk ID number and Get a New One.
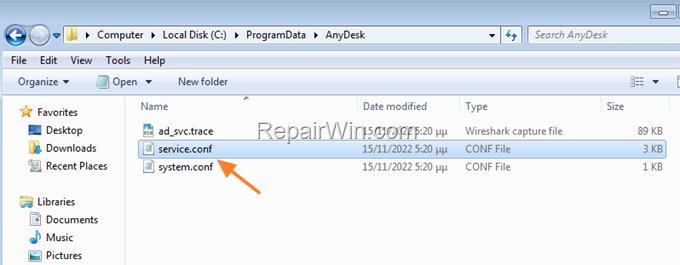
The AnyDesk ID is stored in the ‘service.conf’ file in ‘C:ProgramDataAnyDesk’ folder. To change the current AnyDesk ID and get a new one, jut rename the ‘service.conf’ file as instructed below:
1. Close AnyDesk.
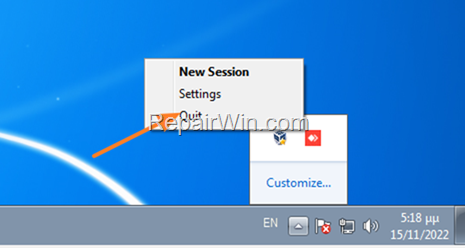
2. Right-click at AnyDesk icon in the taskbar and choose Quit


3. Open Explorer, copy-paste the following address in the address bar and press Enter.
- C:ProgramDataAnyDesk
4. Rename or delete the service.conf file.


5. Now run AnyDesk. A new service.conf file will be created and your AnyDesk ID will be changed. *
* Note: If you follow the instructions above and a new ID is not assigned or you get the message “Disconnected from AnyDesk Network”, proceed as follows:
- Go to Control Panel > Programs and features and uninstall Anydesk.
- Navigate to “C:ProgramData” folder and delete the AnyDesk folder (if exists).
- Navigate to “C:Program Files (x86)” and delete the AnyDesk folder.
- Install AnyDesk again to get a new AnyDesk ID.
That’s all! Did it work for you?
Please leave a comment in the comment section below or even better: like and share this blog post in the social networks to help spread the word about this solution.


