In this article we will show you how you can schedule the sending of an email in Outlook on a specific date and time.
Over the years, email has become an essential communication tool for both personal and business use. Especially in recent years with remote work and virtual meetings, people rely on email more than ever to communicate with colleagues, friends and family.
However, sending an email at the wrong time can sometimes lead to misunderstandings, or miscommunication. This is where email scheduling comes in because it allows users to send emails at a specific time and date.
When the Email Scheduling needed?
There are several reasons why a user might want to schedule an email instead of sending it immediately:
- Different time zone: If a user is sending an email to someone in a different time zone, they may want to schedule the email to arrive during that person’s work hours.
- Business Hours: If a user needs to contact someone outside of normal business hours, scheduling an email to be sent during business hours can help ensure that the recipient receives the message.
- Bandwidth limits: If you need to send a lot of emails, scheduling them to be sent at a later time (eg in the evening) helps to avoid lag while you’re working.
How to Delay – Schedule Email Send in Outlook?
How to send an email later in Outlook for Desktop.
To delay the email sending of a message you compose in Microsoft Outlook:
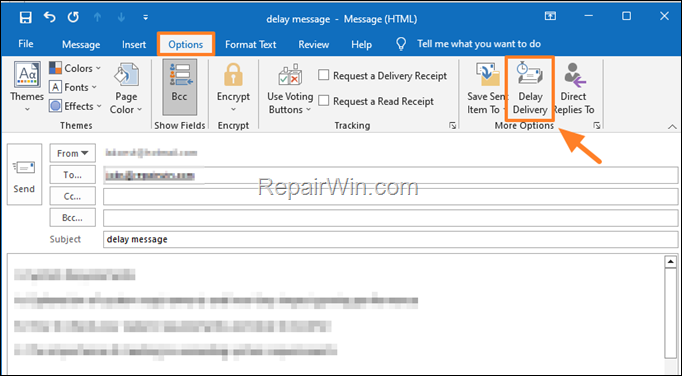
1. Click the Options menu and select Delay Delivery.

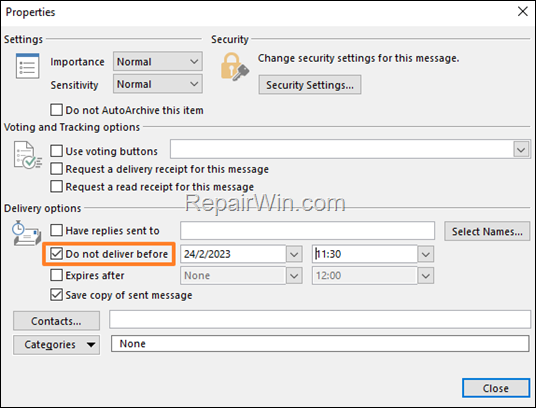
2. Under Delivery options, check the Do not deliver before check box, then select the delivery date and time you want and click Close.

3. Compose your message and when done, click Send.
4. After clicking “Send”, the message remains in the Outbox folder until the delivery time.*
* Note: If your change the decision and you want to send the email immediately, go to Outbox folder open the message and at Options > Delay Delivery options uncheck the Do not deliver before check box and click Close and then Send.
How to send an email later in Outlook for Office365
To schedule the email sending at a later time/date in Outlook for Web or Office365:
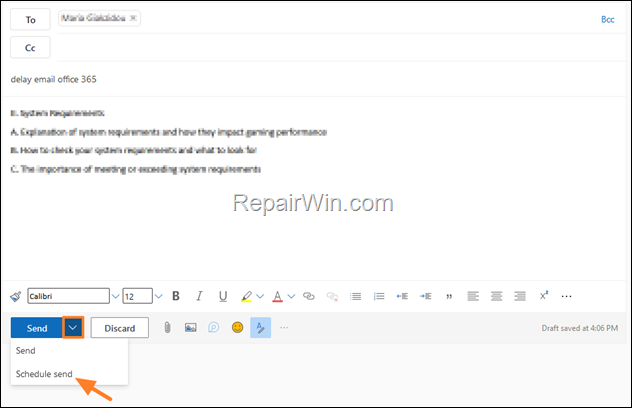
1. When composing the email message you want to delay sending, click the drop-down menu next to the Send button and choose Schedule send.

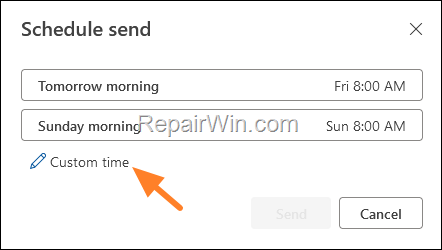
2. Next choose Custom time (if you don’t like the suggested ones).

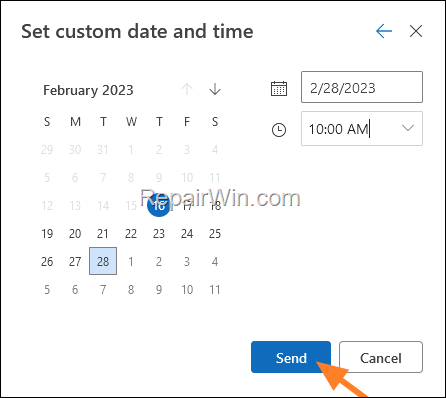
3. Then set the date and time you want to send the email and click Send

That’s all! Which method worked for you?
Please leave a comment in the comment section below or even better: like and share this blog post in the social networks to help spread the word about this solution.


