What is “TuneUp Utilities” ?
“TuneUp Utilities” is a program developed by TuneUp (now is owned by AVG) and is used to speed up your pc performance. In this guide you can find instructions to completely remove TuneUp Utilities from your computer.
Why should you remove it?
“TuneUp Utilities” software was most probably installed on your computer without your knowledge, as additional software, when you downloaded and installed either a new program or the update of an already installed program.
If you want to uninstall TuneUP Utilities from your computer follow the steps below:
How to remove “TuneUp Utilities” from your computer?
Step 1 (Method 1): Uninstall “TuneUp Utilities” software from your Control Panel.
- Open Windows Control Panel. In case you don’t know how to do that, here is what you have to do:
- For Windows 8/7/Vista click at: Start > Control Panel >Programs and Features.
- For Windows XP click at: Start > Settings > Control Panel > Add or Remove Programs.
- From the program list find and remove/uninstall the following applications:
- TuneUp Utilities
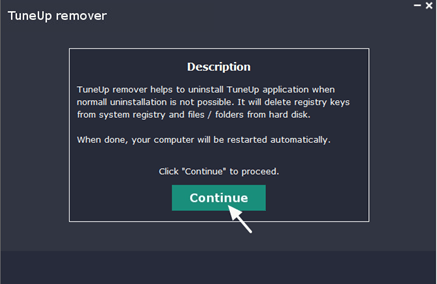
Step 1 (Method 2): Uninstall “TuneUp Utilities” software using TuneUp Remover tool.
If you cannot uninstall TuneUp Utilities using the above step then:
- Download and run the AVG PC TuneUp and TuneUp Utilities Remover tool (TuneUp Remover) from here.
- Press Continue to proceed.
- Be patient until TuneUp Remover uninstall TuneUp Utilities from your computer.

Step 2 (Optional): Check your computer with Malwarebytes Anti-Malware.
- Download and install “Malwarebytes Anti-Malware Free“. (Beware: at the last screen of installation, uncheck the box next to “Enable free Trial of Malwarebytes Anti-Malware PRO” in order to use the free version of this GREAT software).
- Run Malwarebytes Anti-Malware and at the “Scanner” tab, select the “Quick Scan” option and press the “Scan” button.
- Wait until this process is finished. Then click the “Show Results” button to review its findings.
- Right-click to “Select All” items found and press the “Remove Selected” button.
- Restart your computer if needed and you ‘re done.
That’s all folks! It might sound like a lot of work, but in reality you’ll be free from “TuneUp Utilities” in less than 10 minutes, if you follow these instructions. Did it work for you? Please leave a comment in the comment section below or even better: like and share this blog post in the social networks to help spread the word about these really annoying crap Windows infections.
