One of the new programs added on Windows 10 is the Microsoft Edge, as the new default web browser. Microsoft Edge is a minimalist designed Web browser and is designed to replace Internet Explorer in the future.
But many users report issues with Microsoft Edge, as almost happen with all new MS products.
If Microsoft Edge is not working or crashes/freezes you can try to reset Microsoft Edge to its default settings, to uninstall and re-install Microsoft Edge or to use an alternative solution like Chrome, Firefox or the old time classic Internet Explorer as your default web browser.
In this tutorial you’ll find instructions on how to reset Microsoft Edge to default settings and how to uninstall and reinstall Microsoft Edge on your Windows 10 PC in order to fix Microsoft Edge’s working issues.
How to FIX: Microsoft Edge Crash – Not Working issue(s)
NOTE: If you have installed the Trusteer Endpoint Protection (Tusteer Rapport), then uninstall it, restart your PC and check if the Edge is working properly.
Method 1. Reset Microsoft Edge to default Settings (Clear Browsing Data).
In order to clear Browsing Data & Settings on Microsoft Edge:
1. Open Microsoft Edge.
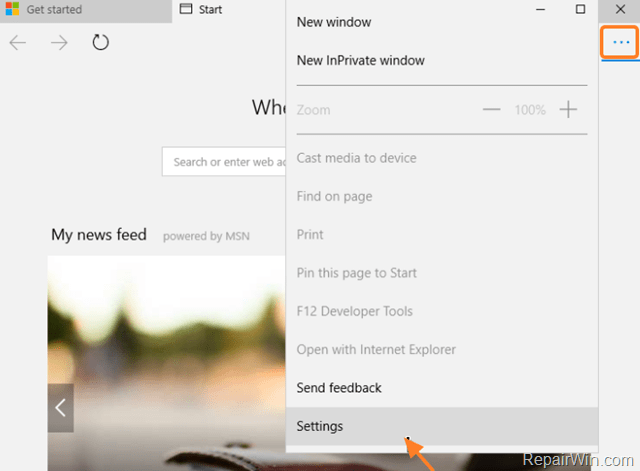
2. Click at the three (3) horizontal dots ![]() on the right upper corner and choose Settings.
on the right upper corner and choose Settings.
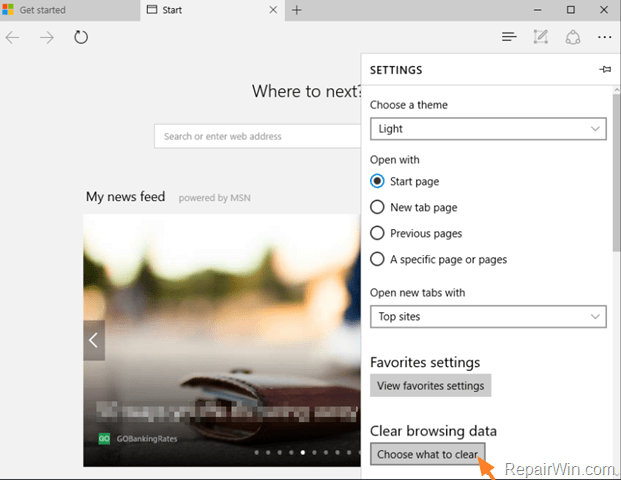
3. Select Choose what to clear under Clear browsing data.
4. Click Show more.
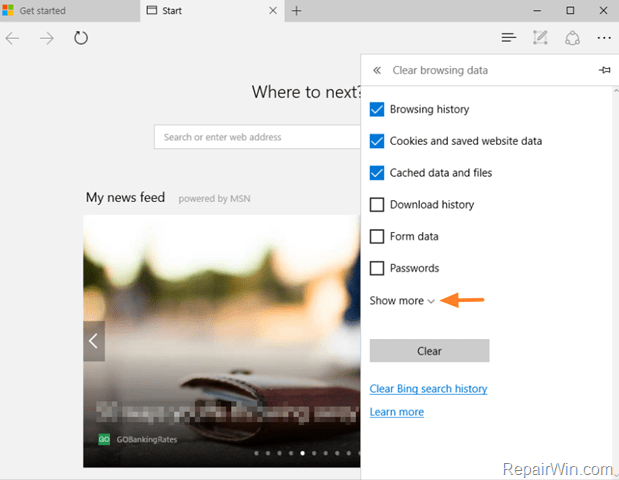
5. Finally check all boxes and press Clear.
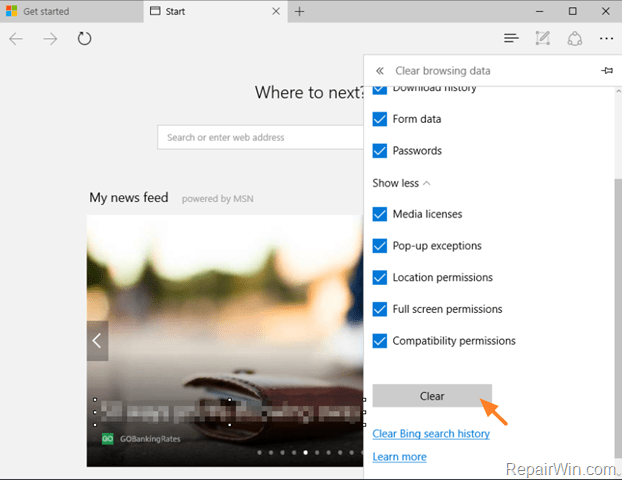
6. Launch Microsoft Edge.
Method 2. Repair and Reset Microsoft Edge.
1. Click the Start button ![]() and then right-click at Microsoft Edge and select More -> App Settings.
and then right-click at Microsoft Edge and select More -> App Settings.
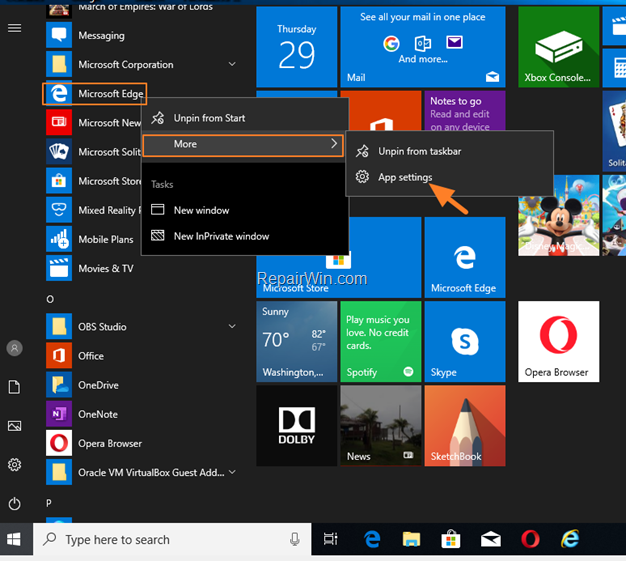
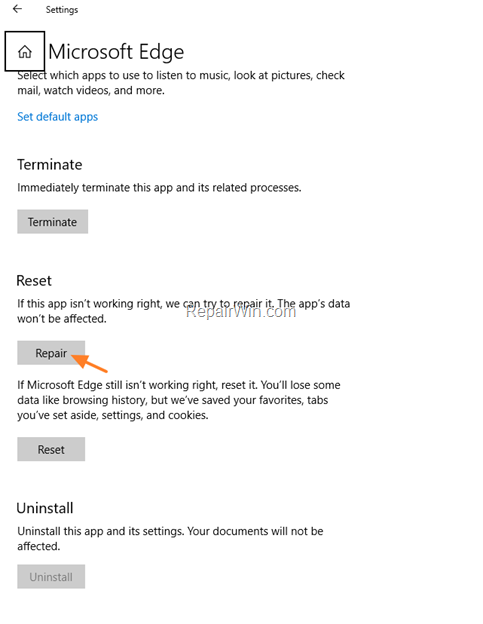
2. Scroll down and click the Repair button to repair Microsoft Edge.
3. Now launch Edge and check if it working normally. If not, then repeat the same steps but now click the Reset button to clear Edge’s data.
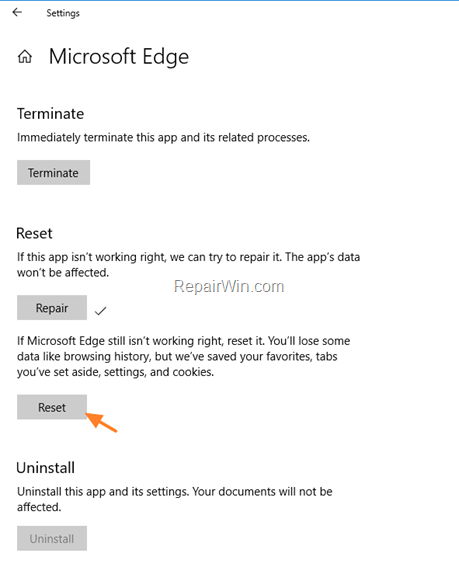
4. Now open Edge normally.
Method 3. Remove and Re-Register (Re-install) Microsoft Edge.
Microsoft Edge is coming as a part of Windows 10 OS and you cannot uninstall it through Programs and Apps in Control Panel. But if you want to completely uninstall and Re-install Microsoft Edge you have to remove (delete) and re-install (re-register) the App package by following the steps below:
Step 1. Restart your computer in Safe Mode.
To restart Windows 10 to Safe Mode:
1. Press Windows ![]() + R keys to open the run command box..
+ R keys to open the run command box..
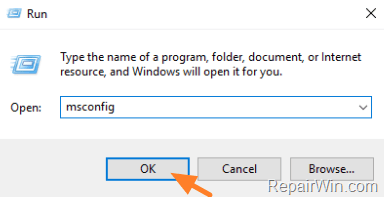
2. Type msconfig and press Enter to open the System Configuration utility.
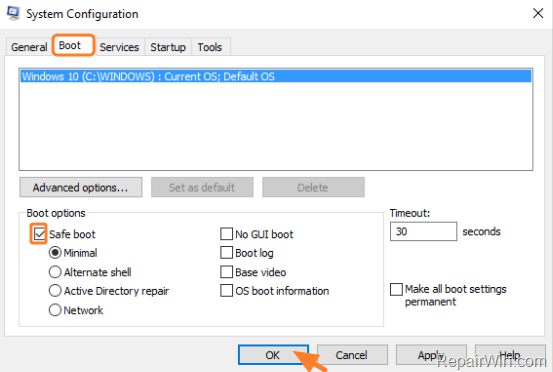
3. At Boot tab, select Safe boot and click OK.
4. Restart your computer.
Step 2. Rename or Delete Microsoft Edge’s Package Folder.
1. Press Windows ![]() + R keys to open the run command box.
+ R keys to open the run command box.
2. Type the following command and hit OK.
%localappdata%Packages
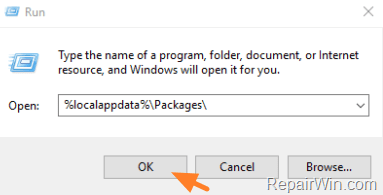
3. Rename or delete* the “Microsoft.MicrosoftEdge_8wekyb3d8bbwe” folder to e.g. “Microsoft.MicrosoftEdge_8wekyb3d8bbwe_OLD“. *
* Note: If you delete this folder you’ll lost all the favorites that stored in Microsoft Edge Web browser on the “120712-0049” folder at this location.
C:Users%Username%AppDataLocalPackagesMicrosoft.MicrosoftEdge_8wekyb3d8bbweACMicrosoftEdgeUserDefaultDataStoreDatanouser1120712-0049
(Replace %username% with your own username)
4. Continue to next step.
Step 3. Start Windows Normally.
To start Windows 10 in Normal mode:
1. Right-click on the Start button and select Run.
2. Type msconfig and press Enter to open the System Configuration utility again.
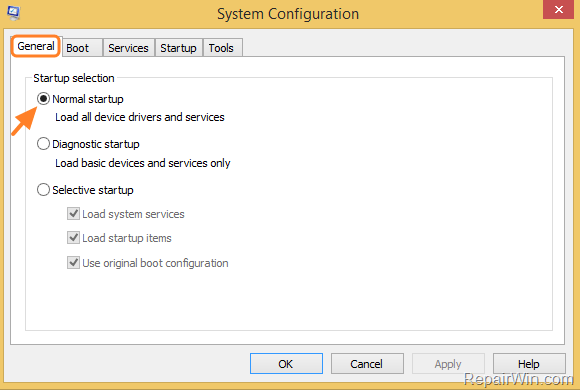
3. At General tab, select Normal Startup and press OK.
4. Restart your computer.
Step 4. Re-Register (Install) Microsoft Edge. *
Important: At the latest Windows 10 build (v1709) Microsoft Edge is reinstalled automatically: If you open EDGE once, the browser will crash and close. But if you wait a few seconds and reopen EDGE the browser should open and run without problems. If this does not happen, then proceed below to re-install Microsoft Edge from PowerShell.
– In order to re-install Microsoft Edge on your computer your have to re-register (Add) MicrosoftEdge App Package from PowerShell.
1. Open PowerShell as Administrator. To do that:
1. At Cortana’s search box type powershell
2. Right click on Windows PowerShell and select Run as administrator.
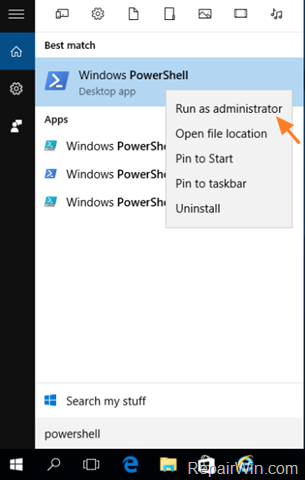
2. At PowerShell window type (copy/paste) the following command and press Enter.
Get-AppXPackage -Name Microsoft.MicrosoftEdge | ForEach {Add-AppxPackage -DisableDevelopmentMode -Register “$($_.InstallLocation)AppXManifest.xml”}

3. When the operation is completed, close PowerShell
4. Restart your computer.
5. After Restart you should have a fresh installation of Microsoft Edge that will be running without problems.
Additional tip to get back your favorites: If you want to restore your favorites to the fresh installed Microsoft Edge app, just copy the “120712-0049” folder from the old/renamed Edge folder to the newly created Edge folder.
e.g. Copy the 120712-0049 folder from:
“C:Users%Username%AppDataLocalPackagesMicrosoft.MicrosoftEdge_8wekyb3d8bbwe_OLDACMicrosoftEdgeUserDefaultDataStoreDatanouser1/”
and Paste the folder to this location:
“C:Users%Username%AppDataLocalPackagesMicrosoft.MicrosoftEdge_8wekyb3d8bbweACMicrosoftEdgeUserDefaultDataStoreDatanouser1/”
That’s all! Did it work for you?
Please leave a comment in the comment section below or even better: like and share this blog post in the social networks to help spread the word about this solution.

