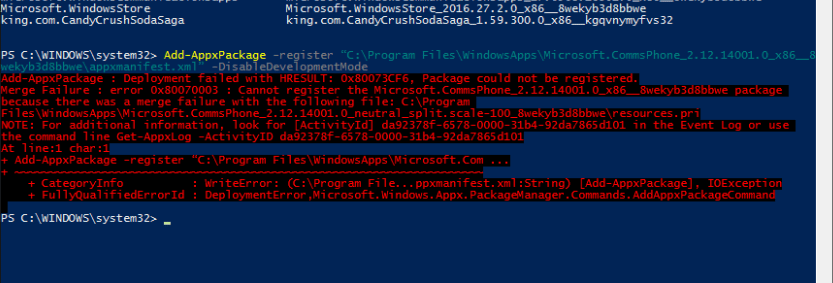
On a Windows 10 based computer, the following error is displayed when you try to reinstall a default modern modern app: “Deployment failed with HRESULT: 0x80073CF6, Package could not be registered. Merge Failure : error 0x80070003“.
The error “80073CF6” has been around for long time now and is occurred when you try to install or update a Modern App in a Windows 10 OS. After some research I realize that the best solution to fix the “Deployment failed with HRESULT: 0x80073CF6, Package could not be registered. Merge Failure : error 0x80070003” problem, is to repair your computer with an in-place upgrade.

Here is the full error message, when trying to reinstall the “Camera” App:
“Add-AppxPackage : Deployment failed with HRESULT: 0x80073CF6, Package could not be registered.
Merge Failure : error 0x80070003 : Cannot register the Microsoft.WindowsCamera_2016.107.10.0_x64__8wekyb3d8bbwe pac
because there was a merge failure with the following file: C:Program FilesWindowsAppsMicrosoft.WindowsCamera_20
07.10.0_neutral_split.language-el_8wekyb3d8bbweresources.pri
NOTE: For additional information, look for [ActivityId] 1a2901a9-581d-0004-fd0c-291a1d58d101 in the Event Log or us
e command line Get-AppxLog -ActivityID 1a2901a9-581d-0004-fd0c-291a1d58d101
At line:1 char:1
+ Add-AppxPackage -register “C:Program FilesWindowsAppsMicrosoft.Win …
+ ~~~~~~~~~~~~~~~~~~~~~~~~~~~~~~~~~~~~~~~~~~~~~~~~~~~~~~~~~~~~~~~~~~~~~
+ CategoryInfo : WriteError: (C:Program File…ppxmanifest.xml:String) [Add-AppxPackage], IOException
+ FullyQualifiedErrorId : DeploymentError,Microsoft.Windows.Appx.PackageManager.Commands.AddAppxPackageCommand“
Tis tutorial contains detailed instructions on how to fix Deployment failed error 0x80073CF6 when you try to install (or re-install) Windows Store Apps in Windows 10 OS.
How to fix Deployment failed error 0x80073CF6, Package could not be registered: 0x80070003 in Windows 10.
The only working solution to resolve the “Deployment failed error 0x80073CF6, Package could not be registered: 0x80070003 ” problem, is to perform a Windows 10 Repair. So let’s start.
Step 1. Create a Windows 10 Installation Media
1. Use Media Creation Tool from Microsoft and create a Windows 10 USB or DVD installation media. Detailed instructions on how to create a Windows installation media can be found on the following articles:
- How to create a Windows 10 USB installation media
- How to create a Windows 10 DVD installation media
Step 2. Perform a Windows 10 repair.
1. Put the Windows 10 installation media on you computer.
2. Double-click to run the Setup application.
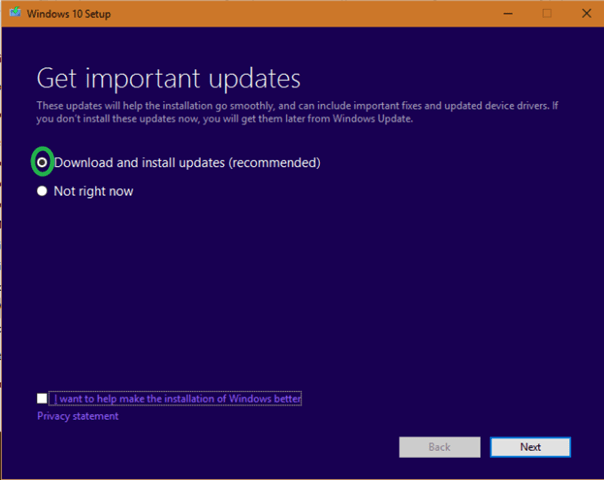
3. Choose to Download and install updates (recommended) when asked and click Next.

3. Accept the license terms.
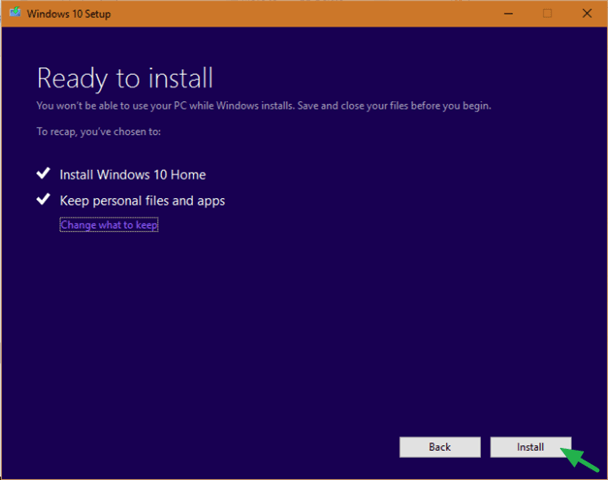
4. Finally click Install to start the repair process.

5. Be patient until Windows repair upgrade is done.
6. After Windows repair and when prompted, login to your account normally.
That’s all folks! Did it work for you?
Please leave a comment in the comment section below or even better: like and share this blog post in the social networks to help spread the word about this.


