On Windows 7 computers, applications and services written using WinHTTP for Secure Sockets Layer (SSL) connections do not support TLS 1.1 or TLS 1.2 protocols, causing any connection to servers that support these protocols to fail.
The lack of support for TLS 1.1 & TLS 1.2 protocols in Windows 7 & Server 2008/2012, affects Outlook* and other Microsoft applications (such as Word and Excel) that use these protocols to connect to a SharePoint library, and also affects applications that use technologies such as WebClient using WebDav or WinRM. *
* For example: If you’re using Outlook in Windows 7 with SSL/TLS, you’ll receive the error “Your server does not support the connection encryption type you have specified”
How to enable TLS 1.1 & TLS 1.2 on Windows 7, Server 2008 R2 & Server 2012.
Step 1. Install Windows 7 or Server 2008 R2 Service Pack 1.
Make sure that your have installed the Windows Service Pack 1. If not, download and install it from here.
Step 2. Install Windows update KB3140245.
1. According your Windows version and architecture (32 bit or 64bit), download and install KB3140245 from the Microsoft Update Catalog.
2. Restart your PC.
Step 1. Enable TLS 1.1 & TLS 1.2 support in Windows through Registry. *
* Note: Microsoft has released an easy fix (Fix51044) that applies automatically the following registry changes, but I prefer the manual way. (Source)
1. Open the Registry Editor. To do that:
- Press Windows
 + R keys to open the run command box.
 - Type regedit & click OK.
2. Navigate to the following path in registry:
- HKEY_LOCAL_MACHINESOFTWAREMicrosoftWindowsCurrentVersionInternet SettingsWinHttp
3a. At the right pane, right-click on an empty space and select New > DWORD (32-bit Value).
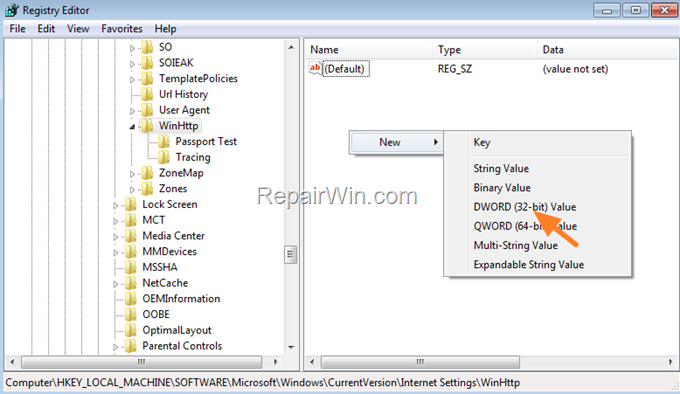
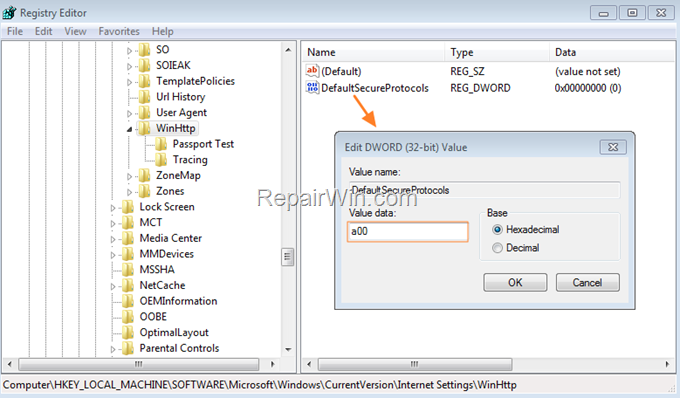
3b. Name the new value as: DefaultSecureProtocols
3c. Now open the DefaultSecureProtocols value, type at value data a00 and click OK.
4. Next, and only if you’re using an 64-bit OS, repeat steps 3a, 3b & 3c and create again the DefaultSecureProtocols REG_DWORD (32-bit) with value a00 at the following registry location:
- HKEY_LOCAL_MACHINESOFTWAREWow6432NodeMicrosoftWindowsCurrentVersionInternet SettingsWinHttp

5. Now, navigate to the following registry path to enable TLS 1.1 & TLS 1.2 on Windows 7:
- HKEY_LOCAL_MACHINESYSTEMCurrentControlSetControlSecurityProvidersSCHANNELProtocols
6a. On the left pane, right-click at Protocols key and select New > Key
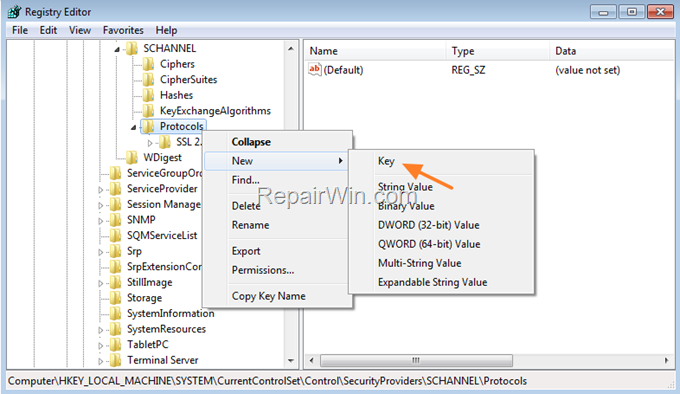
6b. Name the new key as: TLS 1.1
6c. Then right-click at TLS 1.1 and select again New > Key.
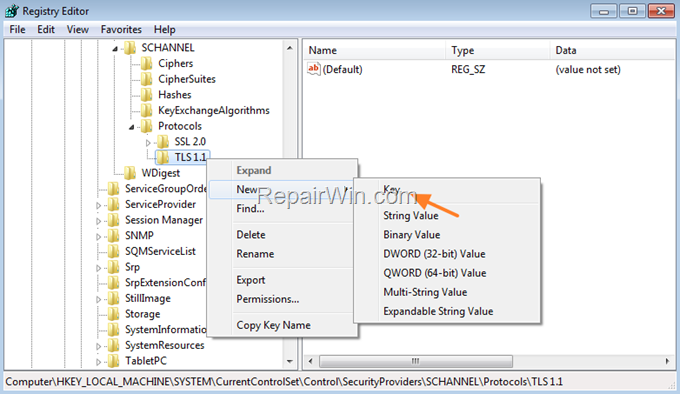
6d. Name the new key as: Client
6e. Now, select the Client key and then at the right pane, right-click at an empty space and select New > DWORD (32-bit Value).
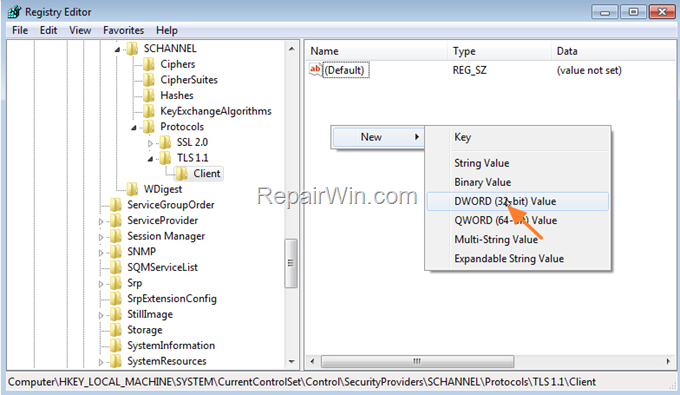
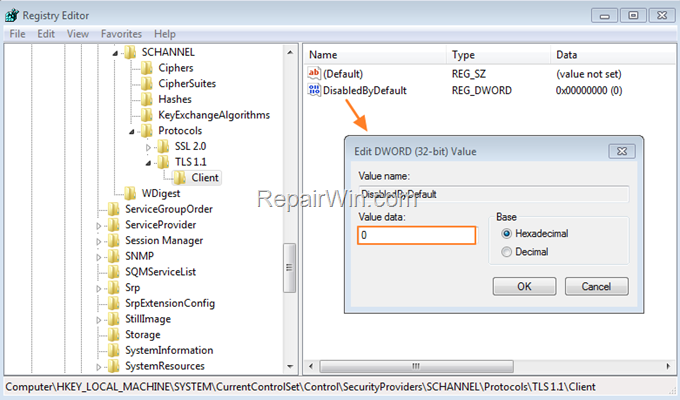
6f. Name the new value as: DisabledByDefault
6g. Finally, open the DisabledByDefault REG_DWORD, enter 0 in the Value Data text box and click OK.
7. Now, right-click again at the Protocols key on the left and select New > Key.
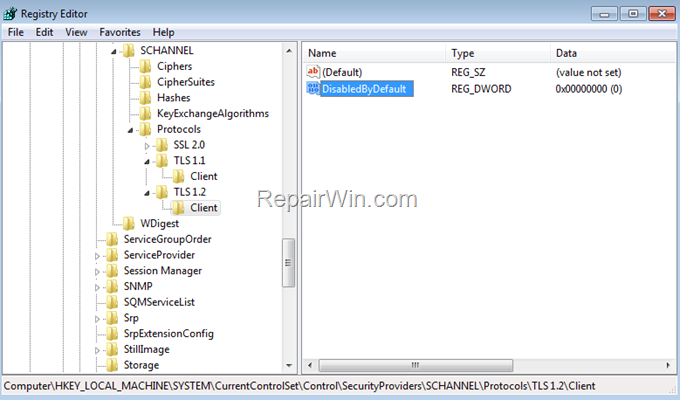
7a. Name the new key as: TLS 1.2
7c. Repeat the steps 6c – 6g to create the Client key and then to create the DisabledByDefault REG_DWORD with value 0.
8. When done, close the Registry Editor and restart the PC.
That’s all folks! Did it work for you?
Please leave a comment in the comment section below or even better: like and share this blog post in the social networks to help spread the word about this solution.

![image_thumb[27] image_thumb[27]](https://qnet88.com/wp-content/uploads/2023/04/image_thumb27_thumb-1.png)
