This tutorial shows how to stop, start or manage services in Windows operating system by using the Task Manager, the Services console or the Registry.
Windows services are a set of various special programs and processes that run in the background and are necessary for the proper functioning of the operating system. In addition to the services of the Windows operating system, many third-party applications or device drivers add their own services (commonly called “third-party services”), in order for the corresponding application or device to work properly.
Because sometimes there is a need when you encounter Windows problems, to manage services, in this tutorial we will show you how you can do it from Windows environment (GUI). *
* Note: If you want to manage services from command prompt or PowerShell see this tutorial: How to Stop, Start or Manage Services from PowerShell or Command Prompt.
How to Manage Services in Windows 11/10/8/7 OS.
Method 1. Stop, Start or Restart a Service in Task Manager.
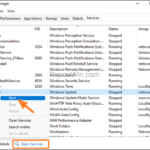
The easy way to stop a running service, or to restart or start it, is by using Task Manager.
1. Press CTRL + SHIFT + ESC to open Task Manager.
2. In Services tab, right-click on the service* that you want to Start/Stop/Restart and choose the corresponding option from the context menu.
* Note: To make your life easier click on Description to sort the services in alphabetical order.
3. If you want to disable or enable a service, click Open Services and read the instructions on method-2 below.


Method 2. Manage Windows Services in Services Console.
The usual way to manage services in Windows is from the Services console.
1. To open the Services console, press the Windows ![]()
![]() + R keys to open the run command box.
+ R keys to open the run command box.
2. Type: services.msc and press Enter. (Accept the UAC warning if appears).


3. In Services console, you’ll see all the services installed on the system with their status (Running or not) and the Startup type (Manual or Automatic.)
4. If you want to just Start, Stop or Restart a service, right-click on it and select the appropriate option from the context menu.


5. In case you want to Enable or Disable a service at Windows Startup, double-click on it to open its Properties, and change the Startup type according your wish. When done, restart your PC to apply the change.


Method 3. Disable or Enable Services in Registry.
If you want to Enable or Disable Windows Services using Registry Editor:
1. Notice the of Service name of the service that you want to manage in service’s properties.


2a. Press Windows ![]()
![]() + R keys to open the run command box.
+ R keys to open the run command box.
2b. Type regedit and press Enter.


3. Navigate to the following registry location from the left and expand the Services folder:
- HKEY_LOCAL_MACHINESYSTEMCurrentControlSetServices
4. Locate the Service name of the service you want to modify it’s Startup type and click on it.
5. In the right window, open the Start REG_DWORD value and consulting the table below, change the value of the data according the Startup type you want. *
2 = Automatic
3 = Manual
4 = Disabled
* Note: To set the Startup type of a service to “Automatic (Delayed Start)”, set the Start value to 2 and the DelayedAutostart value to 1.


6. Close Registry Editor and restart your PC to apply the change.
That’s all folks! Did it work for you?
Please leave a comment in the comment section below or even better: like and share this blog post in the social networks to help spread the word about this solution.


