Many Windows 11 and Windows 10 users have reported that they cannot log into the Windows desktop, because, after entering their password the system stuck on a black screen with only the cursor.
When this issue occurs, other users report that pressing the Enter key multiple times or running File Explorer from the task manager resolves the issue, while others report that the computer does not respond to any command.

The ‘black screen only with only the mouse pointer” issue usually occurs after installing Windows updates or after app or driver updates. In other cases, the issue occurs without an obvious reason or because Windows is unable to load the “File Explorer” or some other service.
This guide contains step-by-step instructions to solve the “black screen with cursor” problem on Windows 11 & Windows 10 based computers.
How to FIX the Black Screen with Cursor problem on Windows 11/10 *
* Note: All the screenshots below are taken on Windows 11, but the instructions also apply to fix the black screen with cursor issue on Windows 10.
1. When you see the black screen with the cursor, press and hold down the Power button on your PC for 5-7 seconds, to fully shutdown your PC.
2. Disconnect the Power Cord and all external peripherals that not needed. (e.g. USB disks, printers, cameras, etc.)
2a. Optional Step for Laptops: Remove also the battery (if possible) for 5 minutes and then re-attach it.
3. Reconnect the Power Cord, Power ON your PC again and check if it can boot normally to desktop. If yes, see if there are available updates to install and then continue to your work. If not…
4. Press the Enter key band wait a few minutes to see if anything changes. If not, press the CTRL + ALT + DEL keys on your keyboard and according to the result, proceed as follows:
- If you see on your screen the “CTRL + ALT + DEL” options (Lock, Switch user, etc.), read the instructions on Part 1.
- If after pressing CTRL + ALT + DEL nothing happens, read the instructions on Part 2.
Part 1. FIX Windows 11 Black Screen with Cursor issue with CTRL + ALT + Delete options.
Method 1. Shutdown your PC.
The first method to fix the black screen issue on Windows 10/11, is to fully shutdown your PC:
1. Press CTRL + ALT + DEL.
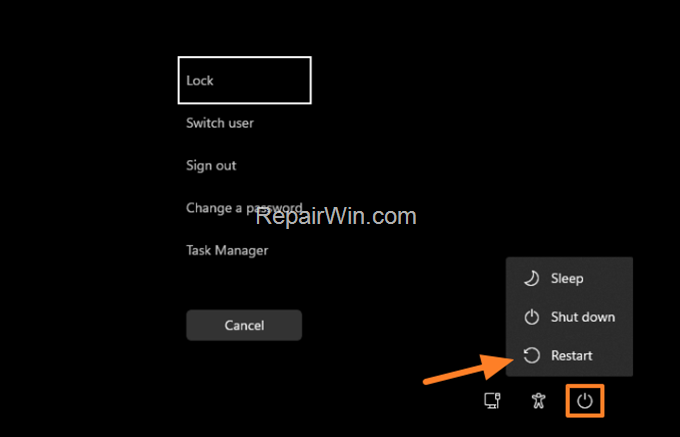
2. When you see the ‘CTRL + ALT + DEL’ options, hold down the SHIFT key on your keyboard, and then click the Power ![]()
![]() button and choose Shut down, to fully shutdown your PC.
button and choose Shut down, to fully shutdown your PC.
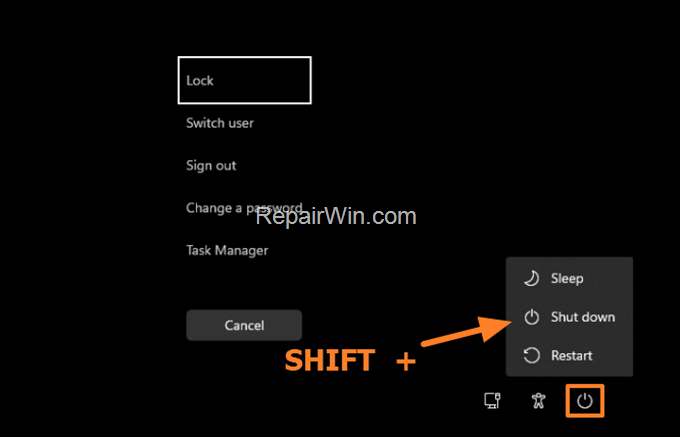

3. When the computer shuts down, wait 2-3 minutes and then press the power button to turn on your PC again.
Method 2. Start File Explorer with Task Manager.
The second method to fix the mentioned issue is to force Windows to open the File Explorer (explorer.exe).
1. Press CTRL + ALT + DEL and click Task Manager. *
* Note: If after clicking Task Manager, nothing happens, skip to Part-2.
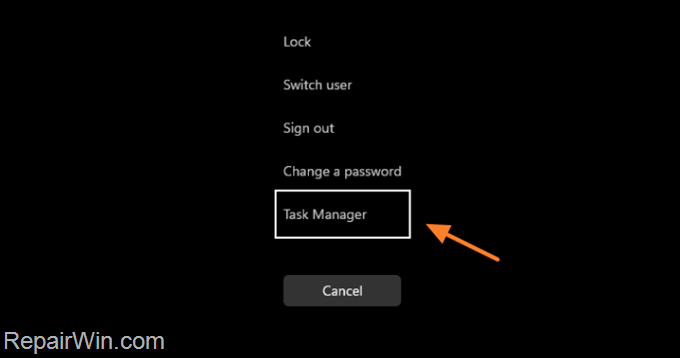

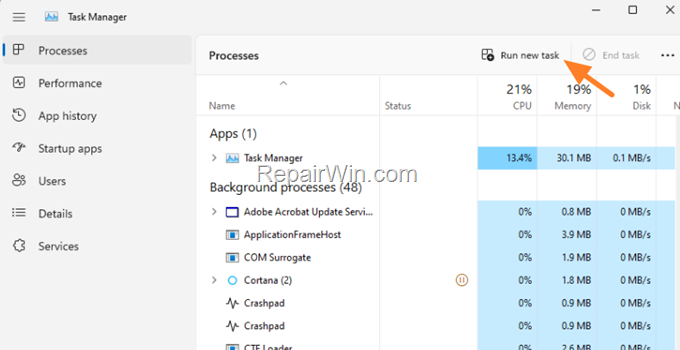
2. In Task manager window, click Run new task.

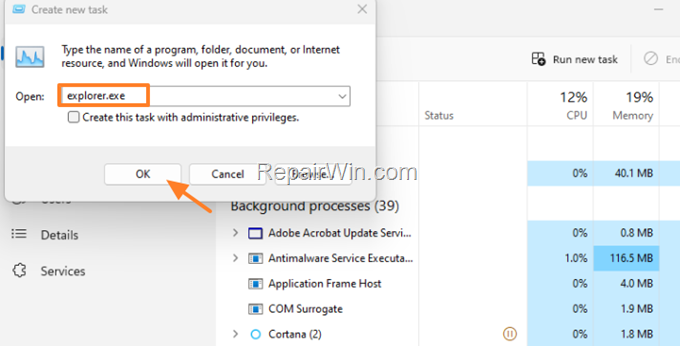
3. Type explorer.exe and click OK.

4. Now wait a couple of minutes to see if Windows can boot in desktop or not. If Windows cannot boot to Desktop, proceed to next step. Otherwise, go to Start > Settings > Windows Update and click Check for Updates. If any updates found, proceed to install them and then restart the computer again to ensure that the problem is gone. (If the problem occurs again after the restart, continue to the next step).
5. Press CTRL + ALT + DEL again and click Startup apps in the Task Manager window.
6. Select one-by-one all the Enabled startup applications and click Disable.
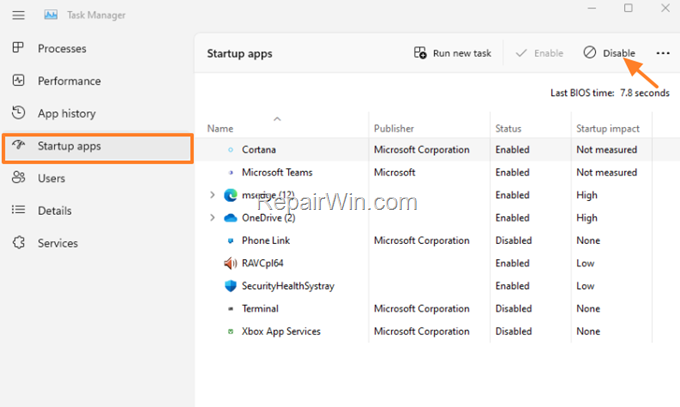

7. When done, press CTRL + ALT + DEL again, restart your PC and check if the issue is fixed. If yes, go again to Startup apps in Task Manager and enable one-by-one the disabled apps and restart your PC until you find out which startup application causes the issue.

Method 3. FIX Black Screen with Cursor issue by Disabling the App Readiness Service.
The black screen with cursor problem usually occurs due to the ‘App Readiness’ service causing the system to crash. To determine if the ‘App Readiness’ service is the cause of the problem, do the following:
1. Press CTRL + ALT + DEL and open Task Manager.
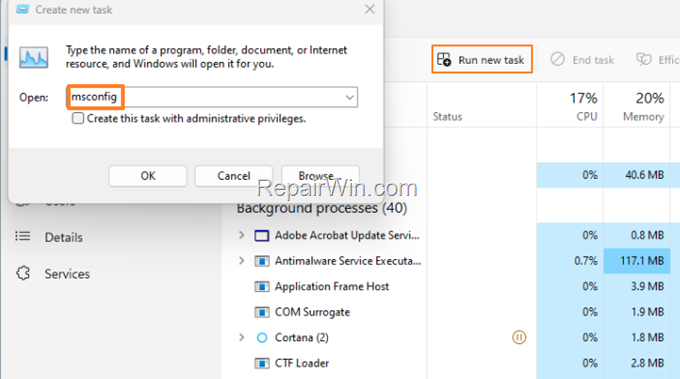
2. In Task manager window, click Run new task, type msconfig and click OK

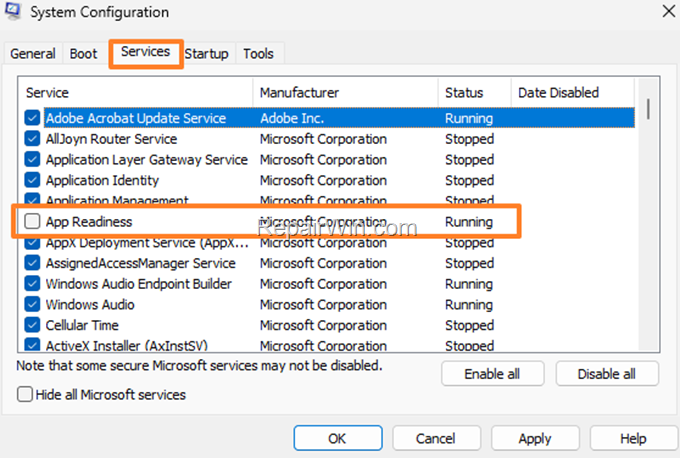
3. In Services tab, locate and uncheck the App Readiness box. Then click Apply and OK and restart your PC

Method 4. Start Windows in Clean Boot State.
Another reason for the black screen with cursor problem is that a third-party service might be preventing Windows from starting normally and loading the desktop. So, do the following:
1. Press CTRL + ALT + DEL and open Task Manager.
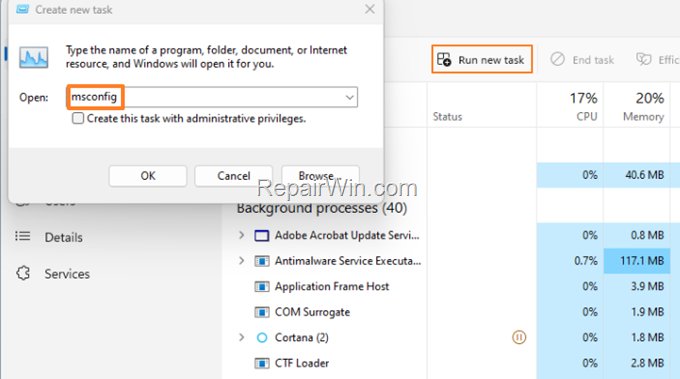
2. In Task manager window, click Run new task, type msconfig and click OK

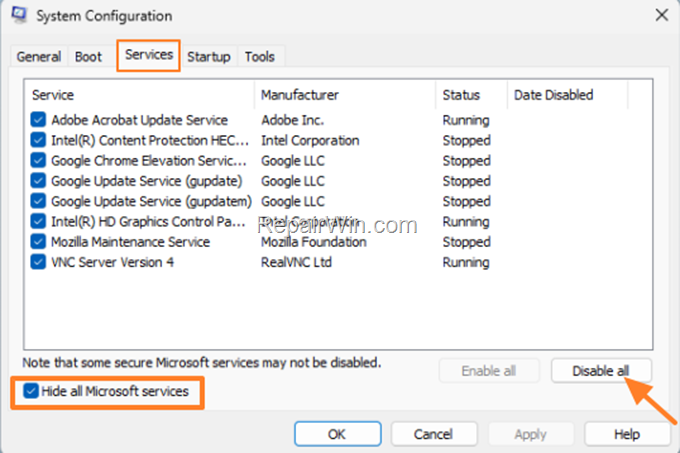
3. In the ‘System Configuration’ window, select the Services tab and do the following: *
* Note: If you don’t see the ‘System Configuration’ window, minimize the Task Manager window.
- Check Hide all Microsoft services.
- Click Disable all to prevent all non-Microsoft services to load at Windows startup.
- Click OK and then restart your PC.

4. If after restart Windows starts normally in desktop, open the ‘System Configuration’ utility again and Enable one-by-one the disabled non-Microsoft services (by checking the relevant checkbox on each service), and restart your PC, until you find out which one cause the problem.
Method 5. Fix Black Screen with Cursor on Windows 11/10 by Uninstalling Updates.
Since in some cases the black screen with cursor problem appears after installing a new application or a Windows Update, proceed to uninstall the latest program or update as instructed below:
1. Press CTRL + ALT + DEL and open Task Manager.
2. In Task manager window, click Run new task, type the following command and click OK.
- control appwiz.cpl
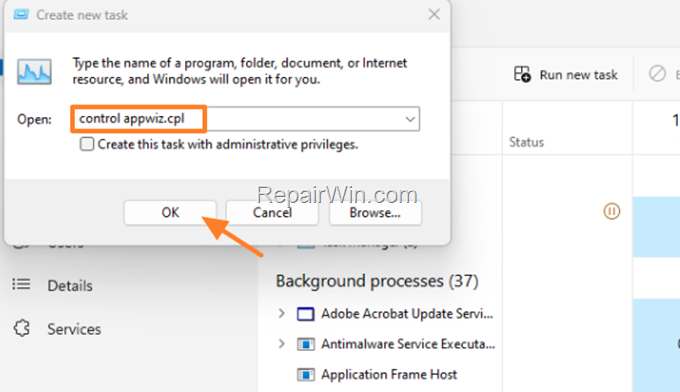

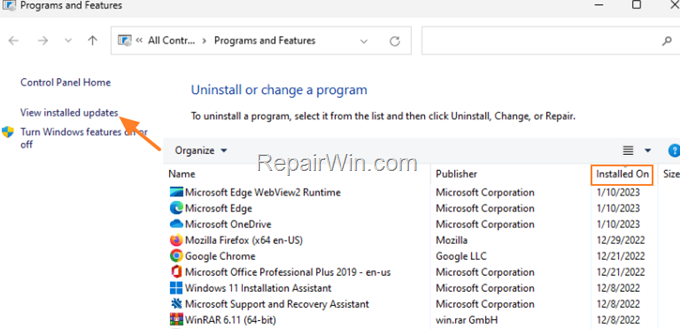
3. In ‘Uninstall or change a program’ window, do the following:
a. Click on Installed On to sort the programs by their installation date. Then see if there is a program that installed recently and if yes, select it and click uninstall to remove it. Then restart the PC and check if the issue persists. If there is no recently installed program…
b. Click View Installed Updates.

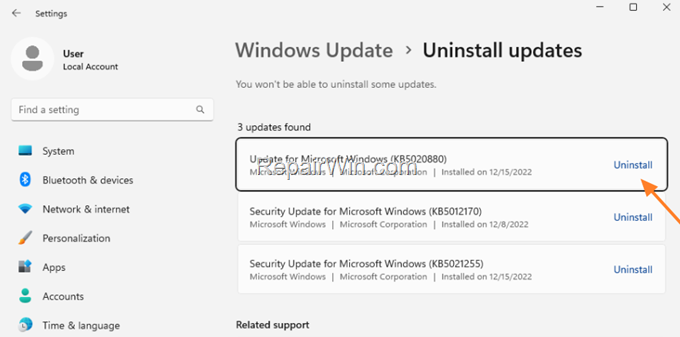
c.Select and Uninstall the latest update(s) and then restart your PC.

4. If after restarting the problem persists, ensure that there are not other updates that installed recently and if so, proceed to the instructions of part-2 below.
Part 2. FIX Windows 11 Black Screen from Safe Mode (WinRE).
If you cannot boot to Windows normally, then try to fix the black screen with cursor issue, using the Windows Recovery Environment (WinRE) options. To do that:
Force Windows to display the “Automatic Repair” Screen and then launch Windows in Safe Mode, by using the instructions on step-1 below. Then according the result proceed as follows:
- If Windows open normally in Safe Mode, use the instructions on Method 6 & 7, to fix the problem.
- If Windows cannot boot to Safe not, skip to Method 8
Step 1. Start Windows 10/11 in Safe Mode from WinRE options.
- Turn off your PC by continually pressing the power button for 5-10 seconds.
- Turn on your PC again, and when you see the spinning dots, press again the power button for 5-10 seconds tore-terminate its operation.
- Repeat the above step one more time.
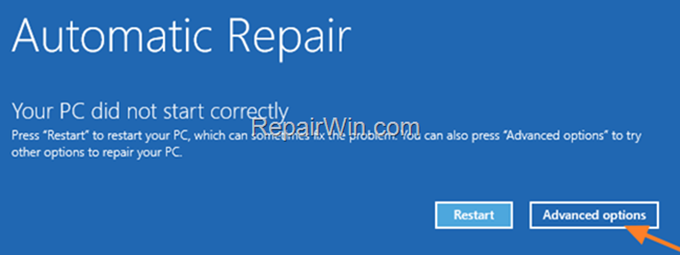
- Leave Windows to enter in Automatic Repair screen and click Advanced options.

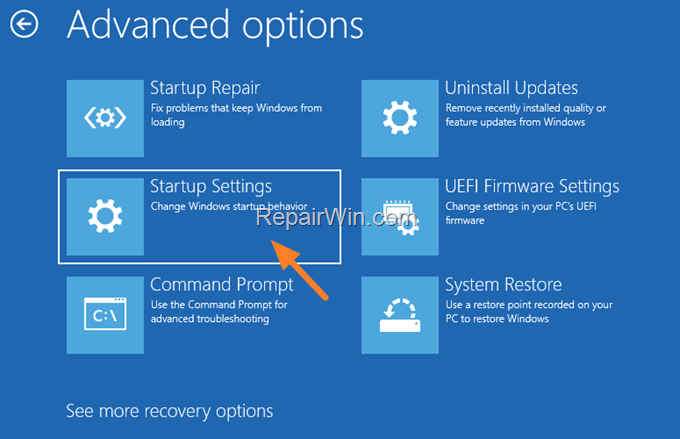
5. Then click Troubleshoot > Advanced Options > Startup Settings.
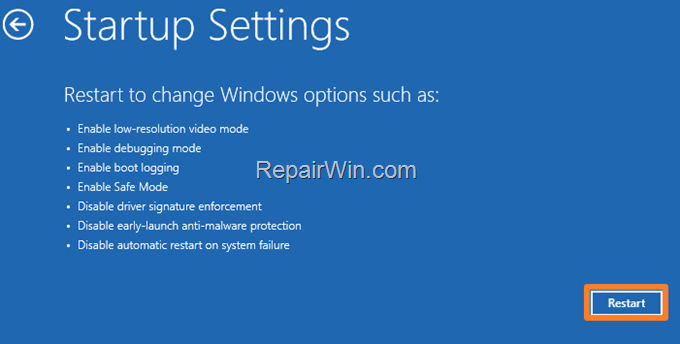
6. Then click Restart.

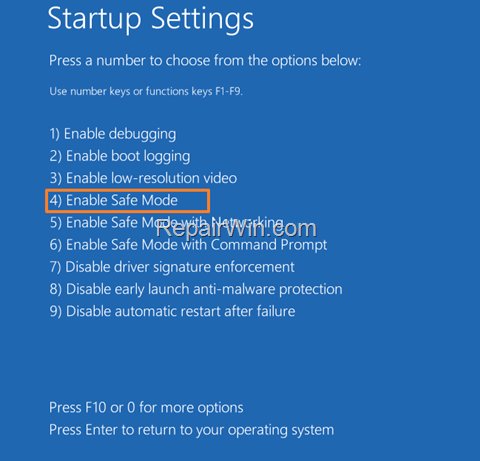
6. At the Startup Settings screen, press 4 or F4 to start Windows in Safe Mode. *
* Note: If Windows open normally in Safe Mode, use the instructions on Method 6 & 7, to fix the problem. If not, skip to Method-8

Method 6. FIX Black Screen with Cursor in Windows Safe Mode.
1. Follow the instructions on step-1 above to start Windows in Safe Mode.
2. In Safe Mode, press CTRL + SHIFT + ESC (or press CTRL + ALT + DEL ) to open Task Manager.
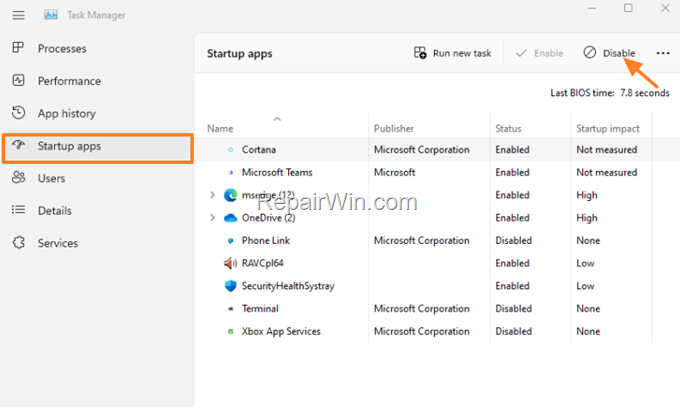
3. Click Startup apps and then select one-by-one all the Enabled startup applications and click Disable.

8. Now restart your computer again and see if the black screen with cursor issue is resolved. Then, according the result:
- If the problem is resolved, proceed and re-enable one-by-one the startup apps and restart your computer, until you find which one cause the problem.
- If the problem is not resolved, follow the same steps described above to start Windows in Safe Mode, then open Task Manager and continue to the next step.
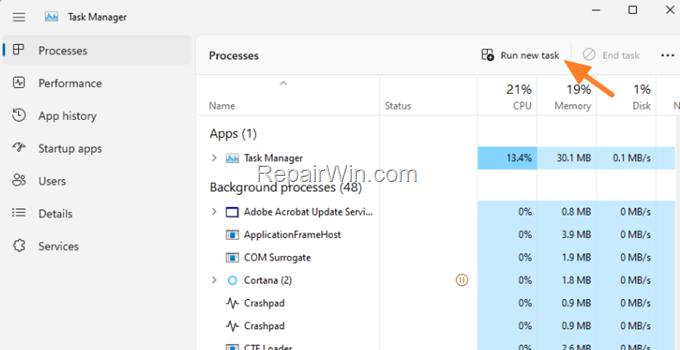
8. In Task Manager, click Run new task.

9. Type msconfig and click OK
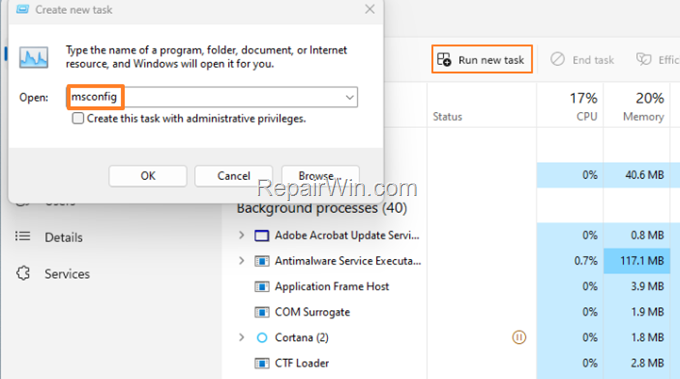

10. In the ‘System Configuration’ window, select the Services tab and locate and uncheck the App Readiness service.
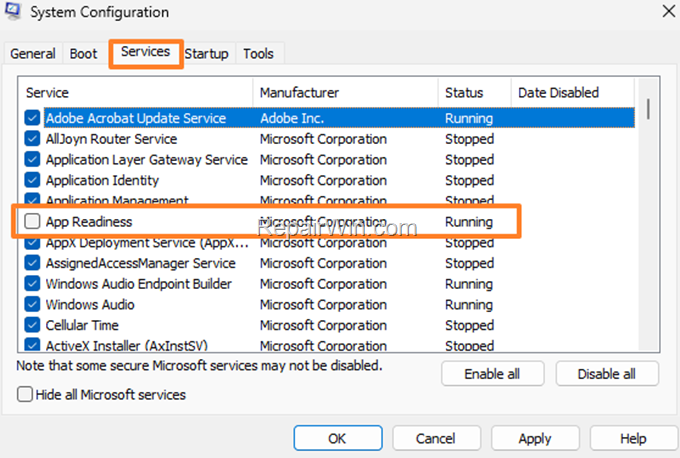

11. Restart again your PC and see if the problem is fixed. Then, according the result:
- If the problem is fixed, then you done here.
- If the problem is not resolved, follow the same steps described above to start Windows in Safe Mode, then open Task Manager and continue to the next step.
12. In Task Manager, click Run new task, type msconfig and press OK.
13. In Services tab, do the following:
- Check the Hide all Microsoft services box.
- Click Disable all to prevent all non-Microsoft services to load at Windows startup.
- Click OK and then restart your PC.
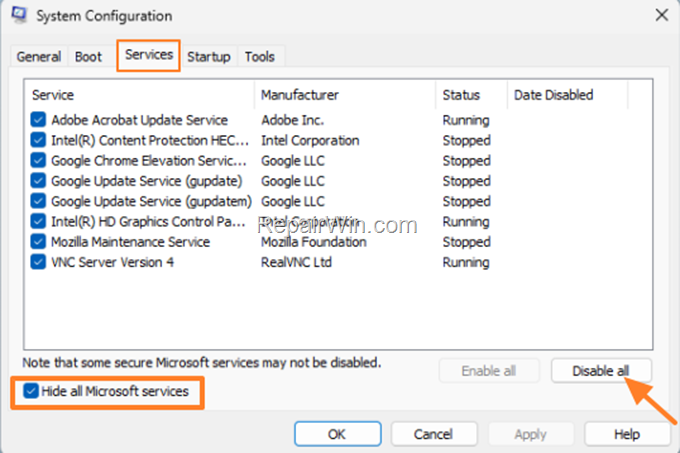

14. After restarting perform the following actions, according the result:
- If the black screen with cursor issue persists, continue to the next method.
- If the black screen with cursor issue resolved and Windows enter normally in desktop, open the ‘System Configuration’ utility again and Enable one-by-one the disabled non-Microsoft services (by checking the relevant checkbox on each service), and restart your PC, until you find out which service causes the problem. When done, proceed and re-enable also the disabled startup apps in Task Manager.
Method 7. Remove and Reinstall the Graphics Drivers in Safe Mode.
1. Start Windows in Safe Mode, using the instructions on step-1 above.
2. In Safe Mode, press CTRL + SHIFT + ESC (or press CTRL + ALT + DEL ) to open Task Manager.
3. In Task Manager click Run New Task, type devmgmt.msc & click OK.
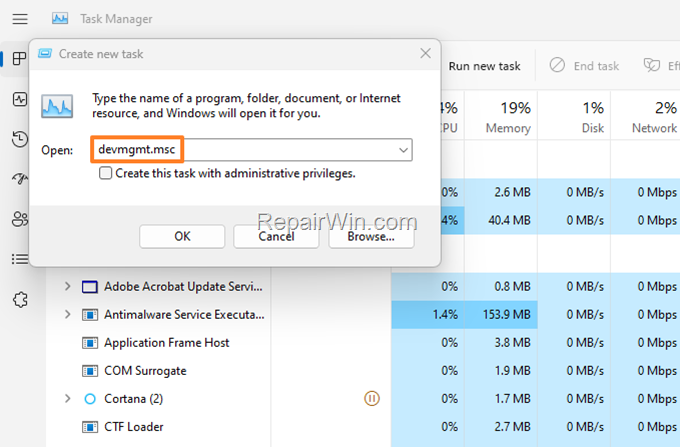

3. In Device Manager, expand the Display adapters.
4. Right-click on the installed display adapter and select Uninstall device.
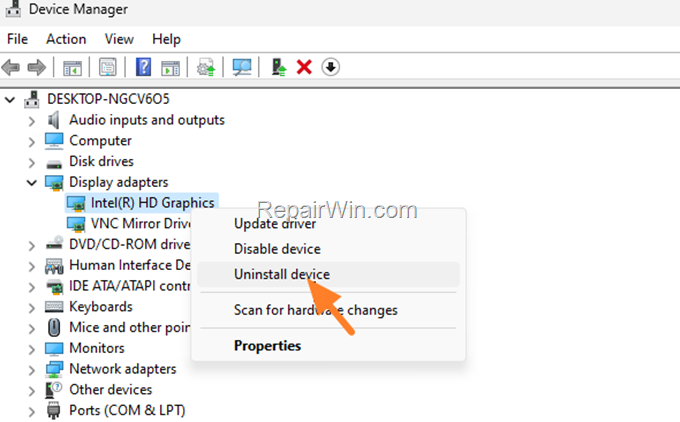

5. At the next window, check the option Attempt to remove the driver for this device (or “Delete the driver software for this device” on Windows 10), and then click Uninstall to completely remove the drivers.
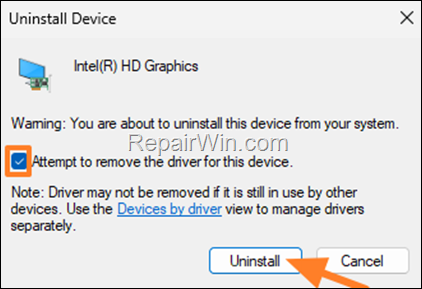

6. When done, restart Windows normally.
Method 8. Fix Black Screen with Cursor with System Restore.
1. Follow the instructions on step-1 above to force Windows to display the Automatic Repair screen and then click Advanced Options > Troubleshoot > Advanced Options.
2. At Advanced Options select System Restore.
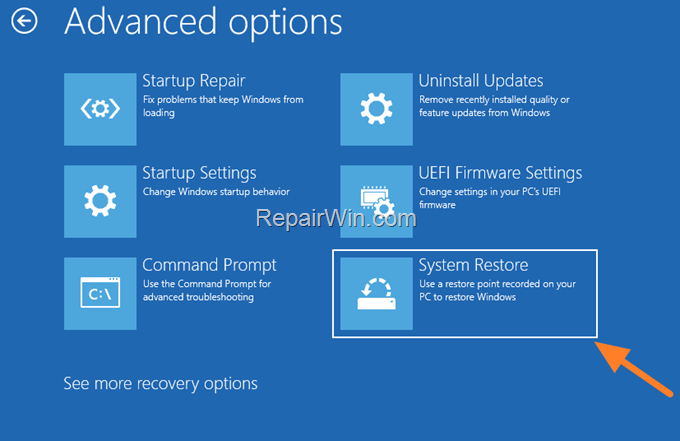

3. At System Restore screen, click Next.*.
* Note: If you see the following screen informing you and there are no restore points, click Cancel and skip to the next method.
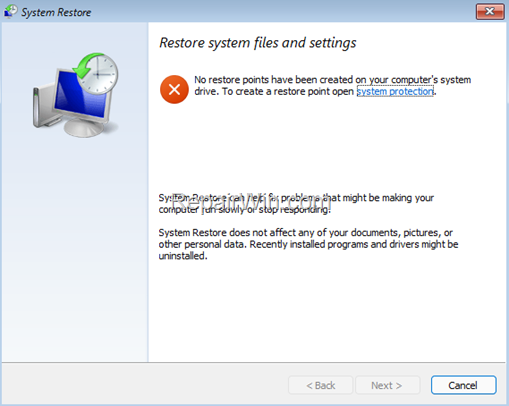

4. At the next screen, choose a previous restore point and click Next and Finish.
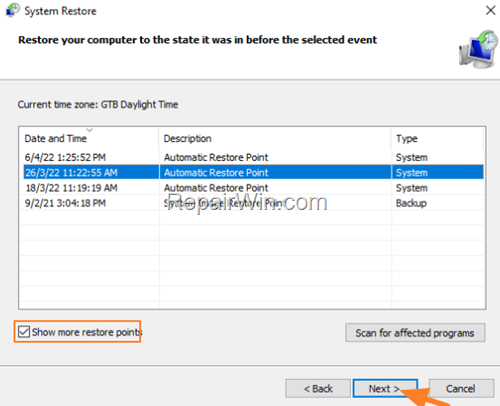

5. Wait System Restore process to restore your system and then check if the problem is fixed.
Method 9. Uninstall Updates from WinRE.
1. Follow the instructions on step-1 above to force Windows to display the Automatic Repair screen and then click Advanced Options > Troubleshoot > Advanced Options.
2. At Advanced Options select Uninstall Updates.
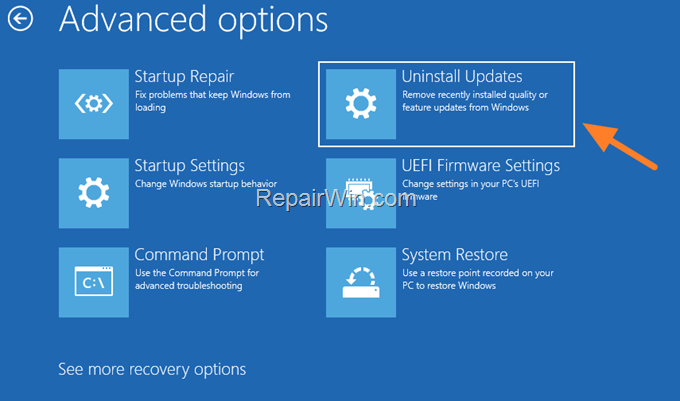

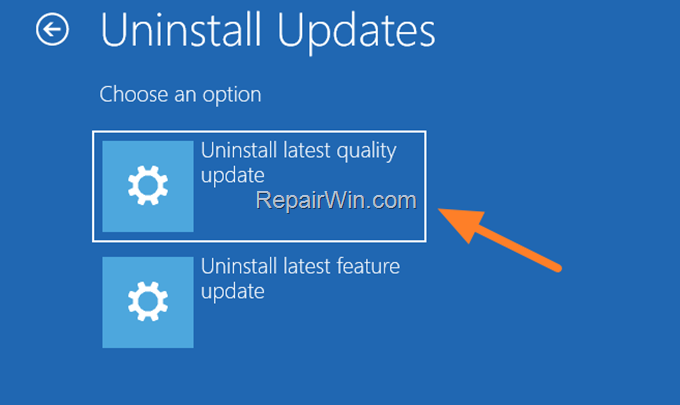
3. At the next screen, click Uninstall latest quality update and after the removal, boot to Windows normally and see if the issue is fixed. If not, perform the same steps to enter in this screen, but this time select Uninstall the latest feature update.

Method 10. RESET this PC. (Re-install Windows).
1. Follow the instructions on step-1 above to force Windows to display the Automatic Repair screen and then click Advanced Options > Troubleshoot.
2. At Troubleshoot screen select Reset this PC.
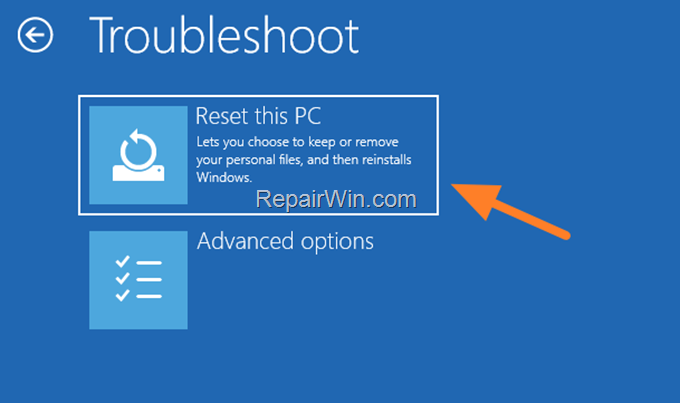

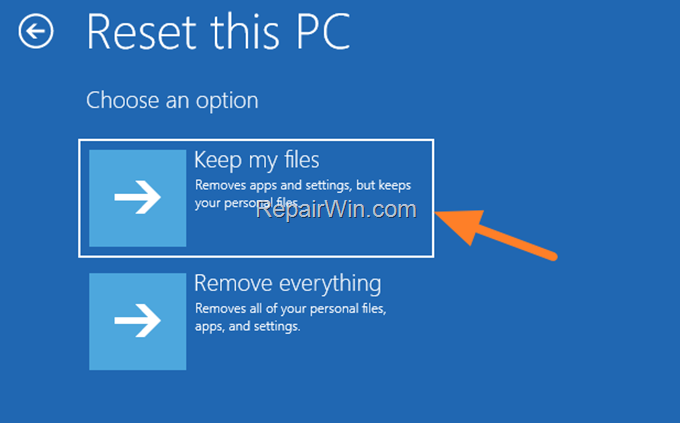
3. At the next screen, read carefully the offered options and choose the one you want.
- Keep my Files: This option will perform a Windows 10/11 refresh without deleting your personal files.
- Remove everything: This option will perform a Windows 10 refresh and removes all your personal files. So, make sure that you have a current backup of your personal files on another storage device before you continue.

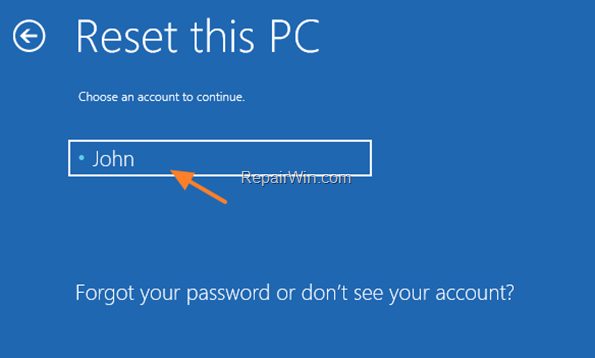
4. At the next screen, choose an account with admin privileges and click Next.

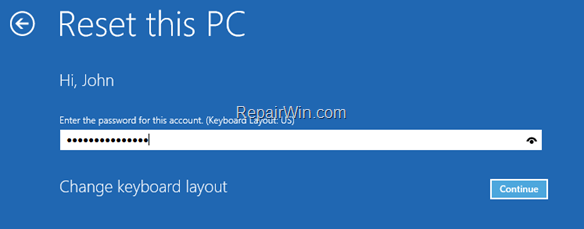
5. Type the password for the selected account and click Continue.

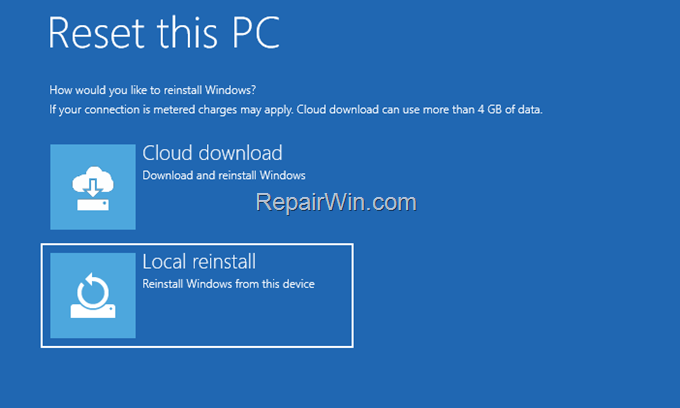
6. Now choose Cloud Download to download a fresh copy of Windows 10/11, or Local reinstall if you don’t have a fast Internet connection.

7. Wait until the installation is completed and you’re done.
Method 11. Clean install Windows.
The last method to repair Windows 10/11 is to perform a clean installation of Windows.
* Important: The clean installation of Windows, means that all your files and settings will be lost during the installation process. So, proceed and backup all your important files and settings to another storage media (e.g. to an external USB drive) before you continue to clean install Windows. To accomplish this task, follow one of the method mentioned in this tutorial: How to Backup Files if Windows Cannot Start (Won’t Boot).
To perform a clean installation of Windows (after backing up your files), follow the instructions on the following guides, according your Operating System.
- How to clean install Windows 10.
- How to clean install Windows 11.
That’s all folks! Which method worked for you?
Please leave a comment in the comment section below or even better: like and share this blog post in the social networks to help spread the word about this solution.


