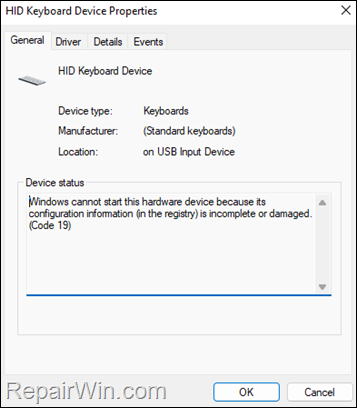
In this guide you can find instructions on how to fix the “keyboard not working” or “keyboard stopped working” issue on Windows 10, with error code 19 in Device Manager: Windows cannot start this hardware device because its configuration information (in the registry) is incomplete or damaged. (Code 19).
Problem in details: Suddenly and for no apparent reason the keyboard does not work after restarting the computer or stopped working after installing an update in Windows 10/11. When this happens, the keyboard in the device manager appears with a yellow exclamation mark with a status “This device cannot Start” or “Windows Cannot Start this device” (code 19).

How to FIX: Keyboard Stopped Working (Code 19) inside Windows 10/11. *
Nội dung
* Important Notes:
1. Before proceeding with the methods below, make sure your keyboard is working and not damaged. To do this, try connecting a different keyboard, or check if your keyboard is working in BIOS setup. To do that:
1. Turn off your PC.
2. Turn on your PC and immediately press the corresponding key (e.g. DEL or F1 or F2 or the F10), to enter in BIOS Setup. (the way to enter in BIOS setup depends on manufacturer).
3. If you can enter in BIOS setup, then navigate in BIOS settings (e.g. by using the arrow keys), to ensure that your keyboard is working. If your keyboard does not work in the BIOS settings, then your keyboard is damaged and you have to replace it.
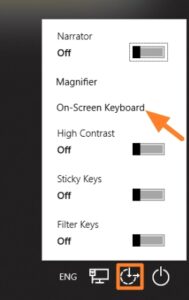
2. If your keyboard seem to work in BIOS setup but its doesn’t work in the login screen to type your password, click the Ease of Access icon ![]()
![]() on the bottom right corner of the login screen and open the On-Screen Keyboard to type your password and continue to the methods below.
on the bottom right corner of the login screen and open the On-Screen Keyboard to type your password and continue to the methods below.

Method 1. Uninstall the Last Update(s).
If the keyboard stopped working after installing updates to Windows 10/11, then this is probably the cause of the problem. To fix this, go ahead and remove the last installed update as follows:
1. Click Start ![]()
![]() and then click Settings
and then click Settings ![]()
![]()
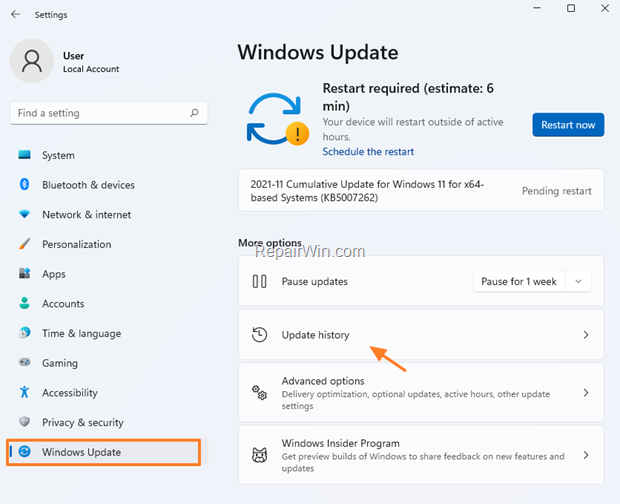
2. Select Windows Update on left and then click Update history at the right.

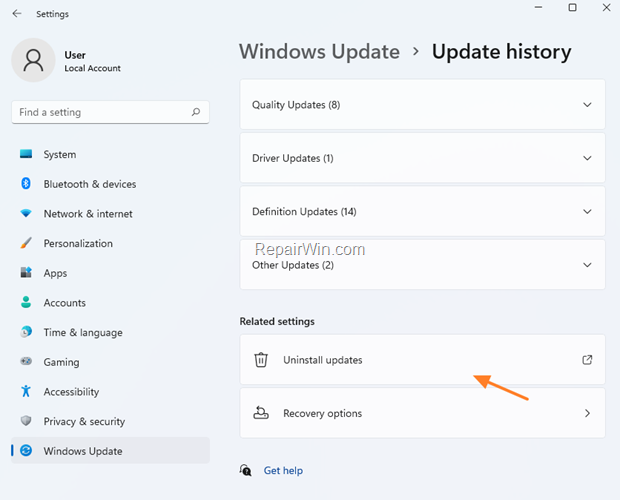
3. Scroll down and click Uninstall updates.

4. Click Installed On to sort the Microsoft Windows updates by their installation date, and then select and Uninstall the latest installed update. *
* Note: If no Updates installed recently, skip to next method.
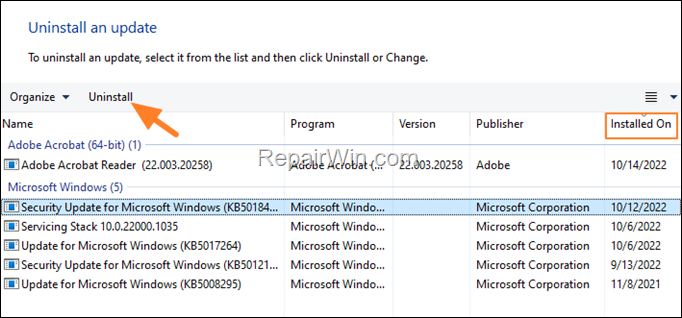

5. When the uninstall process is completed restart you computer to apply changes and check if your keyboard is working. *
* Note: If you see more than one updates installed on the same date, then follow the same instructions and uninstall all of them.
Method 2. Fix Keyboard not Working with Keyboard Troubleshooter.
The next method to fix the keyboard not working/keyboard stopped working issues is to run the keyboard troubleshooter. To do that:
1. Go to Start > Settings > Update and Security > Troubleshoot > Additional troubleshooters. *
* Note: In Windows 11, go to Start > Settings > System > Troubleshoot > Other troubleshooters.
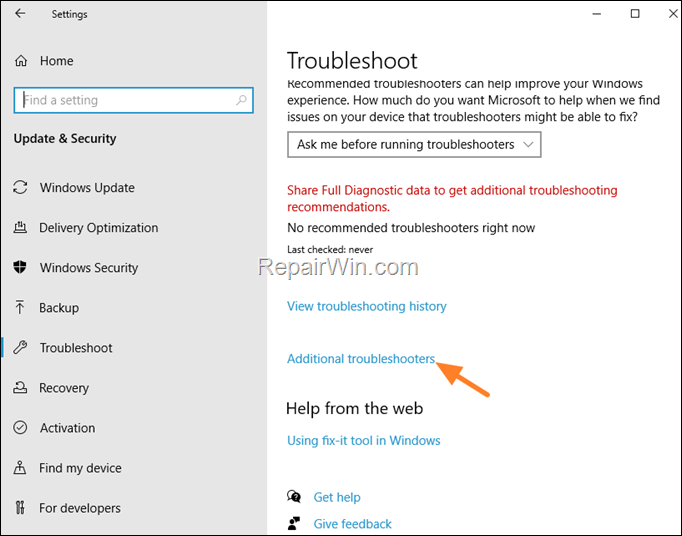

2. Select the Keyboard and click Run the troubleshooter.
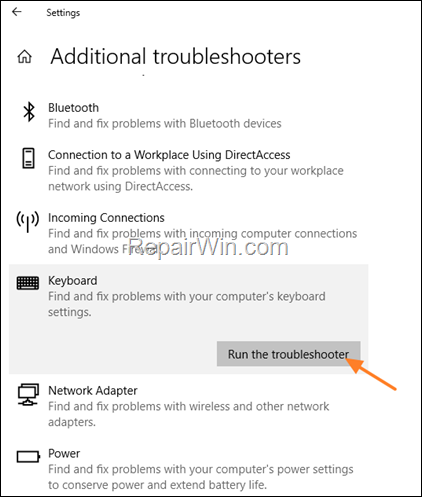

3. Follow the on screen instructions and see if that fixes the keyboard problem.
Method 3. FIX Corrupted Registry Keys.
The next method to solve the Keyboard not working issue it to fix the corrupted registry key.
1. Navigate to Start > Settings > Ease of Access *
* Note: In Windows 11, go to Start > Settings > Accessibility and click Keyboard (under the Interaction settings)
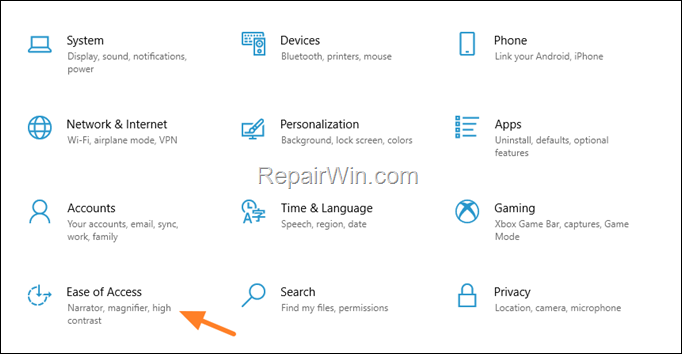

2. At Keyboard options drag the to ON the Use the On-Screen Keyboard switch.


3. With the On-Screen keyboard open, right-click on the Start button and select Run.
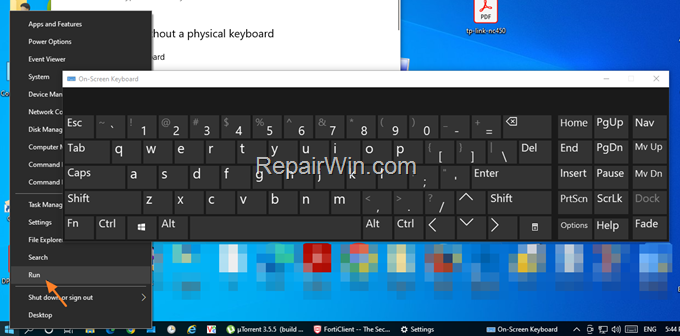

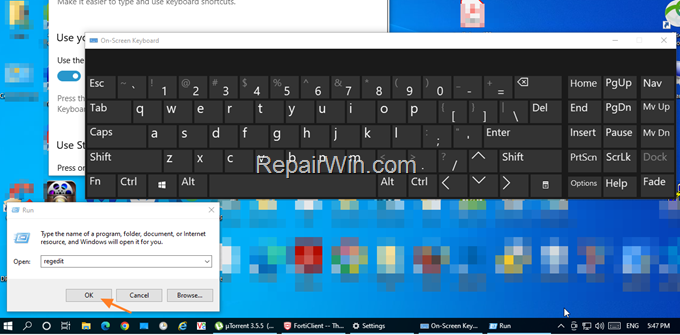
4. At Run box, type regedit by pressing the corresponding keys on the On-Screen keyboard and click OK.

5. In Registry Editor, navigate to the following location:
- HKEY_LOCAL_MACHINESYSTEMCurrentControlSetControlClass{4d36e96b-e325-11ce-bfc1-08002be10318}
6. At the right-pane:
a. Double click to open the UpperFilters REG_MULTI_SZ value.
b. Click inside the value data box and delete everything else, except the kbdclass value.
c. When done, click OK and close the Registry Editor.


7. Restart your PC and see if the problem is fixed. *
* Note: If the problem remains follow the same steps but this time proceed and Delete the UpperFilters key & the LowerFilters key (if exist) and restart your PC. If after the restart, your keyboard is not working again, proceed to the next method.
Method 4. Fix Keyboard Stopped Working by Uninstalling it from Windows.
A common method to fix the “keyboard not working” problem in Windows 10/11 is to uninstall the keyboard device in Device Manager and then restart your computer and let Windows reinstall the keyboard device driver.
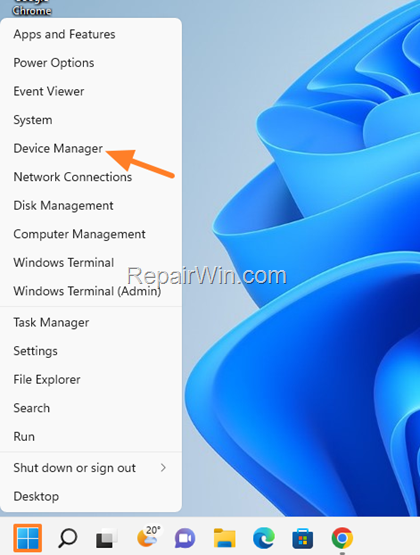
1. Right-click to Start menu and open Device Manager.

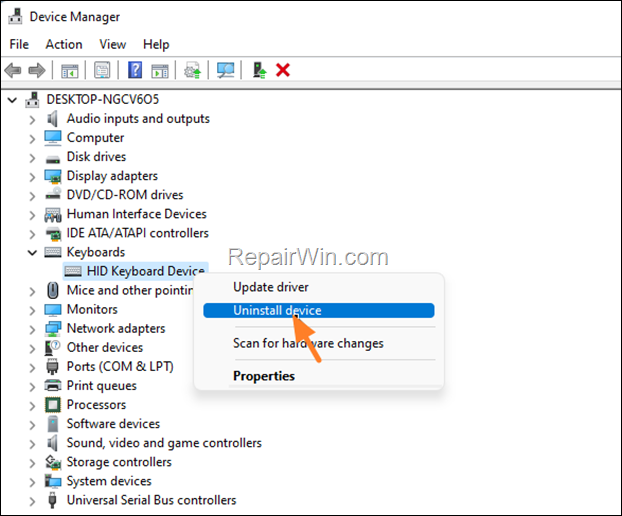
2. In Device manager double click to expand Keyboards and then right-click on the installed Keyboard device(s) and choose Uninstall device. Then click Uninstall again to confirm your decision.

3. Restart you computer. Windows will reinstall the keyboard driver and hopefully your keyboard will work now.
Method 5. Perform a Full Shutdown & Power Drain.
The final method to fix the “Keyboard not working” issue is to perform a power drain as instructed below:
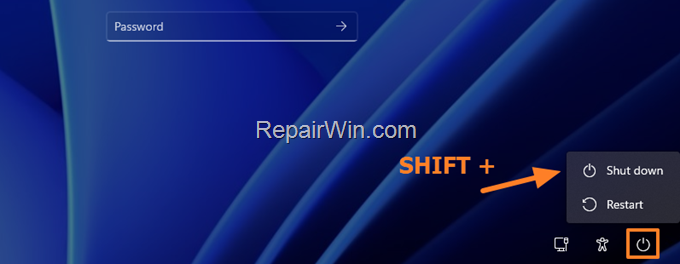
1. Hold down the SHIFT key on your keyboard, and then click the Power ![]()
![]() button and choose Shut down.
button and choose Shut down.

2. Disconnect all connected peripherals.
3. Disconnect the Power Cable & the battery if you own a laptop. *
* Note: If the battery is not removable, do the following: Power On the laptop and when you see the BIOS or the manufacturer’s logo, press & hold down the power button for 15-20 secs.
4. After 1 minute, reconnect the Power Cable.
5. Turn On your PC and check if the keyboard is working.
Additional help: If after following the above methods the keyboard still not working, replace the keyboard, or use an external USB keyboard.
That’s all folks! Did it work for you?
Please leave a comment in the comment section below or even better: like and share this blog post in the social networks to help spread the word about this solution.

Bài liên quan
- FIX: Error 0x81000203 in System Restore. (Solved)
- Cannot Access Shared folder. User has not been granted the requested logon type at this computer. (Solved)
- FIX: Cannot clear TPM – 0x80284001, 0x80290300 or 0x80290304.
- Unable to Schedule Teams Meeting in 15 or 10 minutes slots (Solved)
- How to Share Folder without Username/Password on Windows 10/11.
- FIX: Thunderbird High CPU or Memory Usage issues.