This tutorial contains instructions to resolve the following error when running the DISM command in Windows 10: “Error 1016: An error occurred while attempting to access the image”. The DISM error 1016 may appear when you try to repair a damaged Windows image, by using one of the following DISM commands in Windows 10 command prompt:
- Dism /Online /Cleanup-Image /Restorehealth
- Dism /Online /Cleanup-image /Restorehealth /source:wim:X:sourcesinstall.wim:1 /LimitAccess
…or when using the DISM command in Windows Recovery Environment (WinRE)
- Dism.exe /Image:X: /Cleanup-Image /Restorehealth
How to fix DISM Error 1016: An error occurred while attempting to access the image.
Requirements: In order to fix the problems mentioned in this article, by following the methods below, you will need to boot your computer from a Windows installation media (USB or DVD). If you don’t own a Windows Installation Media then you can create one by using Microsoft’s Media Creation tool.
- How to create a Windows 10 USB installation media.
- How to create a Windows 10 DVD installation media.
Method 1. Restore Windows 10 as it was before installing the updates.
The DISM error 1016, commonly appears after an unsuccessful installation of a Windows Update. So, first of all cancel the installation of the updates. To do that:
1. Boot your system from a Windows installation media.
2. At the below screen press the SHIFT + F10 keys to launch command prompt. (or click Next and go to Repair My Computer > Troubleshoot > Command Prompt).
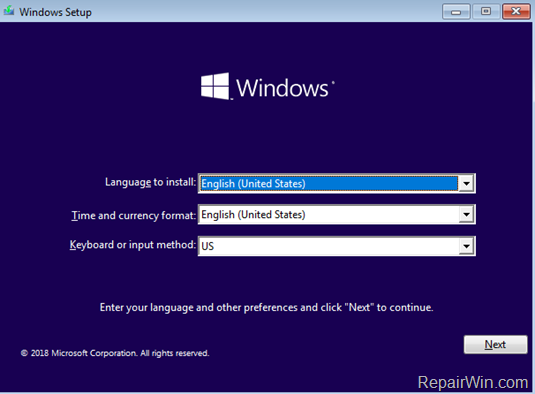
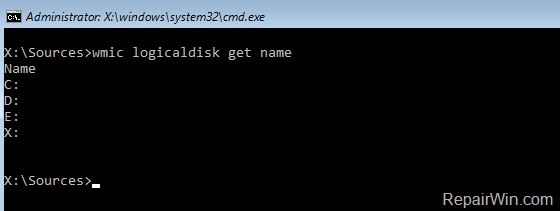
3. At command prompt, get a list of all drives, on your system with this command:
- wmic logicaldisk get name
4. Then find out which drive contains the “Windows” folder, by typing this command: *
- dir DriveLetter:
* e.g. To see the contents of the C: drive, type: “dir C:” (without quotes). If you cannot see the “Windows” folder on the C: drive, then continue to the next drive letter (e.g. “dir D:”, “dir E:”, etc.), until you see the “Windows” folder on one of the listed drives (from the above command).
[As you can see at the screenshot below, the Windows folder (at this case) is located at the D: drive.]
![image_thumb[13] image_thumb[13]](https://qnet88.com/wp-content/uploads/2021/12/image_thumb13_thumb-1-1.png)
5. Once you find on which drive the “Windows” drive is located (e.g. at drive “D:” in this example), navigate to that drive by typing DriveLetter: + Enter.
6. Then create a scratch folder on the drive by typing this command:
- mkdir D:Scratch
![image_thumb[7] image_thumb[7]](https://qnet88.com/wp-content/uploads/2021/12/image_thumb7_thumb-1-1.png)
7. Then give the below command to rollback your system, after the unsuccessful update:
- DISM /Image:D: /ScratchDir:D:Scratch /Cleanup-Image /RevertPendingActions
* Note: Change the drive letter D according to your case.
8. Once the above DISM command is executed, you should receive the following message on screen:
“Reverting pending actions from the image….
The operation completed. Any revert of pending actions will be attempted after the reboot
The operation completed successfully.”
![image_thumb[11] image_thumb[11]](https://qnet88.com/wp-content/uploads/2021/12/image_thumb11_thumb-5.png)
9. Close command prompt and restart your computer. *
10. If Windows boot normally, then continue to your work. If Windows won’t boot and tries again to install the updates, then:
1. Power off you PC.
2. Start again your computer from the Windows installation media.
3. Launch command prompt.
4. At command prompt give the following commands in order (don’t forget to change the drive letter D according to your case):
- del D:WindowsSoftwareDistribution
- del D:WindowsWinSxScleanup.xml
- del D:WindowsWinSxSpending.xml
5. When done, close command prompt and restart your PC. *
* Note: If the boot fails again, then boot again is WinRE command prompt and give the following commands (don’t forget to change the drive letter D according to your case):
- chkdsk /f D:
- sfc /scannow /offbootdir=D: /offwindir=D:windows
- dism /image:D: /cleanup-image /restorehealth
Method 2. Restore Windows Registry from Backup.
The next method to fix the dism error 1016 (An error occurred while attempting to access the image), is to restore the Windows registry from the ‘RegBack’ folder. *
* Info: The ‘RegBack’ folder, (full path=WindowsSystem32ConfigRegBack), is the location where Windows stores automatically a backup of the registry files whenever the machine is starting up.
To restore the registry from the RegBack folder:
1. Boot your system from a Windows installation media and then follow the steps 1-5 from the method-1 above to navigate to the Windows drive. (e.g. the “D:” in this example).
2. First of all, take a backup of the current registry files, by giving the following commands in order. (Press Enter after typing each command):
- cd windowssystem32config
- md Backup
- copy *.* Backup

3. Now navigate to RegBack folder by giving this command:
- cd RegBack
4. Then type DIR (to view the contents of RegBack folder).
5. Now see if any of the listed files has 0 (zero) bytes in their file size and proceed below according your case:
- Case A. If any of the listed files has 0 (Zero) bytes in its size, then stop here, and continue to the next method, because the registry backup files are useless or corrupted.
- Case B. If all the listed files, have a size different from zero (like in the screenshot below), then proceed to the next step.
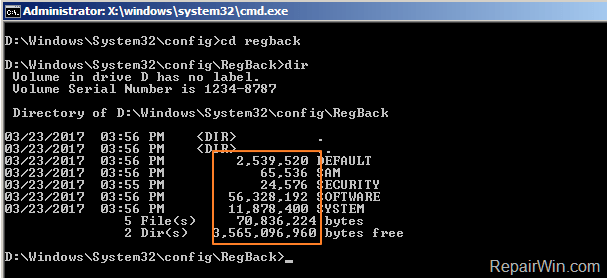
6. Copy the registry files from the WindowsSystem32ConfigRegBack folder to WindowsSystem32Config folder, by giving this command:
- copy *.* ..
7. When prompted, press A to overwrite the files in destination after giving the copy command.

8. When the copy is completed, type exit and press Enter to close command prompt.
9. Restart your computer and try to boot to Windows.
* Note: If the Windows fails to boot again, then boot again is WinRE command prompt and give the following commands (don’t forget to change the drive letter D according to your case):
- chkdsk /f D:
- sfc /scannow /offbootdir=D: /offwindir=D:windows
- dism /image:D: /cleanup-image /restorehealth
Method 3. Restore Windows 10 to a Previous Working State.
The next method to solve the DISM error 1016, is to restore your system to a previous working state. To do that:
1. Boot your system from the Windows installation media.
2. At the below screen click Next and then click Repair your Computer > Troubleshoot.
![image_thumb[20] image_thumb[20]](https://qnet88.com/wp-content/uploads/2021/12/image_thumb20_thumb.png)
3. At Advanced Options click System Restore. *
* Note: If the Go Back to a Previous Build option, is available on this screen then choose that option.
![image_thumb[28] image_thumb[28]](https://qnet88.com/wp-content/uploads/2021/12/image_thumb28_thumb.png)
4. At the next screen click your Operating System.
![image_thumb[29] image_thumb[29]](https://www.repairwin.com/wp-content/uploads/2019/02/image_thumb29_thumb.png)
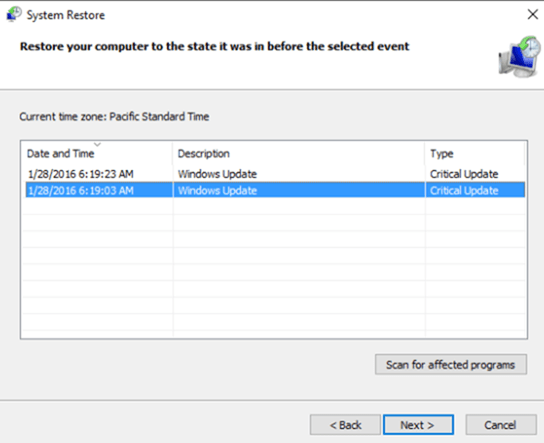
5. Then at System Restore Wizard, click Next and then choose an earlier working state (Date/Time) and click Next to start the restore process.
Method 4. Repair Windows 10.
The final method to resolve the error 1016 in DISM, is to repair Windows 10 with In-Place Upgrade or to back up your files and then to clean install Windows 10.
That’s all folks! Did it work for you?
Please leave a comment in the comment section below or even better: like and share this blog post in the social networks to help spread the word about this solution.

