Some times there is the need to reset bios password, in order to be able to enter the BIOS and modifying its settings (e.g. to change the boot order). This BIOS Reset procedure on a desktop computer is a relatively easy process, because in most cases all you need to do is to remove the power cord and the CMOS/BIOS battery for a few minutes or to short the CLEAR CMOS jumper on the motherboard (if exists).

In the other hand if you own a Laptop, the procedure to reset the BIOS/CMOS setup password, is more complicated especially if the CMOS battery is not easy accessible.
This tutorial lists all the available ways to remove/clear the BIOS/CMOS password on a HP Probook, Elite or Pavilion Laptop.
How to Reset BIOS Password on HP Laptop.
Method 1. Remove the CMOS/Password battery.
Method 2. Reset BIOS Password by using a Master Password.
Method 3. Reset CMOS Password by using the BIOS Configuration Utility from HP.
Method 4. Clear BIOS Password with HP Probook/Elitebook BIOS Password Reset Utility.
Method 5. Remove HP BIOS/CMOS Password by Updating the BIOS.
Other methods to Remove BIOS Password on HP Laptops.
Method 1. Remove the CMOS/Password battery.
The first method to remove the BIOS password on a HP (or other brand) laptop or Desktop computer, is to locate and remove the CMOS battery for a few minutes. To accomplish this task:
1. Find out he location of the CMOS/Battery, by performing a simple search on the web about how to replace the CMOS battery on your laptop, computer or motherboard model.
2. Once you find that information, power down and remove the power cord from your computer.
3. Follow the instructions you found to open the laptop chassis.
4. Remove or disconnect the CMOS battery* for 6-10 minutes to erase the CMOS settings and clear CMOS password.
5. Reconnect (or put back in its place) the CMOS battery and then close the chassis.
6. Power on your computer and enter BIOS setup.
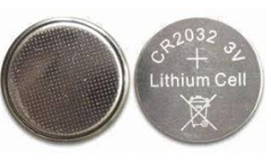
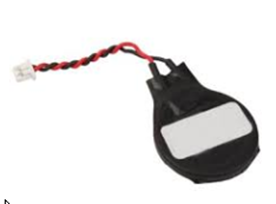
(Common types CMOS batteries)
Method 2. Reset BIOS Password by using a Master Password.
1. Power on you Laptop and press the corresponding function key to enter into BIOS/CMOS Setup.
2. Type three (3) times an incorrect password.
3. You will receive a “System Disabled” message and a digit code.
4. From another working computer, navigate to Clear Bios Passwords page.
5. Type the digit code from the “System Disabled” message and click Get Password.
6. Restart the locked computer and type the suggested password(s) from the Clear Bios Passwords site.
Method 3. Reset CMOS Password by using the BIOS Configuration Utility from HP.
1. Download the HP BIOS Configuration Utility.
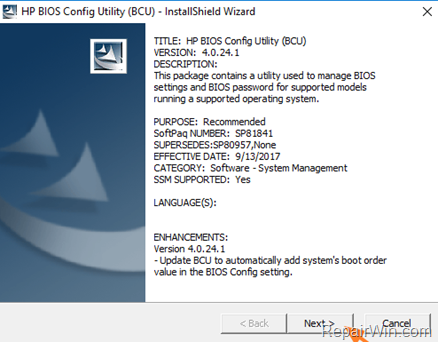
2. Install the Bios Configuration Utility on your system.
3. During the installation process note the installation folder of the “HP Bios Config Utility (BCU)”. *
* Note: Commonly the BCU is installed at “C:Program Files (x86)HPBIOS Configuration Utility”.
3. After installation open Command Prompt as administrator.
4. From command prompt navigate at the installation folder of the “HP Bios Config Utility (BCU”, by typing this command:
- cd program files (x86)hpbios configuration utility
5. Then type the following command to remove the BIOS/CMOS Setup password on you HP Laptop:
- biosconfigutility.exe /newsetuppassword:””
6. If everything goes smoothly then you receive a “Successfully modified Setup Password” message. *

7. If you receive an error message says that your “System is not supported. Unable to connect to HP WMI namespace” (see the screenshot below), then follow the steps below:

a. Download and install the HP System Software Manager (SSM) version sp2095.exe* from here
* Note: keep in mind that this SSM version, works better with Windows 7, Vista or XP)
b. Open Command Prompt as Administrator.
c. Navigate to the BCU location “C:Program Files (x86)Hewlett-PackardSSM”, from the command prompt window.
d. Then type the following command: *
- biosconfigutility.exe /nspwd:”pwd“
* Note: If you want, replace the letters pwd in quotes with a desired password.
e. BCU should respond, “Successfully Modified the Setup Password.”.
f. Reboot your computer and enter BIOS Setup with the password you given.

Method 4. Clear BIOS Password with HP Probook/Elitebook BIOS Password Reset Utility. *
Note: This below method to reset the BIOS password, is tested to the following HP laptop models (Source):
HP Elitebook 2530P, HP Elitebook 4310S, HP Elitebook 4510S, HP Elitebook 6930P, HP Elitebook 8460P, HP Elitebook 8530W, HP Probook 2230S, HP Probook 2560P, HP Probook 2730P, HP Probook 2740P, HP Probook 6460B, HP Probook 6455B, HP Probook 6535B, HP Probook 6550B, HP Probook 6730B, HP Probook 6735B, HP Probook 8440P, HP Probook 8530P, HP Probook 8540, HP Probook 8560P, HP Probook 8560W, HP Probook 8560W, HP Probook 8730W
1. Download and extract the HP Bios Reset Utility (HPBR.RAR).
2. Insert an EMPTY USB disk.
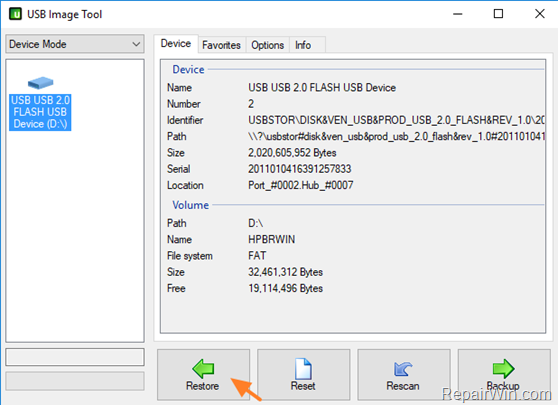
3. From the extracted files, locate and double click to run the USB Image Tool.

4. Select the USB drive on the left pane and then click Restore.
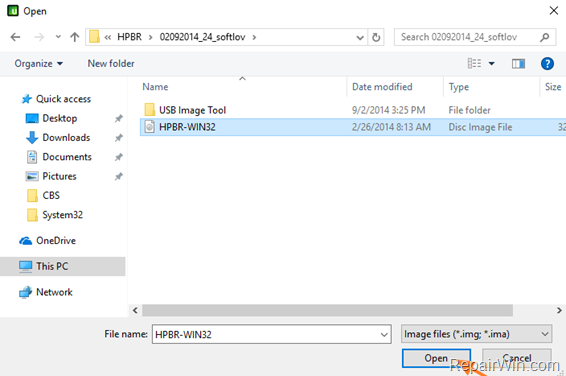
5. From the extracted HPBR folder, find and select the “HPBR-WIN32” file and then click Open.
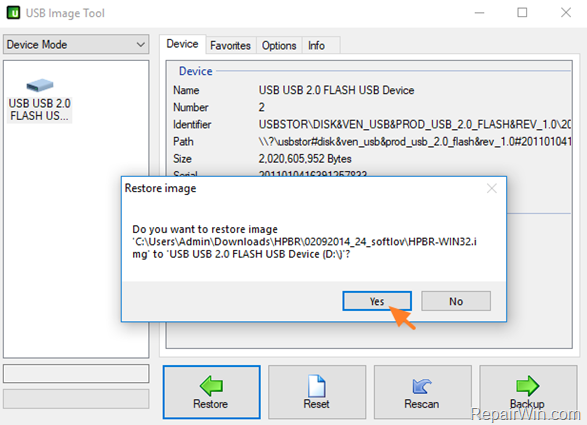
6. Click Yes to restore image.
7. Reboot your computer and boot from the USB drive.
8. At command prompt, type DOS and press Enter.
9. Then press 1 for FIRST RUN.
10. According to your laptop model, type the corresponding number and press Enter to reset the BIOS password. *
* Notes:
1. Some models may need to run the program second time. If so, reboot your system again and press 2 for SECOND RUN
2. If your laptop model is unsupported (not listed) then after giving the “DOS” command, type 5 to run SHOTGUN (to try all models).
Method 5. Remove HP BIOS/CMOS Password by Updating the BIOS.
To reset the BIOS password by updating the BIOS on your HP notebook, follow the instructions on this article. (Be careful, flashing the bios on your machine is risky).
Other methods to Remove BIOS Password on HP Laptops.
1. Replace the BIOS CHIP.
2. Try to find a solution on HP Support forum.
Did it work for you?
Please leave a comment in the comment section below or even better: like and share this blog post in the social networks to help spread the word about this solution.

