If you are unable to update Windows 10 due to error 0xC1900101-0x30018, continue reading below to fix the problem. The Windows 10 Update error 0xC1900101-0x30018 , usually occurs when you upgrade Windows 10 to its latest version and, according to Microsoft, is caused by a connected device or a device driver.
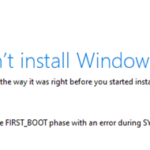
Problem in details: The Windows 10 upgrade fails with error: “We couldn’t install Windows 10, 0xC1900101-0x30018. The installation failed in the FIRST BOOT phase with an error during SYSPREP_SPECIALIZE operation”, and then reverts back to the previous Windows 10 version/build.

This tutorial contains instructions to fix the Windows 10 Upgrade Error 0xC1900101 – 0x30018: “The installation failed in the FIRST_BOOT phase with an error during SYSPREP_SPECIALIZE operation”.
How to FIX: Error 0xC1900101-0x30018 in Windows 10 Update/Upgrade.
The error code 0xC1900101 – 30018 in Windows 10 update, indicates a problem with an incompatible device, driver or program on the system. So, before you continue to the methods below, apply the following actions:
1. Ensure that you have enough free space. Windows 10 requires at least 32 GB of free space to upgrade. To free up disk space use Disk Cleanup.
2. Install the latest drivers for all the devices on your system, especially for the Ethernet & the Wireless adapter (if any). *
3. Disconnect all external USB drives & SD cards and any other USB device that don’t needed.
4. If you ‘re using a third-party antivirus program, then temporarily disable or -better- uninstall it.
5. Disable the Hard Drive Encryption (BitLocker, VeraCrypt, etc.).
6. Finally, before restarting your computer to install the update, disconnect from the network. (e.g. Unplug the Ethernet cable or disable the Wi-Fi) adapter).
* Note: If after applying all the instructions in this article, the Windows 10 Upgrade Installation still fails, proceed and update also the BIOS (Firmware) on your system.
Method 1. Disable the Secure Boot .
The first method to resolve the error 0xC1900101 – 0x30018, in Windows 10 update, is to disable the secure boot feature in BIOS. To do that:
1. Power On your system and immediately press the corresponding key* to enter into BIOS SETUP.
* Note: Usually to enter in BIOS, you have to press the DEL or F1 or F2 or the F10 key. (depends on manufacturer)
2. Look at Security or at Boot Options, or at Authentication settings,* to find the Secure Boot option and Disable it.
* Notes:
1.The location of the ‘Secure Boot’ setting in BIOS, depends on device’s manufacturer.
2. If you cannot find the ‘Secure Boot’ setting, then Disable the CSM Support and then Save and Exit form BIOS setup. Then enter into BIOS setup again to find the Secure Boot.
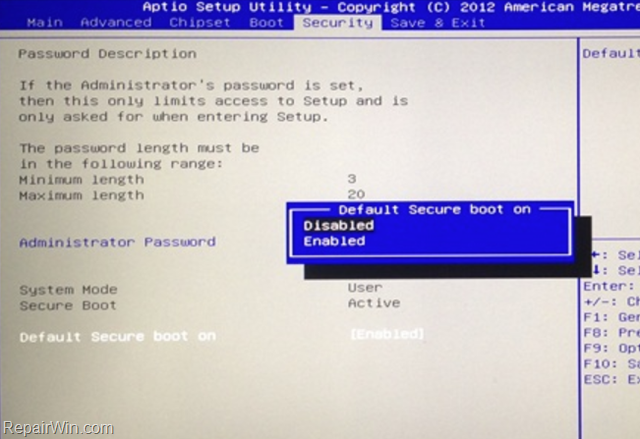
3. Save settings and EXIT BIOS Setup.
4. Let Windows to boot normally and try to install the update. If the update fails again, then re-enable the ‘Secure Boot’ and continue to next method.
Method 2. FIX Error 0xC1900101-0x30018 by Repairing Windows 10 System Files.
1. Open Command Prompt as Administrator.
2. In command prompt give the following command and press Enter:
- DISM.exe /Online /Cleanup-image /Restorehealth

3. When the DISM operation is completed, type the following command and hit Enter:
- sfc /scannow

4. Now wait until the System File Checker repairs the Windows System Files.
5. When this done, restart your computer and try to install the Update.
Method 3. Update Windows from the Windows 10 ISO File .
The next method the Windows 10 update error “0xC1900101 – 0x30018: Installation failed in FIRST_BOOT phase” is to update Windows 10, from the Windows ISO file. To do that:
Step 1. Download Windows 10 in a ISO File.
1. Navigate to Windows 10 download page and click Download Tool now to download Media Creation Tool.
2. Run the downloaded file file and Accept the License Terms at the first screen.
3. Select Create installation media for another PC.
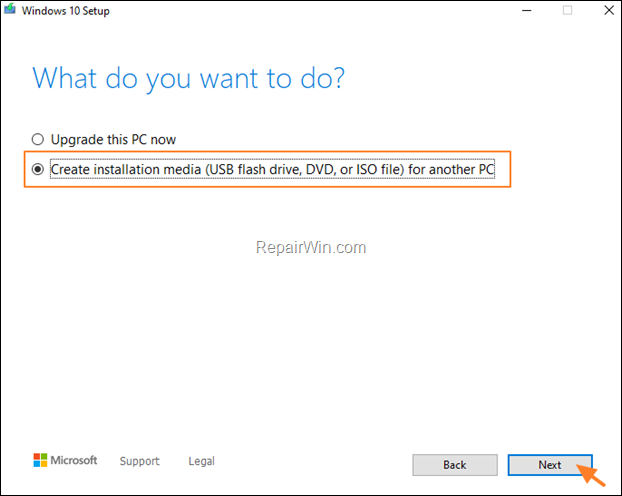
4. At ‘Language, architecture and edition’ screen click Next.
5. Select ISO file and click Next.
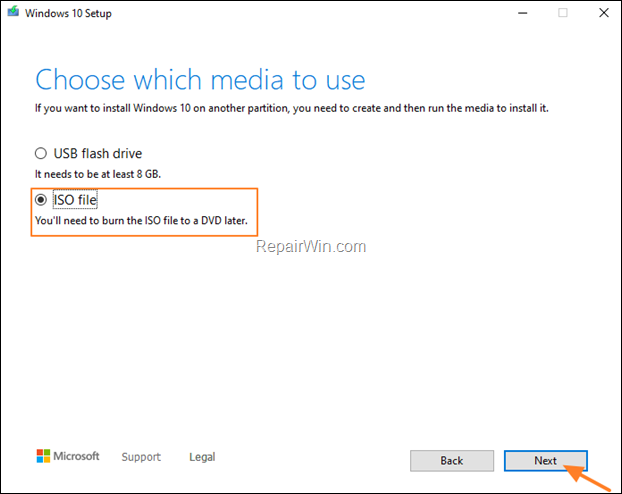
6. Save the ‘Windows.iso’ file to your desktop.
7. The Media Creation Tool will now begin to download the Windows 10 in an ISO format.
8. When the download is completed, close the Media Creation Tool.
Step 2. Run Disk Cleanup.
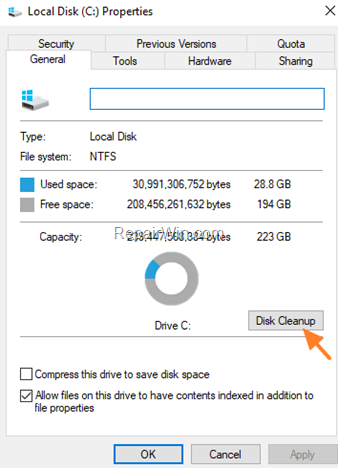
1. Right-click on drive C: and select Properties.
2. At General tab, click Disk Cleanup.
3. At ‘Disk Cleanup’ window, click Clean up system files.
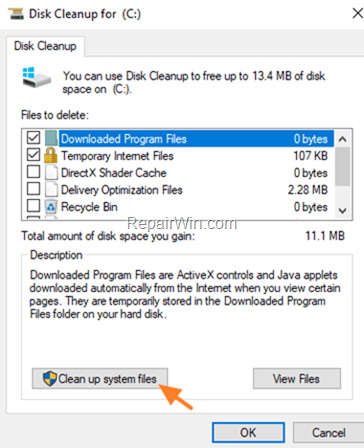
4.In addition to the files selected for deletion, select the following and click OK to delete them.
- Windows Update Cleanup
- Windows upgrade log files
- Temporary Windows installation files
![image_thumb[10] image_thumb[10]](https://qnet88.com/wp-content/uploads/2021/12/image_thumb10_thumb.png)
5. Close the Disk Cleanup tool and continue to next step.
Step 3. Run DISM & SFC tools to repair Windows 10.
Now, follow the steps in Method 2 above and run the DISM & SFC tools to repair Windows 10.
Step 4. Update Windows 10 from the ISO file.
1. IMPORTANT: Disconnect your computer from the Internet, (or set it to “Airplane mode” if you own a laptop).
2. IMPORTANT: Disable or temporarily uninstall any third-party antivirus.
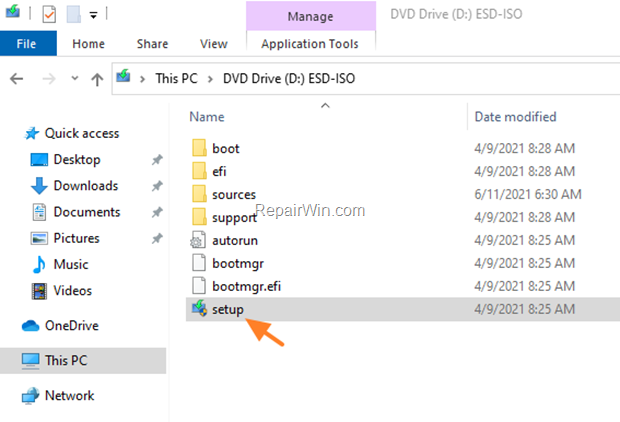
3. Then, right click on the “Windows.iso” file (on your desktop) and click Mount.
4. Double click at Setup application.
5. Click Next to install Windows 10.
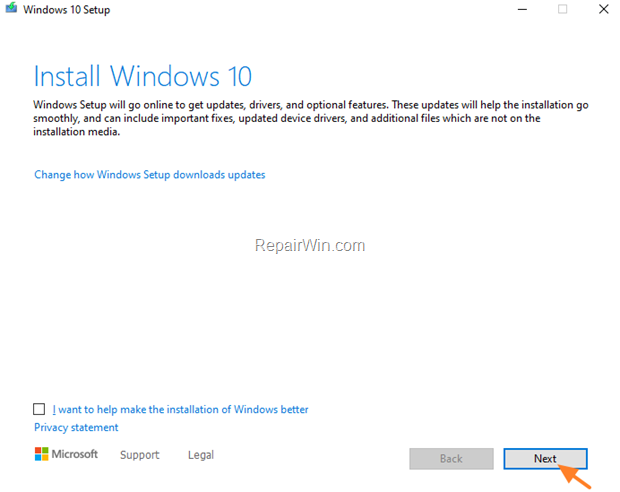
6. Follow the rest onscreen instructions to update your system.
Method 4. Clean install Windows 10.
The last method, to fix the Windows 10 Upgrade issues, is to perform a clean installation of Windows 10 on your system.
Important: The clean Windows 10 installation means that all your files and settings will be lost during the installation process. So, proceed and backup all your important files and settings to another storage media before continue. (e.g. to an external USB drive).
To perform a clean Windows 10 installation read the instructions on this article: How to clean install Windows 10
That’s all folks! Did it work for you? Please leave a comment in the comment section below or even better: like and share this blog post in the social networks to help spread the word about this solution.

