If you have connected your TV to your laptop using an HDMI cable and there is no sound output while playing a video, or the HDMI is not displayed as a Playback device, continue reading this tutorial.
Problem in details: On a laptop running Windows 10, the Digital Output device (HDMI) is not listed as a Playback device and there is no sound output when connected to the TV with an HDMI cable.
The “No sound output from HDMI” issue in Windows 10, may appear for several reasons, so in this guide you will find step-by-step instructions to troubleshoot the problem.
How to FIX: No Sound Output from HDMI & HDMI Not Displayed in Playback devices in Windows 10*
* Suggestions: Before your continue to the steps below:
- Right click at the sound icon
 on the taskbar to Open Volume Mixer and ensure that the Digital Output device is not muted.
 - Make sure the HDMI cable is properly connected both on the laptop and the TV.
- After connecting the HDMI cable, restart your computer.
- In the TV, set the correct HDMI Port as the video input device.
- If your own a laptop, close the lid or press the Power button once, to put your laptop to sleep. Then press again the power button and check the sound from the HDMI again.
- Check if the problem persists, with another HDMI cable.
Step 1. Set HDMI as the Default Playback Device.
The first step to resolve the HDMI Audio issues on Windows 10, is to set HDMI as the Default Audio device.
1. Navigate to Windows Control Panel and open Sound.
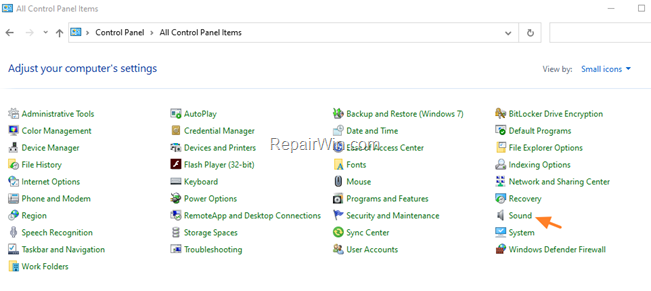
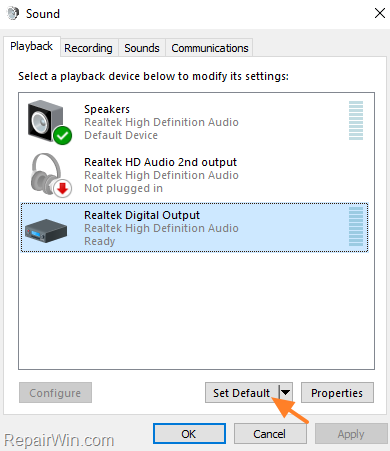
2. Make sure that Digital Output (HDMI) is the Default playback device, otherwise select the Digital Output device and click the Set Default button. When done, play a video to test the HDMI sound and if the problem persists, continue to the next step. *
* Notes: Try the following, according your case:
1. If the Digital Output device is disabled, right click on it and click Enable. Then highlight it and press Set Default.
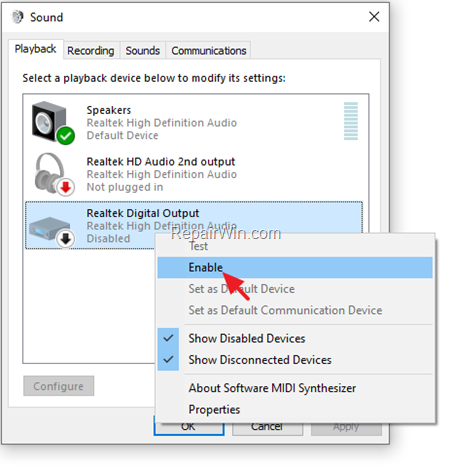
2. If the Digital Output device is not showing as a Playback device:
a. Right-click on an blank space and ensure that both the Show Disabled Devices and the Show Disconnected devices options are selected (checked). If any of the above options is not selected, then click on it to select it.
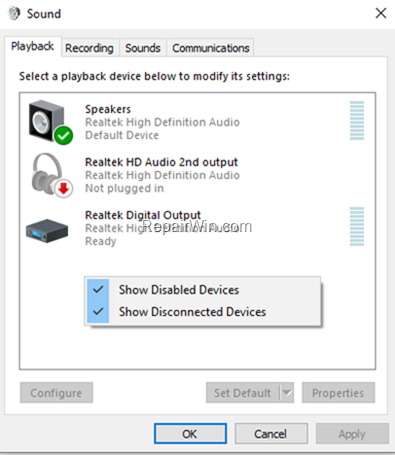
b. Then right-click at Digital Output device and choose Enable.
c. When done, set as default the Digital Output device.
Step 2. Roll back the Sound Card Driver.
In some cases, the “HDMI no sound to TV” issue, may appear after an automatic driver update. So, proceed and rollback the audio driver.
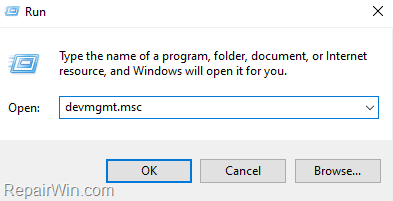
1. Open Device Manager. To do that:
1. Press Windows
+ R keys to open the run command box.
2. In the “Open” box, type: devmgmt.msc & click OK.
2. Expand the Sound, video and game controllers.
3. Right click on the High Definition Audio device and select Properties.
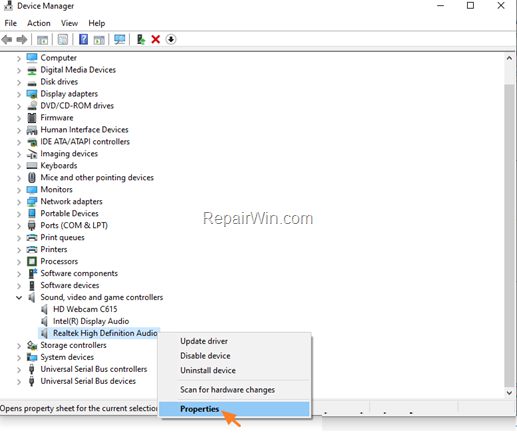
4. At Driver tab, click Roll Back Driver button. *
* Note: If the Roll Back Driver button is inactive, continue to the next step.
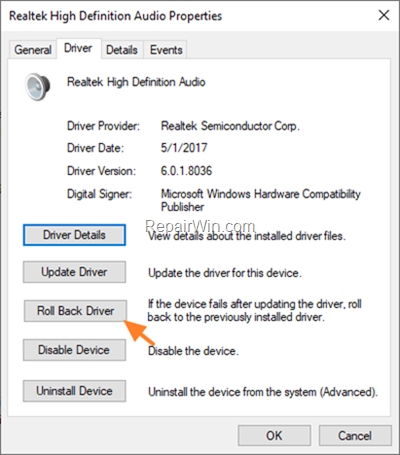
5. Select a reason for the driver package rollback and click Yes.
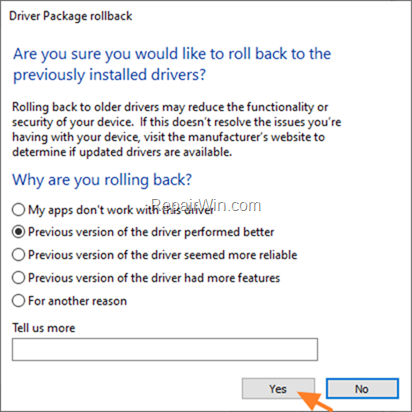
4. When the driver rollback is completed, restart your computer.
5. After restart, proceed and test the sound from the HDMI. If you still cannot hear sound on your TV, continue to the next step.
Step 3. Change the Sound Card Driver.
The absence of sound is often due to the wrong sound card driver. To fix, this problem:
1. Open Device Manager.
2. Expand the Sound, video and game controllers.
3. Right click at Realtek High Definition Audio device and select Update Driver.
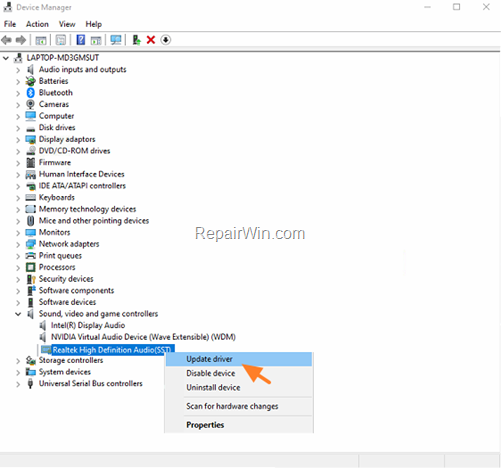
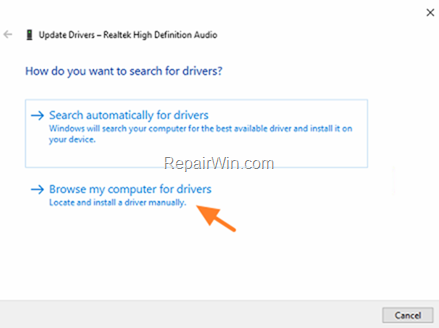
4. Select Browse my computer for drivers.
5. Select Let me pick from a list of available drivers on my computer.
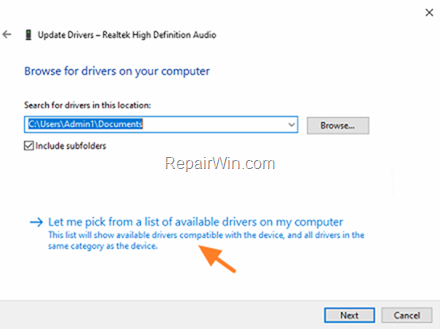
6. At the next screen, select the High Definition Audio Device and click Next.
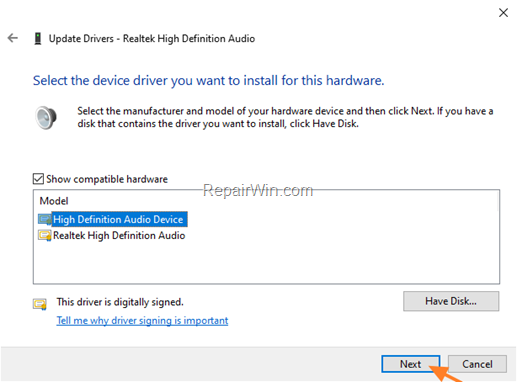
8. When the driver installation is completed, restart your computer.
9. After restart, proceed and test the sound from laptop’s speakers.
Step 4. Uninstall and Re-Install the Sound Card Driver.
1. Open Device Manager.
2. Expand the Sound, video and game controllers.
3. Right click at High Definition Audio device and select Uninstall device.
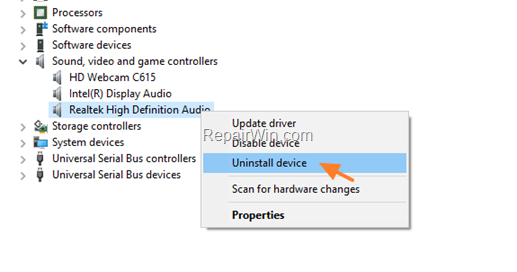
4. After uninstall, restart your computer, and let Windows to install the sound drivers automatically. If this doesn’t happen, then navigate to Settings > Update and Security and force Windows to Check for updates.
Step 5. Uninstall and Re-Install the Display Adapter.
1. Open Device Manager.
2. Expand the Display adapters.
3. Right-click on the installed display adapter and select Uninstall device.
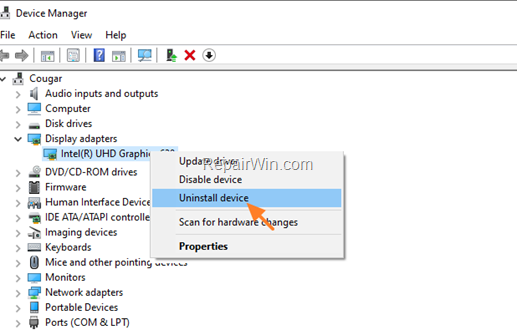
4. After uninstall, restart your computer, and let Windows to install the display drivers automatically. If this doesn’t happen, of if you still face the issue, navigate to your laptop’s manufacturer support site and download the latest display drivers according your laptop model.
That’s all folks! Which method worked for you? Please leave a comment in the comment section below or even better: like and share this blog post in the social networks to help spread the word about this solution.

