.single .post-author, .post-date {
text-transform: none;
}
,
Last updated: November 20th, 2023
If the Windows 11 KB5031354 fails to install with error 0x800F081F, in this troubleshooting guide you’ll find detailed steps to fix the problem.
The Error 0x800F081F when installing updates in Windows 11 usually occurs when there are problems with either the update files, or the system files. In rarer cases, the problem occurs due to installed security software or due to disk problems.
This tutorial contains instructions to resolve the installation error 0x800F081F when installing the “2023-10 Cumulative Update for Windows 11 Version 22H2 for x64-based Systems (KB5031354)}”
How to FIX Error 0x800F081F on KB5031354 Update in Windows 11.
Method 1. Force Windows to download again the KB5031354 Update.
Sometimes errors may occur when installing updates, because the installation files for an update may not be downloaded correctly or have errors. So, the first step to troubleshoot the error 0x800F081F on KB5031354 Update, is to force Windows to re-download the update’s installation files.
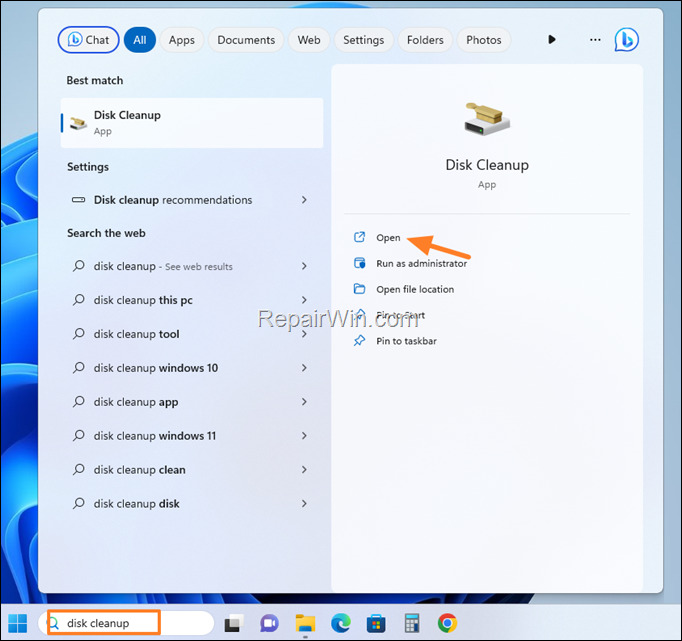
1. Type “disk cleanup” in the search bar and then open the Disk Cleanup App.

2. At ‘Disk Cleanup’ window, click Clean up system files.


3. In addition to the files selected for deletion, select the following and click OK to delete them.
- Windows Update Cleanup
- Windows upgrade log files
- Temporary Windows installation files


4. Close the Disk Cleanup tool.
5. Now, navigate to Start > Settings > Windows Update and click Check for Updates.
6. Let Windows to search and download the update again and then proceed to install it.
Method 2. Install KB5031354 Update Manually.
The second method to bypass the install error 0x800F081F in KB5031354, it to download and install the update manually from Microsoft update catalog.
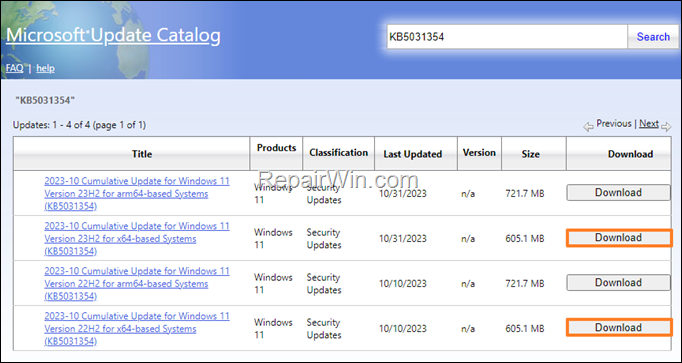
1. Navigate to this link: https://www.catalog.update.microsoft.com/Search.aspx?q=KB5031354
2. According to the version of Windows 11 (22H2 or 23H2)* you have click on the corresponding download button.
* Note: To view the installed Windows 11 version, type “winver” in the search and then click to run the winver command.

3. Then click on the given link to download the KB5031354 update file.
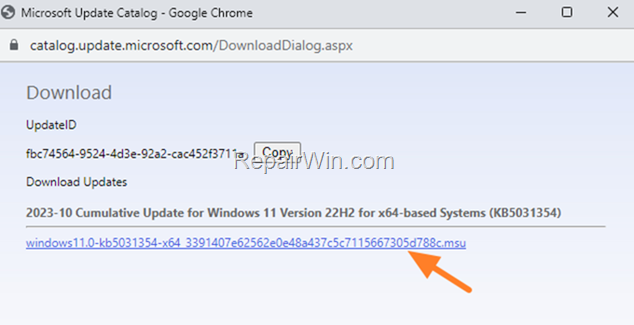

4. Finally, double-click on the downloaded file to install the KB5031354 update.
Method 3. Install the next update released after KB5031354.
Some Windows updates may not install because they are problematic. In such a case, installing the next released KB update may fix the problem. So, at this case:
1. Download and install the KB5032190 from Microsoft update catalog, and see if that fixes the problem.
Method 4. Repair Windows System Files with DISM & SFC Tools.
If the above method do not solve the problem, try checking and repairing any errors in the Windows system files as follows:
1. Open Command Prompt as Administrator.
2. In command prompt give the following command and press Enter:
- DISM /Online /Cleanup-Image /StartComponentCleanup


3. When the process is completed, give the following command:
- DISM.exe /Online /Cleanup-image /Restorehealth


4. When the DISM operation is completed, type the following command and hit Enter:
- sfc /scannow


5. Now wait until the System File Checker (SFC), repairs the Windows System Files.
6. When this done, restart your computer.
7. Open Windows Update and try to install the failed update(s).
Method 5. Delete the Windows Update Store folder.
Step 1: Stop the ‘Windows Update’ service.
1. Open Windows Services control panel: To do that:
- Press Windows

 + R keys to open the run command box.
 - In the Search box, type: services.msc & click OK.
- Press Windows


2. In Services control panel locate the Windows Update service.
2a. Right-click on Windows Update service and select Stop.
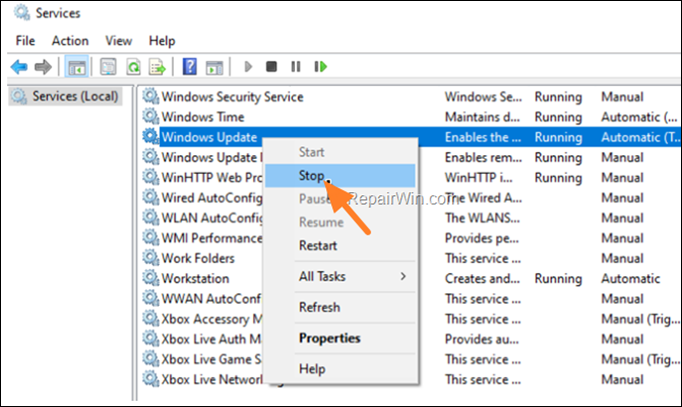

3. Now, without closing the Services window proceed to Step-2 below.
Step 2: Delete the ‘SoftwareDistribution’ folder. *
* Info: The “C:WindowsSoftwareDistribution“ folder, is the location where Windows store the Windows Updates. Many times, this folder becomes corrupted and you must re-create it in order to download the updates from scratch.
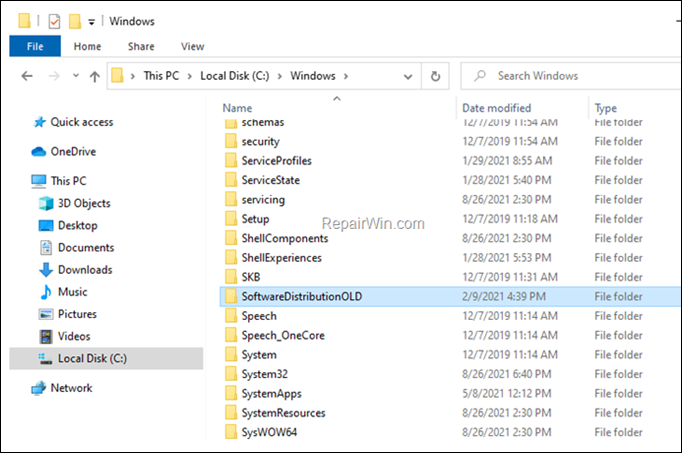
1. Open Windows Explorer and navigate to: C:Windows folder.
2. Find and Delete the SoftwareDistribution folder (or rename it. e.g. to “SoftwareDistributionOLD”) .

Step 3. Start the ‘Windows Update’ service.
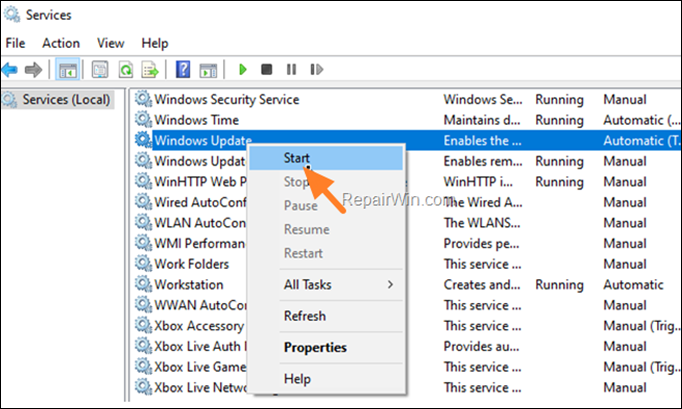
In Windows Services control panel, apply the following actions:
1. Right-click on Windows Update service and select Start.

Step 4: Check and Install Windows 10 Updates.
1. Navigate to Start > Settings > Windows Update and click Check for Updates.
2. Let Windows to search and download the update again and then proceed to install it.
Method 6. Disable or Uninstall any 3rd Party Antivirus Program.*
Although disabling or uninstalling your antivirus puts your computer at risk, many users report that uninstalling their third-party antivirus (especially Norton & Malwarebytes), resolves the 0x800F081F installation issue in Windows 11 update KB5031354.
So, if you’re using any third-party antivirus perform the following steps:*
* Note: If you don’t have a third-party antivirus installed, skip to next method.
1. Uninstall your third-party Antivirus.
2. Follow the instructions on Method-1 above and try to install the KB5031354 update again.
3. When the installation is completed, reinstall your Antivirus program.
Method 7. Upgrade Windows 11 with an In-Place Upgrade.
If none of the above methods helped to resolve the Windows 11 KB5031354 0x800F081F install error, try upgrading with an “In-place Upgrade”. To perform this task, follow the instructions in this tutorial: How To Repair Windows 11 With In-Place Upgrade.
That’s all folks! Did it Work for you? And if so, by what method?
Please leave a comment in the comment section below or even better: like and share this blog post in the social networks to help spread the word about this solution.

- Author
- Recent Posts
- FIX: KB5031354 fails to install – 0x800F081F on Windows 11 (Solved) – November 20, 2023
- How to Stop Adobe Acrobat DC Updates. – November 15, 2023
- FIX: Adobe Photoshop Could not import the clipboard (Solved) – November 13, 2023

