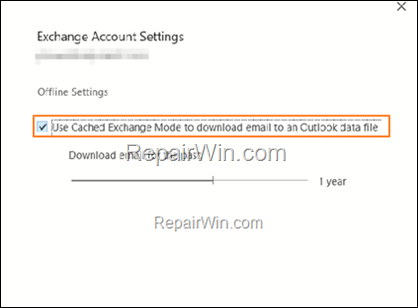
If you cannot enable the “Use Cached Exchange Mode” option, because is greyed out, continue reading below to fix the problem.
Cached Exchange Mode gives users the ability to access all their email even when they are not connected to the Exchange Server. The usual way to activate the Cached Exchange Mode is to open the account settings in Outlook and to check the option “Use Cached Exchange Mode to download email to an Outlook data file“. However, some users complain that this option is greyed out (inactive) and they can’t turn it on.
* Note: The “Use Cached Exchange Mode” option in Outlook will be grayed out is you’re using a POP3 or IMAP account


If you are using an Exchange account and the “Use Cached Exchange” option is disabled, this is probably due to a group policy set by your network administrator. At such a case contact your network administrator to disable this policy,* or apply the instructions below to bypass the policy restriction.
* Note: See the Note at the end of this article to allow the creation of OST files via Group Policy.
How to FIX: Use Cached Exchange Mode option is Grayed Out and Cannot be Enabled. (Outlook 2019, 2016, 2013 or Outlook for Office 365.
1. Close Outlook.
2. Press the Windows ![]()
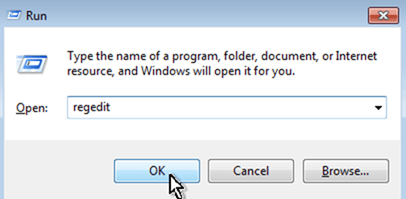
![]() + R keys to open the run command box.
+ R keys to open the run command box.
3. Type regedit and press Enter.


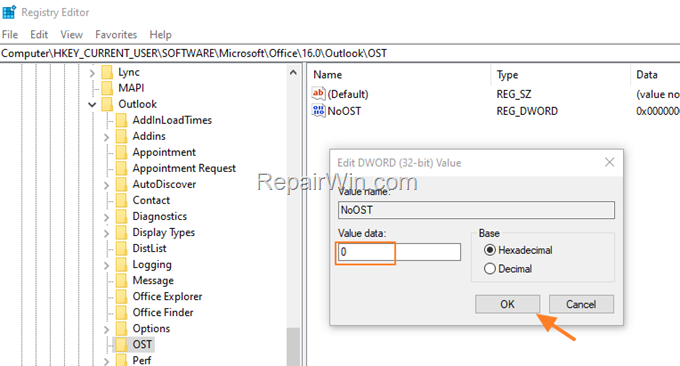
4. In Windows registry navigate (from the left pane) at the following path according your Outlook version: *
Outlook 2019/2016 or Outlook for Office365
- HKEY_CURRENT_USERSOFTWAREMicrosoftOffice16.0OutlookOST
Outlook 2013
- HKEY_CURRENT_USERSOFTWAREMicrosoftOffice15.0OutlookOST
* Note: If the OST folder is missing, right click in Outlook folder and
5. At the right pane, do one of the following actions:
- Delete the NoOST REG_DWORD value, OR…
- Double-click to open the NoOST REG_DWORD value, and set the value data to 0 or to 3 to enable the Cached Exchange Mode. *


* Note: The value of NoOST can be one of the following:
Value Description
0 An OST is created by default and used for calendar caching. You can enable offline access and use the offline store. This is the default if the NoOST entry is missing.
1 An OST is set up by default and used for calendar caching. Users cannot enable offline access or use the offline store. The options in the Exchange Server properties are not available.
2 An OST is not set up by default and you cannot enable offline access or use an offline store. The options in the Microsoft Exchange Server properties are not available.
3 An OST is not set up for Online mode. Users can enable offline access and use the offline store.
6. Now, navigate at the following path, according your Office version:
Outlook 2019/2016 or Outlook for Office365
- HKEY_CURRENT_USERSoftwarePoliciesMicrosoftOffice16.0OutlookCached Mode
Outlook 2013
- HKEY_CURRENT_USERSoftwarePoliciesMicrosoftOffice15.0OutlookCached Mode
7. At right pane, delete the “Enable” REG_DWORD value if exists, or set the value data to 1.
8. Click OK and close the Registry Editor.
9. Start Outlook. The “Use Cached Exchange Mode” option will be enabled now.*
* Note: If the problem persists, contact your network administrator to allow the creation of OST files through Group Policy using the following steps:
1. Open the Group Policy Management Editor and open the default domain policy (or the policy you have specified for the exchange cached mode).
2. In Group Policy, navigate to:
- User ConfigurationPoliciesAdministrative TemplatesMicrosoft Outlook xxAccount SettingsExchange
3. At the right pane:
a. Set the Do not allow an OST file to be created to Disabled.
b. Open the Cached Exchange mode folder and set the Use Cached Exchange mode for new and existing Outlook profiles to Enabled.
4. Close the group policy editor and give the gpupdate /force command to apply the change to all workstations.
That’s all folks! Did it work for you?
Please leave a comment in the comment section below or even better: like and share this blog post in the social networks to help spread the word about this solution.

Bài liên quan
- FIX: Error 0x81000203 in System Restore. (Solved)
- Cannot Access Shared folder. User has not been granted the requested logon type at this computer. (Solved)
- FIX: Cannot clear TPM – 0x80284001, 0x80290300 or 0x80290304.
- Unable to Schedule Teams Meeting in 15 or 10 minutes slots (Solved)
- How to Share Folder without Username/Password on Windows 10/11.
- FIX: Thunderbird High CPU or Memory Usage issues.