If you’re looking for a way to view and backup Chrome Usernames and Passwords in order to restore them in another computer, continue reading below.
Some times there is the need to perform a fresh Chrome installation (completely uninstall and reinstall Chrome) in order to resolve problems with our favorite browser. At these cases you have to backup your Chrome bookmarks and all the saved usernames and passwords in Google Chrome, in order to restore them after the new installation.
Where Chrome Login Data (Usernames & Passwords) are stored?
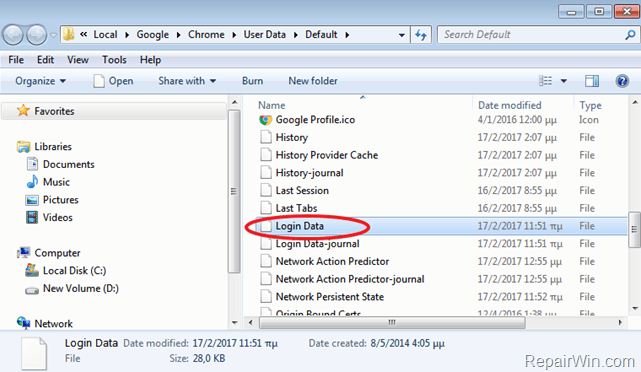
Chrome Usernames: The saved usernames in Chrome, are stored in a single file which named “Login Data” and can be found at the following location on the disk:
If you use Windows 10, 8, 7 or Vista:
- C:Users%Username%AppDataLocalGoogleChromeUser DataDefault
- e.g. If your username is “User” then the “Login Data” file is stored at ‘C:UsersUserAppDataLocalGoogleChromeUser DataDefault’ folder
If you use Windows XP:
- C:Documents and Settings%Username%Local SettingsApplication DataGoogleChromeUser DataDefault
- e.g. ‘If your username is “User” then the “Login Data” file is stored in ‘C:Documents and SettingsUserLocal SettingsApplication DataGoogleChromeUser DataDefault’ folder.
Chrome Passwords: Unfortunately Chrome does not store the saved passwords in the Login Data file (as many sites mistakenly claimed). It stores only the usernames.
This tutorial contains instructions on how to backup and restore Chrome Stored Credentials (Usernames and Passwords).
How to Backup and Restore Chrome Login Data (Usernames and Passwords).
The most reliable ways to backup the saved login credentials in Google Chrome are the following:
Method 1. Backup & Restore Chrome Login Credentials using your Google Account.
The first and most easiest method to backup and restore the saved usernames and passwords from Google Chrome, is to synchronize all your Chrome data (Bookmarks, Username & Passwords) to your Google Account, by using the “Sync Settings” from Chrome options. To do that:
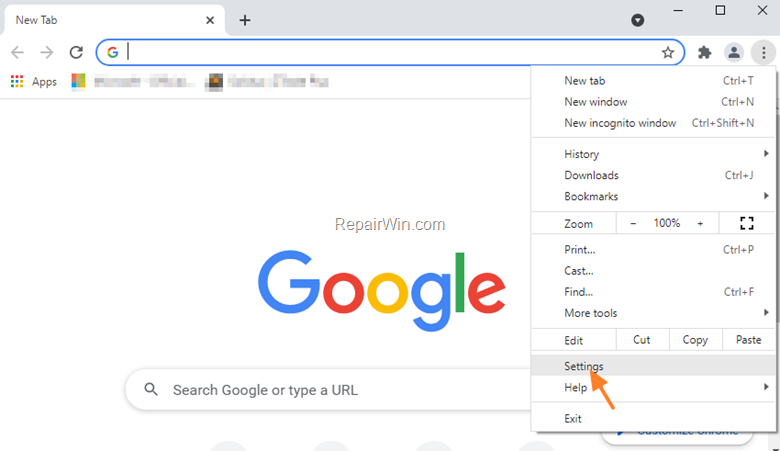
- From Chrome Options menu
 at the top right, select Settings.
 - Sign in to Chrome, by using your Google Account.
- Under “Sign in,” click Advanced sync settings.
- Choose the information that you want to sync to your Google Account and click OK.
- After backing-up your Chrome data to your Google account, whenever you sign-in to Chrome with your Google account at any device, your bookmarks and your login info will be synchronized to the new device.
Method 2. Backup Chrome Usernames & Passwords & Restore them Manually.
The second method is to manually backup & restore the Chrome saved Login Data (Usernames & Passwords) by using the instructions below:
Step 1. Backup Chrome Passwords & Usernames.
At first, retrieve and write down (e.g. in a text file), all the saved usernames and passwords in Chrome by using one of the following options:
Option 1. View and export the Chrome Usernames and Passwords by using the WebBrowserPassView utility.
- Related article: How to view all stored passwords in all Web Browsers.
Option 2. Export the Chrome Usernames & Passwords to .CSV file:
To save the stored usernames and passwords from Google Chrome to a C.SV file:
- Click on Chrome’s menu
 icon at the upper right corner, and choose Settings.
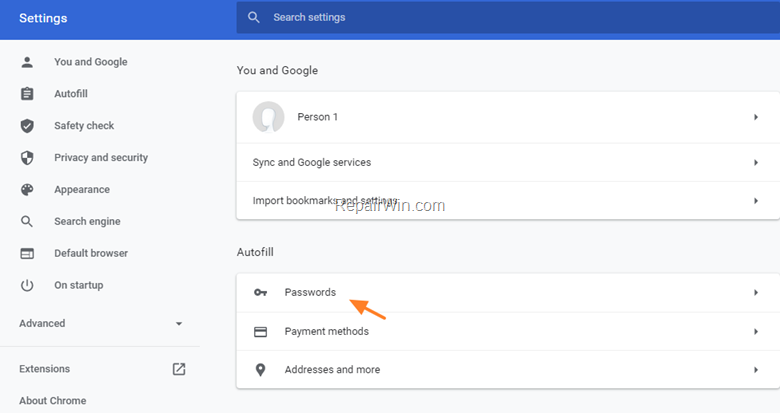
2. At ‘Autofill’ section click Passwords.

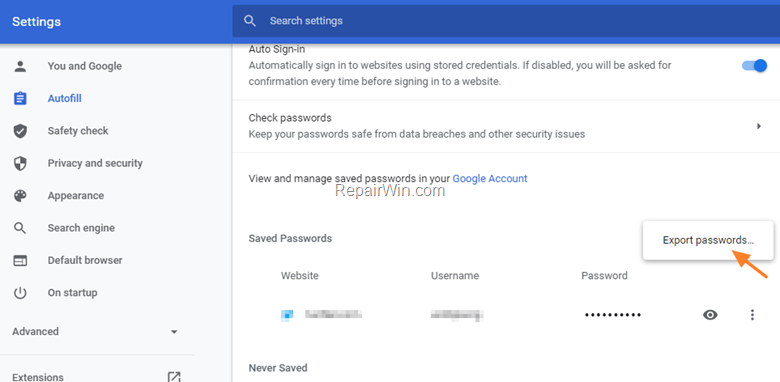
3. Click the three dots icon
 next to Saved Passwords and choose Export Passwords. *
* Note: If you want to view the saved password for a specific website, click the “Show Password” (eye) icon, next to the site you want to view the password for.

4. Click Export Passwords again, and then type (if asked) your Windows (User) password & click OK.
5. Save the “Chrome Passwords.csv” to the backup location.
Step 2. Backup Chrome Login Data file.
2. Navigate to the following locations (according your OS) and copy the “Login Data” file, which contains the stored “Usernames” from Chrome, to your backup location:
If you use Windows 10, 8, 7 or Vista:
- Simultaneously press “Windows” + “R” keys to open the RUN window.
- In “RUN” window copy and paste the following command:
- %LOCALAPPDATA%GoogleChromeUser Datadefault
- Press Enter
- Find the ‘Login Data‘ file and copy it to the backup location.
If you use Windows XP:
- Simultaneously press “Windows” + “R” keys to open the RUN window.
- In “RUN” window copy and paste the following command:
- %USERPROFILE%Local SettingsApplication DataGoogleChromeUser Datadefault
- Press Enter
- Find the ‘Login Data‘ file and copy it to backup location.
2. Proceed reading below to learn how to restore all Chrome Usernames and Passwords to the new computer.
Step 3. Restore Chrome Usernames & Passwords from .CSV file.
To restore your Chrome usernames and passwords:
1. Exit Google Chrome.
2. Copy and Paste the “Login Data” file (that you copied at Step-2) from the backup location, to the Chrome ‘Default’ folder. To do that:
- If you use Windows 8, 7 or Vista:
- Copy the Login Data file from the backup.
- Simultaneously press “Windows” + “R” keys to open the RUN window.
- In “RUN” window copy and paste the following:
- %LOCALAPPDATA%GoogleChromeUser Datadefault
- Press Enter
- Paste the Login Data file.
- If you use Windows XP:
- Copy the Login Data file from the backup.
- Simultaneously press “Windows” + “R” keys to open the RUN window.
- In “RUN” window copy and paste the following:
- %USERPROFILE%Local SettingsApplication DataGoogleChromeUser Datadefault
- Press Enter
- Paste the Login Data file.
3. Launch Chrome.
4. In Chrome address bar, type:
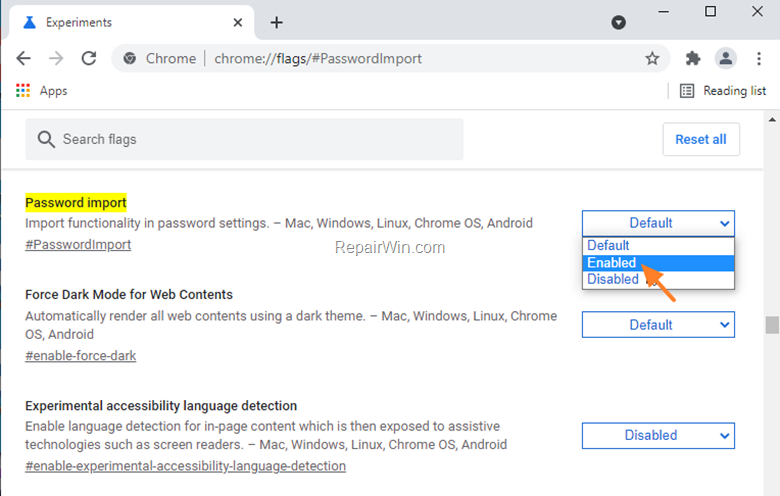
- chrome://flags/#PasswordImport
5. Set the Password Import setting to Enabled and click the Relaunch button.
6. After Chrome restart, from the Chrome menu ![]() , choose Settings.
, choose Settings.
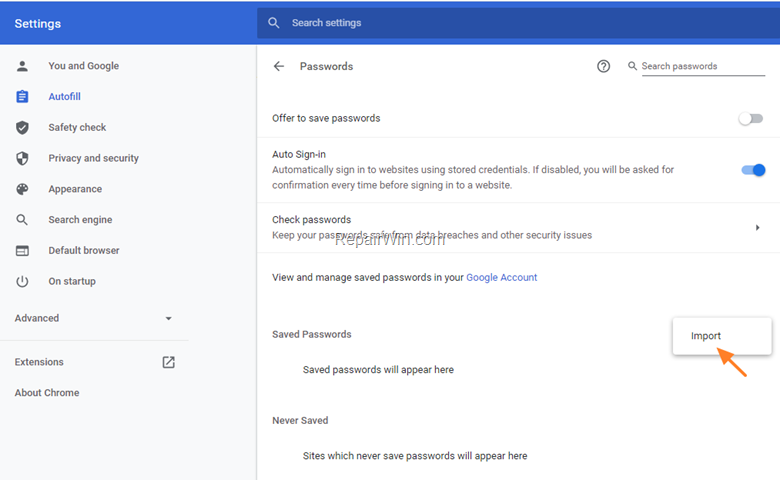
7. Click Passwords and the then click the three dots icon ![]() next to ‘Saved Passwords’ and choose Import.
next to ‘Saved Passwords’ and choose Import.
8. Select the “Chrome Passwords.csv” file from the backup location and click Open.
9. You’re done! Visit one by one all the websites and check if you can login without typing your credentials. If not, then type again your username and the password from the CSV file.
That’s all folks! Did it work for you?
Please leave a comment in the comment section below or even better: like and share this blog post in the social networks to help spread the word about this solution.

