By default the OneDrive App, is installed automatically during the Windows 10 installation and run at Windows startup. If you don’t want to use OneDrive, then follow the instructions below to disable OneDrive at Windows 10 startup and to remove OneDrive from Explorer’s Navigation pane.
This tutorial contains instructions to prevent OneDrive to start at Windows startup and to remove OneDrive from the Navigation Pane in Windows 10/8/8.1.
- Related article: How to Completely Uninstall OneDrive.
How to Disable OneDrive to Start Automatically in Windows 10.
To stop OneDrive from starting:
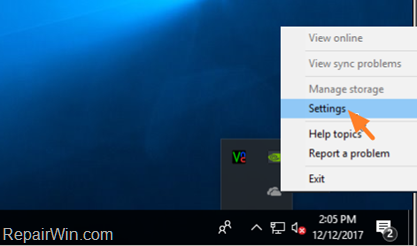
1. At notification area at the bottom right corner, right click at OneDrive icon and choose Settings.
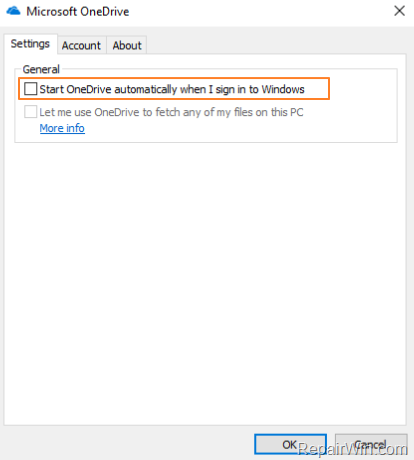
2. At Settings tab, unselect the Start OneDrive automatically when I sign in to Windows checkbox and click OK.
3. Then proceed (if you want) to remove the OneDrive shortcut from the Explorer navigation pane in Windows Explorer.

How to remove OneDrive from Navigation Pane in Windows 10.
If you want to disable OneDrive from the File Explorer pane: *
* Note: Keep in mind that disabling the OneDrive in Explorer’s sidebar, doesn’t mean that you’ll remove also the “OneDrive” folder and it’s contents in your profile folder (“C:Users%YourUserName%OneDrive”). So, after disabling the “OneDrive” shortcut at the navigation pane, transfer the contents of the “C:Users%YourUserName%OneDrive” folder to another location on your disk and then delete the OneDrive folder.
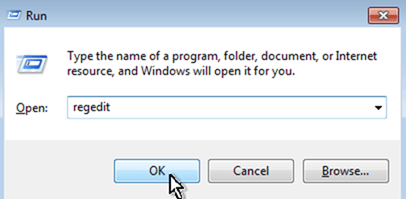
1. Open open Registry Editor. To do that:
- Simultaneously press “Windows” + “R” keys to open the RUN window.
- In “RUN” window “Open” box, type: regedit
- Press Enter.
2. From the left pane, navigate to the following key:
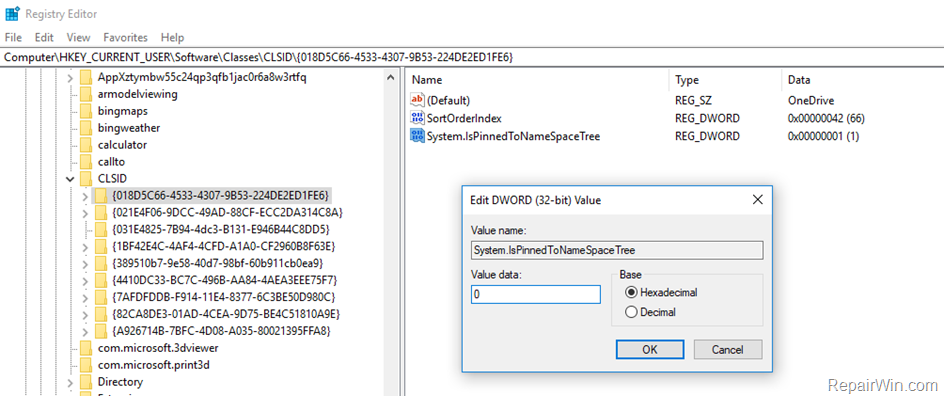
- HKEY_CURRENT_USERSOFTWAREClassesCLSID{018D5C66-4533-4307-9B53-224DE2ED1FE6}
3. At the right pane, double click at System.IsPinnedToNameSpaceTree REG_DWORD value and change the value data from 1 to 0.
4. Click OK and then close Registry Editor.
5. Close and reopen Windows Explorer.
That’s all folks! Did it work for you?
Please leave a comment in the comment section below or even better: like and share this blog post in the social networks to help spread the word about this solution.

