Fortunately with VirtualBox 7.0 and later, Oracle has included in its hypervisor the option to enable TPM and Secure Boot support for any operating system that needs them to run, like the Windows 11.
The system requirements for installing Windows 11 are that your system must have a 64-bit compatible processor, at least 4 GB of RAM, and support TPM and Secure Boot.
VirtualBox now offers the ability to emulate the TPM and Secure Boot features in order to allow the virtual machine to use the TPM & Secure Boot functionalities as if it were a physical machine.
This guide contains instructions on how to enable TPM and Secure Boot on an Oracle VirtualBox VM machine to install Windows 11, even if the host machine does not support TPM or Secure Boot.
How to Enable TPM & Secure Boot Support in VirtualBox.
Step 1. Install VirtualBox 7.0 or later.
* Note: If you’re already have installed VirtualBox 7.0 or later version, skip to next step.
1. Download and install the latest Microsoft Visual C++ Redistributable package and restart your PC.


2. Navigate to VirtualBox download site and…
a. Download and Install the latest VirtualBox version for Windows hosts (Version 7 or later).
b. Download and install the Oracle VM VirtualBox Extension Pack.


Step 2. Enable TPM, EFI and Secure Boot features in VirtualBox 7.
To enable the TPM and Secure Boot support in a VirtualBox Machine in order to install Windows 11, apply the following steps:
1. Open the VM Settings and at the System options, do the following:
1. Choose TPM: v2.0
2a. Enable EFI (Special OSes only)
2b. Enable Secure Boot *
3. Click Reset keys to Default and then click OK.
4. Finally click OK to save the changes.


2. Now you’re ready to install Windows 11.
Additional Help:
1. To install Windows 11 in the Virtual Machine, go to Storage settings, select the Storage Controller and click the Add button next to it to select the Windows 11 ISO file.


2. After attaching the Windows 11.iso file click OK.


3. Now Start the VM Machine and continue to the installation of Windows 11. *
* Note: After installing Windows 11 on the Virtual Machine, you can check that the TPM 2.0 is recognized by doing the following:
1. Press Windows ![]()
![]() + R keys to open the run command box.
+ R keys to open the run command box.
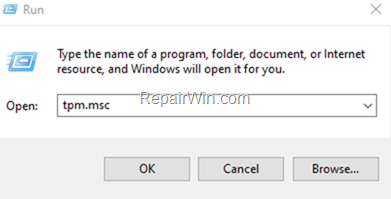
2. Type tpm.msc and press Enter to open the TPM Management Console.


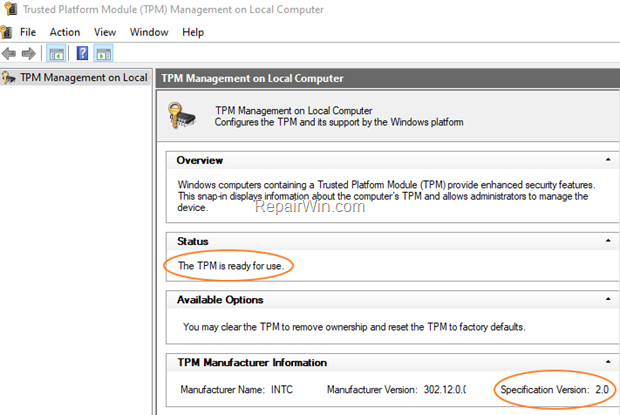
3. Normally, you’ll read under the Status: “TPM is ready for use“, and under the TPM Manufacturer Information: “Specification Version 2.0″.


- Related article: How to Install Windows 11 on VirtualBox even without TPM.
That’s all folks! Did it work for you?
Please leave a comment in the comment section below or even better: like and share this blog post in the social networks to help spread the word about this solution.


