Internet Explorer is already pre-installed on Windows 10 to support sites that use older web technologies. However, if you do not need Internet Explorer on your computer, you can easily remove it by following the instructions below.
The article contains detailed instructions on how to remove Internet Explorer & how to re-install Internet Explorer on your Windows 10 PC.
How to Remove & Install Internet Explorer 11 on Windows 10.
Method 1. Remove or re-Install Internet Explorer from Programs & Features.
1. The first method to uninstall or install Internet Explorer in Windows 10, is to navigate in Control Panel > Programs and Features > Turn Windows Features on or off.
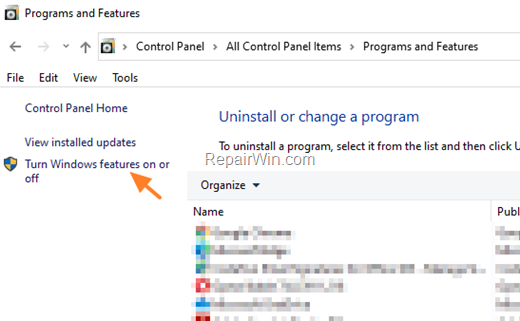
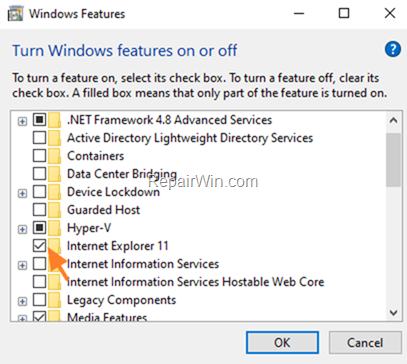
2. In Windows features options:
a. Uncheck the Internet Explorer 11 checkbox and click OK to remove Internet Explorer from your PC
or…
b. Check the Internet Explorer 11 checkbox and click OK to install Internet Explorer on your PC.
3. Close all open windows and restart your PC.
Method 2. Uninstall & re-Install Internet Explorer from Apps & features in Windows 10.
The second method to remove Internet (or to add Internet Explorer), in Windows 10 is to go to the Start ![]() menu > Settings
menu > Settings ![]() > Apps > Optional features
> Apps > Optional features
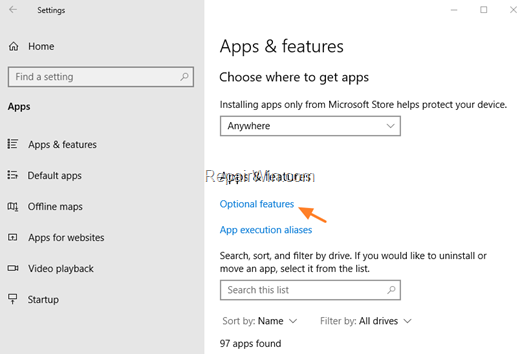
To Uninstall Internet Explorer from App & features:
a. Click at Internet Explorer 11 and click Uninstall.
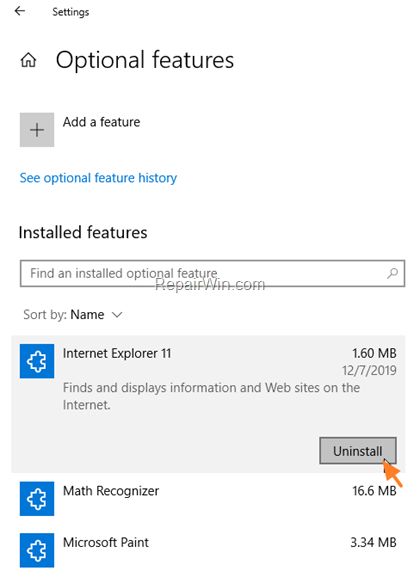
b. When the uninstall process is complete, restart your computer.
To Install Internet Explorer in Windows 10:
(Go to Start -> Settings > Apps > Optional features)
1. Press the Add feature + button.
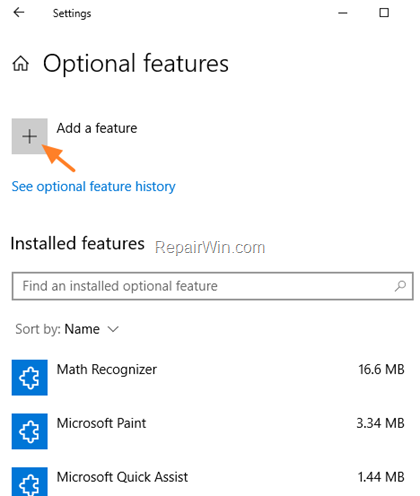
2. Search for (or locate in the list) the Internet Explorer 11 and click Install
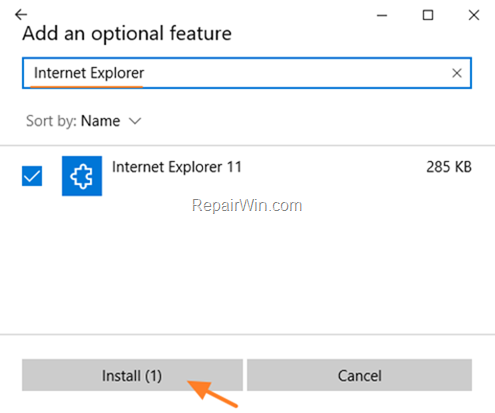
3. When the installation is complete, restart your computer and you’re done.
Method 3. Uninstall or Install IE11 using DISM.
Another method to uninstall IE11 from Windows 10, is to use the Deployment Image Servicing and Management (DISM) command-line tool to disable Internet Explorer.
1. Open Command Prompt as Administrator.
2. In command prompt, give this command and press Enter: *
- dism /online /Disable-Feature /FeatureName:Internet-Explorer-Optional-amd64
* Note: For Windows 10 32bit, give this command: dism /online /Disable-Feature /FeatureName:Internet-Explorer-Optional-x86

3. When prompted click the Y key to restart your PC. *
* Note: If you want to re-install Internet Explorer 11 in Windows 10, open again the Command Prompt line tool (as Administrator) and give this command:
- dism /online /Enable-Feature /FeatureName:Internet-Explorer-Optional-amd64
* Note: For Windows 10 32bit, give this command: dism /online /Enable-Feature /FeatureName:Internet-Explorer-Optional-x86

That’s all folks! Which method worked for you?
Please leave a comment in the comment section below or even better: like and share this blog post in the social networks to help spread the word about this solution.

