Like Windows 10, updates in Windows 11 are automatically installed in the background to keep your device safe and to fix problems or security flaws in the operating system. But there are times when, while a Windows update may resolve some problems, it can cause others and therefore requires removal in order to get your system back to normal.
Type of updates in Windows 11 :
As with Windows 10, Windows 11 updates fall into two categories:
1. Quality Updates: This is the most common type of updates containing minor fixes for the operating system and security updates, such as the latest definitions for Windows Defender.
2. Feature Updates: This type of updates includes major improvements for the operating system and typically released twice per year .
Quick Steps to Uninstall an Update in Windows 11:
1. Go to Start > Settings > Windows Update > Update history > Uninstall updates.
2. Select the update you want to remove, then select Uninstall.
3. Restart your PC after uninstalling the update.
This tutorial contains all the available methods with step-by-step instructions for uninstalling updates on Windows 11.
- Related article: How to prevent an Update or Driver from been installed in Windows 10/11.
How to Uninstall Windows 11 Updates (All Methods).
- Method 1. Uninstall Windows 11 Updates from Windows Update options.
- Method 2. Uninstall Windows 11 Updates from Control Panel.
- Method 3. Uninstall Windows 11 Updates from Command Prompt.
- Method 4. Uninstall Windows 11 Updates from PowerShell
- Method 5. Uninstall Windows 11 Updates from Windows Recovery Environment.
Method 1. How to Uninstall Updates from Windows Update options.
1. Click Start ![]()
![]() and then click Settings
and then click Settings ![]()
![]()
2. Select Windows Update on left and then click Update history at the right.
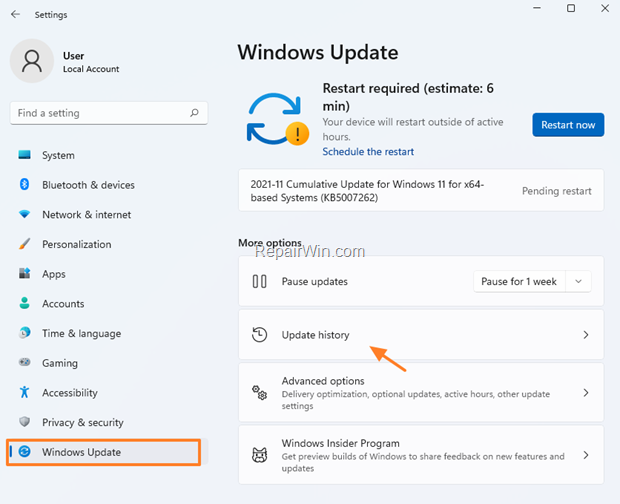

3. Click Uninstall updates.
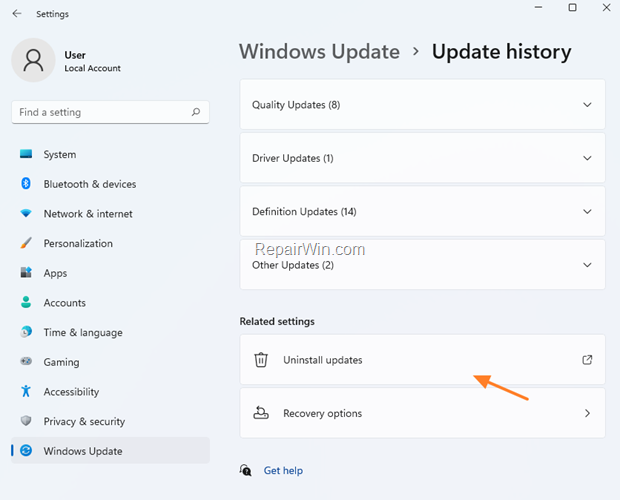

4. Select the update that you want to remove and click Uninstall.
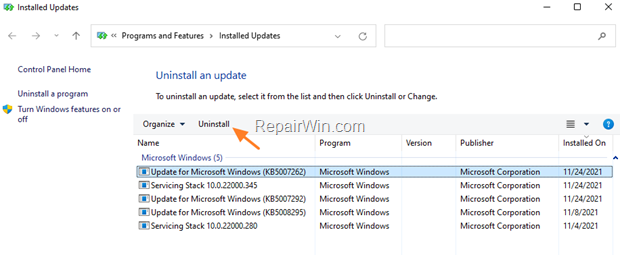

5. When the uninstall process is completed restart you computer to apply changes.
Method 2. How to Remove Windows 11 Updates From Program and features.
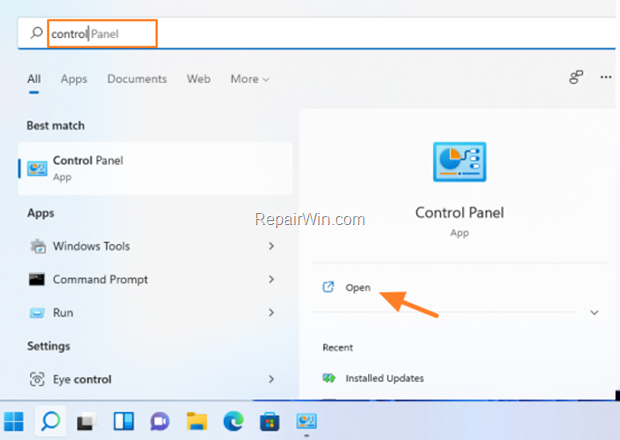
1. Click the Start menu and type control in the search box. Click to open Control Panel.

2. Click Program and Features. *
* Note: If you don’t see the “Programs and Features” item, set the View By: to Small icons.


3. Click View installed updates on the left pane.
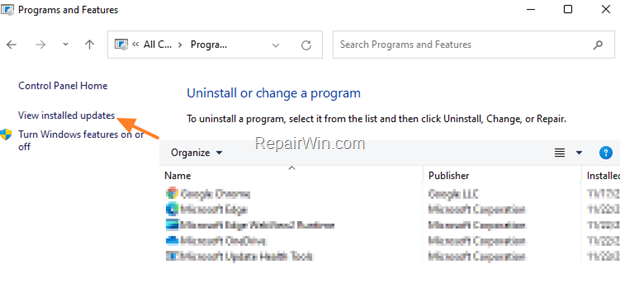

4. Select the update that you want to remove and click Uninstall.
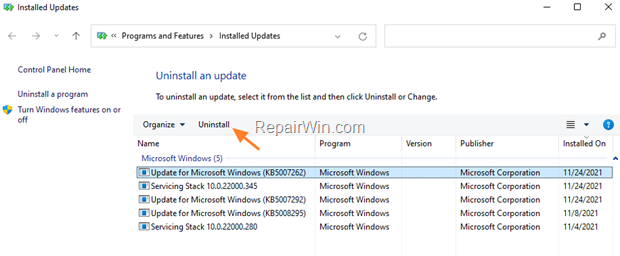

5. When the uninstall process is completed restart you computer to apply changes.
Method 3. How to Uninstall Windows 11 Updates from Command Prompt.
The third method to uninstall updates in Windows 11, is by using the “WSUA” command: To remove updates from command prompt:
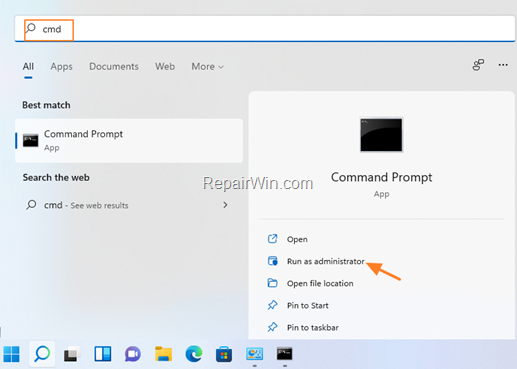
1. Open Command Prompt as Administrator. To do that:
- Click the Start menu and type cmd in the search box
- Click Run as administrator.

2. Type the following command to display the configuration of the operating system and to view a list of the installed updates:
- systeminfo.exe
3. At Hotfix(s) section, locate the number of the KB update that you want to uninstall. (e.g. “KB5007292”)


4. To remove the desired update (e.g. “KB5007292”) from command prompt, give the following command:
- wusa /uninstall /kb:5007292


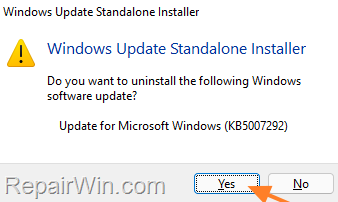
5. Ask Yes at Windows Update Standalone Installer notification to confirm your decision:

6. When the uninstall process is completed restart you computer to apply changes.
Method 4. How to Uninstall Updates in Windows 11 from PowerShell.
To remove updates from Windows PowerShell:
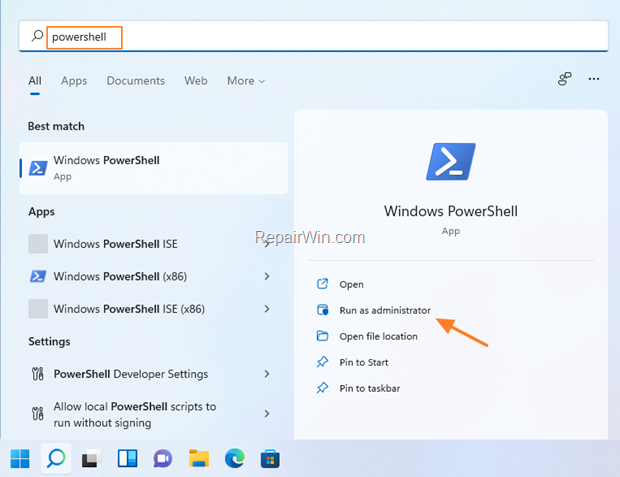
1 Open PowerShell as Administrator. To do that:
- Click the Start menu and type powershell in the search box
- Click Run as administrator.

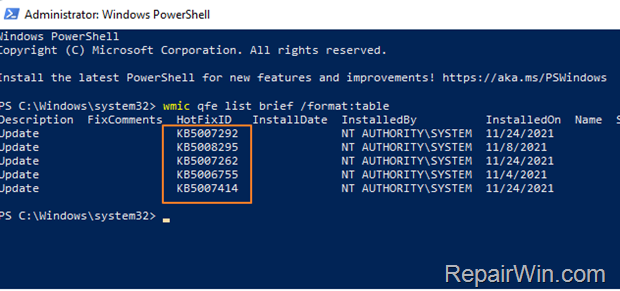
2. In PowerShell give the following command to get a list of the installed updates:
- wmic qfe list brief /format:table
3. At “HotFixID” column, locate the KB number of the update that you want to uninstall. (e.g. “KB5007292”)

4. Finally type the following command to remove the desired update from PowerShell::
- wusa /uninstall /kb:5007292


5. When the uninstall process is completed restart you computer to apply changes.
Method 5. How to Uninstall Updates from Windows 11 WinRE.
If Windows 11 cannot start normally, then you can uninstall updates from the Windows Recovery Environment (WinRE).
To remove updates from Windows Recovery Environment:
1. Press the SHIFT key and then click Power > Restart (either from Windows GUI or at Login screen) to restart Windows in WinRE. *
* Note: If Windows cannot start normally, then force Windows to enter in WinRE by pressing and holding your computer’s power button while it boots to turn it off. Repeat the process 2 more times and then leave Windows to enter in WinRE.
2. Go to Troubleshoot > Advanced Options and choose Uninstall Updates.
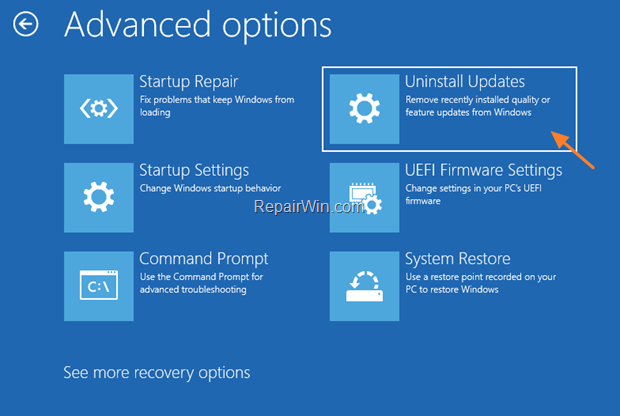

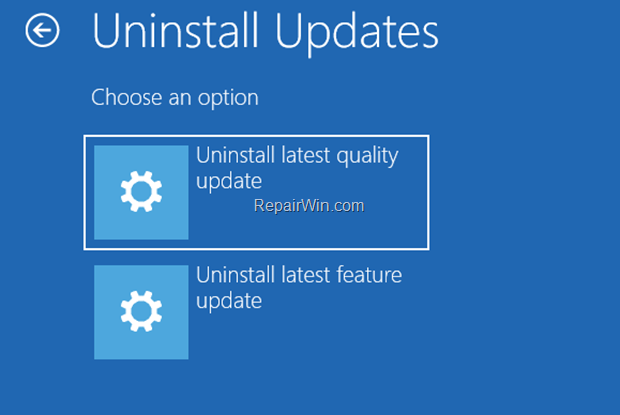
3. At the next screen and if you know the type of the latest installed update, choose the corresponding option. If you do not know the type of the most recently installed update, choose first to “Uninstall the latest quality update” and, after uninstall, try to boot your computer. If Windows still can’t start then “Uninstall the latest feature update”

That’s all! Did it work for you?
Please leave a comment in the comment section below or even better: like and share this blog post in the social networks to help spread the word about this solution.


