“INACCESSIBLE BOOT DEVICE” is a blue screen of death (BSOD) error that can be appeared on Windows 10 OS after you have used the “Reset This PC” feature to restore your Windows 10 PC to factory default settings or to refresh (reinstall) Windows 10 without loosing your files or after you have upgraded your system to Windows 10.
BSOD INACCESSIBLE BOOT DEVICE error as appeared in Windows 10: “Your PC ran into a problem and needs to restart. We ‘re just collecting some error info, and then you can restart. If you like to know more, you can search online later for this error: INACCESSIBLE BOOT DEVICE:

The INACCESSIBLE_BOOT_DEVICE or STOP 0x0000007B is a common BSOD error, that can caused on all Windows versions (Windows 7, 8 & 10) and is occurred if Windows cannot access the system partition at startup.
This tutorial contains detailed instructions on how to resolve the INACCESSIBLE_BOOT_DEVICE or STOP 0x0000007B error in Windows 10, 8.1, 8, 7 or Vista.
How to fix the INACCESSIBLE BOOT DEVICE / STOP 0x0000007B Error in Windows Startup.
Nội dung
Method-1. Modify SATA Mode to AHCI in BIOS to fix INACCESSIBLE BOOT DEVICE
1. Power On your system and press the corresponding key* to enter into BIOS SETUP
* Usually is the DEL or F1 or F2 or F10 key. (depends on manufacturer)
2. Find and change the SATA Mode from RAID to AHCI.
3. Save settings and EXIT BIOS Setup.
4. Try to start Windows normally (or to reinstall Windows). If Windows doesn’t start, then continue to next Method.
Method-2. Boot in Safe Mode & Restart to resolve INACCESSIBLE BOOT DEVICE.
The next method is a little stupidly and simple but many times is working: Start your computer in Safe Mode and then Restart.
Windows 7 or Vista:
1. Power On your computer and press the F8 key to show the Advanced Boot Options menu.
2. Using the Down arrow key, highlight the Safe Mode option and press Enter.
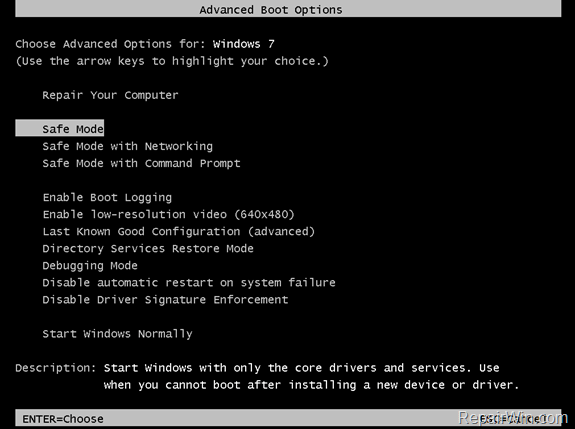
3. If Windows is starting in Safe Mode, then Reboot your PC and see if Windows is starting normally now. If not, continue to next Method.
Windows 10, 8.1 & 8.
Case 1: If your computer is booting normally to Windows or you can “reach” the login screen:
1. Hold down the “SHIFT” key and go to Power -> Restart.
2. After PC restarts, choose: Troubleshoot -> Advanced Options –> Startup Settings.
3. Click Restart.
4. After PC restarts, press the F4 (or the “4“) key to boot Windows into Safe Mode.
5. If Windows is starting in Safe Mode, then Restart your PC and see if Windows is starting normally now. If not, continue to next Method.
Case 2: If Windows cannot start (cannot reach the login screen or you cannot login to Windows, then Create a Windows USB installation media according your Windows version.
- Related article: How to create a Windows 10 USB installation media.
2. Boot your computer from the Windows installation media.
3. Press Next at Language options screen.
4. Choose Repair your computer.
5. Then choose Troubleshoot -> Advanced Options –> Command Prompt.
6. At command prompt window, type bcdedit /set {default} bootmenupolicy legacy and press Enter.

7. Type exit to close command prompt window and restart your computer.
8. After restart, press the F8 key to enter into Advanced Boot Options menu.
9. Using the down arrow key, highlight the Safe Mode option and press Enter.
10. If Windows starting in Safe Mode, then Reboot your PC and see if Windows is starting normally now. If not, continue to to next Method.
Method-3. Modify SATA Mode Settings in Registry. (Offline)
The next method is to modify offline the Registry settings for the SATA Controller Mode.
1. Create a Windows USB installation media according your Windows version.
2. Boot your computer from the Windows installation media.
3. Press Next at Language options screen.
4. Choose Repair your computer.
5. Open Command Prompt.
Windows 7 or Vista:
1. Press Next at the following screen:
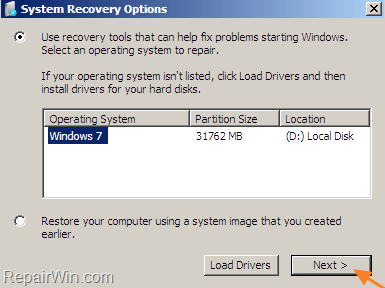
2. Select Command Prompt.
Windows 10, 8.1 & 8.
1. Choose Troubleshoot -> Advanced Options –> Command Prompt.
6 In command prompt type regedit and press Enter.

7. In Registry Editor, select the HKEY_LOCAL_MACHINE key.
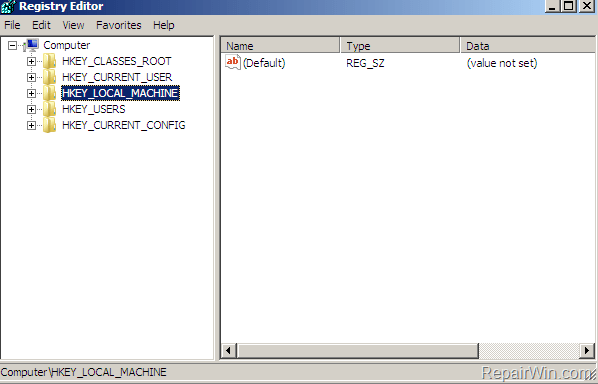
8. From the File menu, select Load Hive.
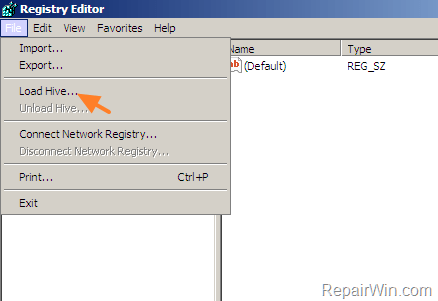
9. At “Load Hive” screen find and open the system file, from the %System_Drive%WindowsSystem32config directory. *
* The %System_Drive%: is the drive where the Windows OS is installed. (e.g. “C:WindowsSystem32config”)
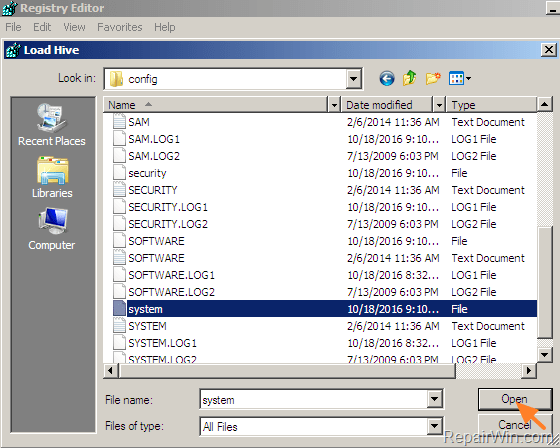
10. Then type a new Key Name: (e.g. “Repair“) and press OK.
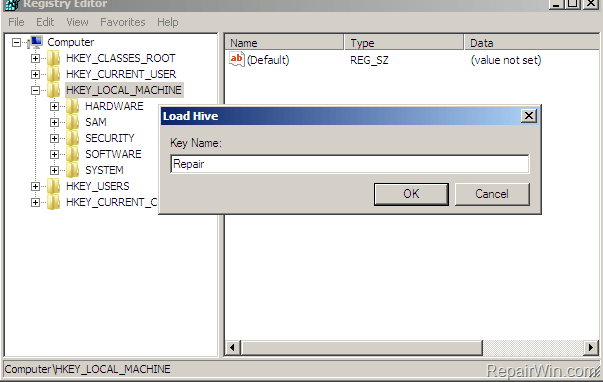
11. Now navigate to the following key (from the left side): *
HKEY_LOCAL_MACHINE<New Key>ControlSet001servicesmsahci
(e.g. “HKEY_LOCAL_MACHINERepairControlSet001servicesmsahci”)
- Note for Window 8, Windows 10 & Server 2012: If you cannot find the “msahci” key, then navigate to the “StorAHCI” key (e.g. : “HKEY_LOCAL_MACHINERepairControlSet001servicesstorahci”) , because according to Microsoft, MSAHCI has been replaced by StorAHCI.
12. At the right side: double click at the Start value and at the value data box type 0
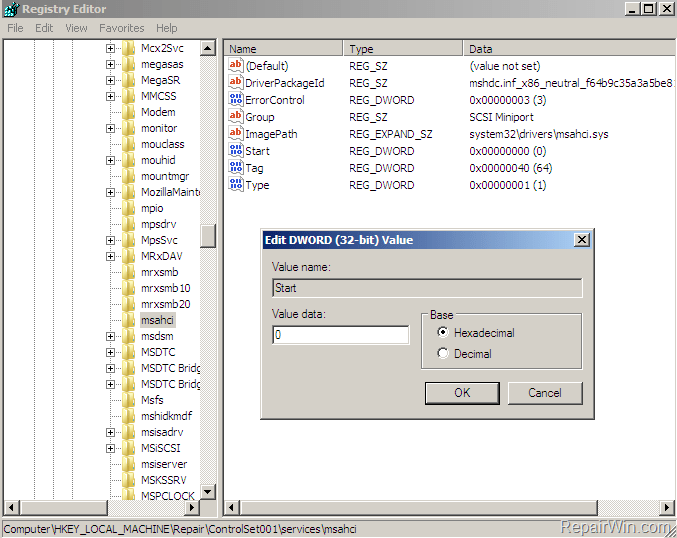
13. Perform the same steps and set – also – the Start value to 0 to the following two (2) keys:
- HKEY_LOCAL_MACHINE<New Key>ControlSet001servicespciide
- HKEY_LOCAL_MACHINE<New Key>ControlSet001servicesiaStorV
14. When done with the changes, select the <New Key> under the HKEY_LOCAL_MACHINE (e.g. “HKEY_LOCAL_MACHINERepair”)
15. From the File menu choose Upload Hive.
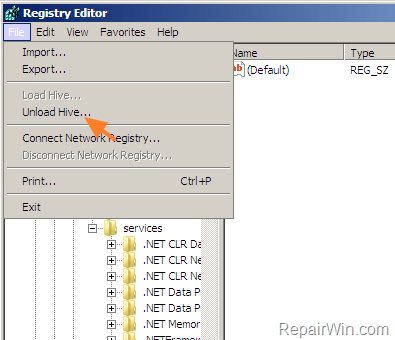
16. Close Registry Editor and restart your computer. *
* Note: Make sure that the SATA MODE is AHCI in BIOS SETUP.
17. Start Windows normally.
Method-4: System Restore: Restore your computer to an earlier working state
1. Create a Windows USB installation media according your Windows version.
2. Boot your computer from the Windows installation media.
3. Press Next at Language options screen.
4. Choose Repair your computer.
5. Restore your computer to a previous working state.
Windows 7 or Vista:
1. Press Next.
2. Select System Restore
3. Follow the onscreen instructions and restore your computer to an earlier state.
Windows 10, 8.1 & 8.
1. Choose Troubleshoot -> Advanced Options –> System Restore.
2. Follow the onscreen instructions and restore your computer to an earlier point.
Method-5: Perform a Clean Installation of Windows.
– The final method, is to use the Windows USB installation media you created and perform a clean Windows installation.
That’s all folks! Did it work for you?
Please leave a comment in the comment section below or even better: like and share this blog post in the social networks to help spread the word about this.
Bài liên quan
- FIX: Error 0x81000203 in System Restore. (Solved)
- Cannot Access Shared folder. User has not been granted the requested logon type at this computer. (Solved)
- FIX: Cannot clear TPM – 0x80284001, 0x80290300 or 0x80290304.
- Unable to Schedule Teams Meeting in 15 or 10 minutes slots (Solved)
- How to Share Folder without Username/Password on Windows 10/11.
- FIX: Thunderbird High CPU or Memory Usage issues.