If you are experiencing slow access to network shared network folders, continue reading below to learn how you can fix the issue.
Some users complain that when they try to access a shared network folder, the contents of the folder are displayed after a long time, and any changes they make to the network folder files (e.g. creating, renaming or deleting files), are not displayed immediately but with a long delay.
The slow delay in accessing shared network folders especially with thousands of files is due to the cache memory that SMB Redirector holds in order to reduce the number of interactions a client requires with a SMB server for common file browsing operations. To fix the problem, proceed and disable the caches used by the client SMB network redirector, as instructed below.
How to Fix: Slow Access to Network Drives and Folders in Windows 10/11.
1. Open Registry Editor. To do that:
1. Press Windows
+ R keys to open the run command box.
2. Type regedit and press Enter.
2. In Registry Editor, navigate to the following location:
- HKEY_LOCAL_MACHINESYSTEMCurrentControlSetServicesLanmanWorkstationParameters
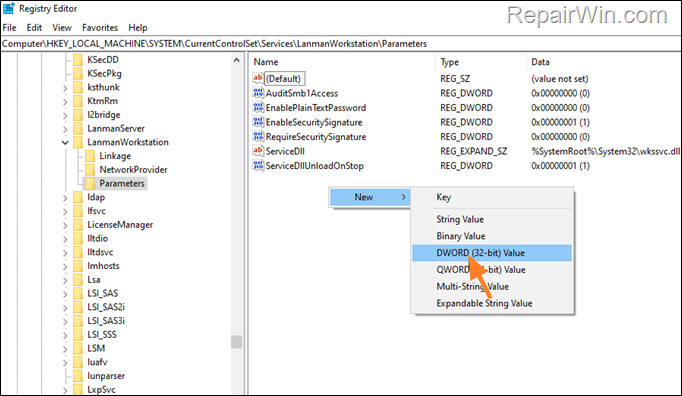
3. At the right-pane right-click on an empty space and select New > DWORD (32-bit) value.


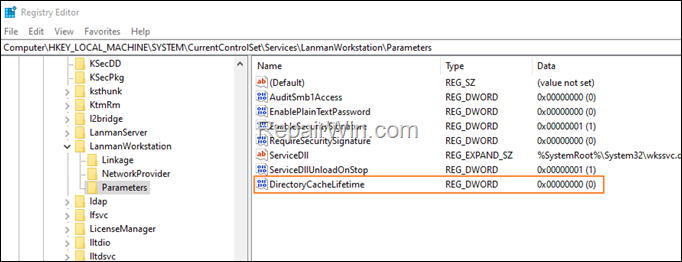
4a. Name the new value as DirectoryCacheLifetime and press Enter.
4b. Leave the Value data to 0 (ZERO) and close Registry Editor.


5. Restart your PC. Now check if the slow opening of network files still exists. If yes, proceed as follows:
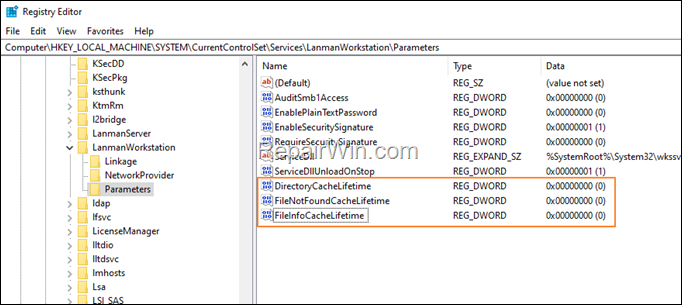
6. Perform the steps 1-4 above and create another two (2) new DWROD values with names: *
- FileNotFoundCacheLifetime
- FileInfoCacheLifetime
* Note: When done, you should see the following screen:


7. Restart your computer and normally the problem should solved.
That’s all folks! Did it work for you?
Please leave a comment in the comment section below or even better: like and share this blog post in the social networks to help spread the word about this solution.
![Slow Access in Network Shared Folders in Windows 10/11. [FIX] 7 Hình ảnh thuộc sở hữu của trang web qnet88.com](https://qnet88.com/wp-content/uploads/2023/04/btn_donate_lg-131.gif)


