In this guide you can find instructions on how to solve the USB Device not recognized error. When you receive the “USB Device not recognized “ error, then the USB device that you try to install appears as an unknown device in Device manager and the status of the device looks like this:
“Windows has stopped this device because it has reported problems. (Code 43)”.
If you want to fix USB device errors and problems, first make sure that you have installed the latest and the correct driver(s) for your USB device(s) and then follow the steps below to re-install all USB controllers on your computer because USB devices often malfunction due to corrupted software drivers.

How to fix ‘USB Device not recognized’ error in Windows 8, 7 & Vista
Method 1. Connect the Device to another USB port.
First of all, connect the USB device that is not recognized, to another USB port. (If your PC has a USB 2.0 port, then prefer to connect the device to that port)
Method 2. Install the drivers for the USB device.
From the USB device’s manufacturer support site, download and install the latest drivers for the unrecognized USB device.
Method 3. Perform a Power Reset / Static Discharge.
1. Disconnect all connected peripherals.
2. Remove the AC charger.
3. Remove the battery.
4. Push and release the power button ten (10) times in a row at one second interval.
5. Now push and hold down the power button for thirty (30) seconds.
6. Reinsert the Battery and then connect the AC charger.
7. Press the power button to turn on your laptop.
8. Connect one by one the USB devices.
Method 4. Disable USB Suspend Settings.
1. Open Power Options from Control Panel.
2. Click at Change plan settings.

3. Then select Change Advanced Power Settings.
4. At USB Settings set the USB selective suspend setting to Disabled.
![image_thumb[1] image_thumb[1]](https://qnet88.com/wp-content/uploads/2021/12/image_thumb1_thumb-15.png)
5. Click OK to apply changes and restart your computer.
7. Restart your computer.
Method 5: Install the latest Intel device drivers.
1. Download the Intel® Driver Update Utility.

2. Run Intel® Driver Update Utility and press Next at the first screen.

3. Accept the license terms and press Install.

4. Wait unit Inter Driver Update Utility, installs all required programs and files.

5. When the System Update is Completed press Launch.

6. Press Start Scan.

7. When the driver scan is completed, press Download to save the latest drivers to your download location.

8. Finally press Install to the next screen(s) to install the latest Intel drivers for your computer.

9. When the driver installation is completed, restart your computer.
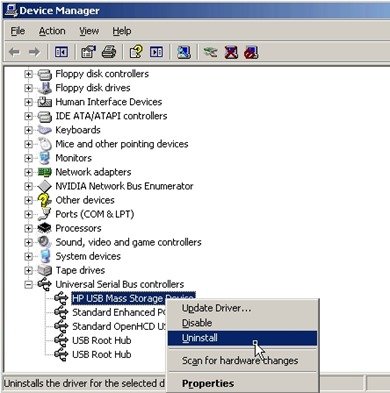
Method 6: Uninstall USB controllers and devices from Device Manager.
- Open Device Manager. To do that:
- Press “Windows” + “R” keys to open the RUN window.
- In “RUN” window “Open” box, type: devmgmt.msc
- Press Enter.
- In Device Manager expand Universal Serial Bus controllers.
- Right-click on every USB controller or device and select Uninstall. (if you use a USB Keyboard or Mouse and you lost the connection, unplug and re-plug them to regain connectivity.)
- Restart your computer.
- Wait until Windows re-installs Universal Serial Bus controllers.
- Plug your USB device again.
- Install drivers if needed.

Other methods to fix the USB NOT RECOGNIZED error.
1. Try to restore your computer to a previous working state.
- How to Restore Windows 10, 8 or 8.1 to a previous working state
- How to Restore Windows 7 or Vista to a previous working state.
2. Change the device’s USB cable.
That’s all folks! Did it work for you?
Please leave a comment in the comment section below or even better: like and share this blog post in the social networks to help spread the word about this solution.


