.single .post-author, .post-date {
text-transform: none;
}
,
Last updated: April 15th, 2025
If you’re trying to install the version 24H2 of Windows 11 and the installation fails, you’re not alone. From October 2024 to today (April 2025), many users who tried to upgrade their systems to Windows 11 v24H2 reported and continue to report installation failures, with different issues and installation error codes such as 0x8007001f, 0x800f0922, 0XC1900101, or 0xc1900201.
Here are some of the most reported problems/errors in Windows 11 v24H2 upgrade:
- There were problems installing some updates, but we’ll try again later – 0x800f0922
- There were problems installing some updates, but we’ll try again later – 0x8007001f
- Windows 11 24H2 download or installation progress stuck at a certain percentage (e.g., 0%, 60%, 99%)
- We couldn’t complete the updates. Undoing changes.
- We couldn’t install Windows 11.
- The installation failed in the FIRST_BOOT phase with an error during MIGRATE_DATA operation – 0x8007001F – 0x3000D
- The installation failed in the SAFE_OS phase with an error during BOOT operation – 0xC1900101 – 0x20017
- We couldn’t update system reserved partition – 0xc1900201
Here are some of the most common reasons why Windows 11 24H2 fails to install.
- 0x800f0922: The ‘App Readiness’ service is disabled or not running.
- 0x8007001f: Existence of Unknown User profiles.
- 0xC1900101 – 0x20017: Incompatible or outdated drivers, old BIOS version, disk or system files corruption.
- 0xc1900201: Insufficient space on the system reserved partition.
If Windows 11 v24H2 won’t install, this guide will provide you with the necessary steps to follow and proven solutions to fix the problem according to my experience.
How to fix: Windows 11 24H2 installation failed.
To minimize the problems in Windows 11 v24H2 upgrade and before you continue to the methods below, first do the following important actions:*
- Download, install and run the WindowsPCHealthCheck to check if your computer meets the requirements to install Windows 11 24H2
- Ensure that you have enough free space. Windows 11 requires at least 64 GB of free space to upgrade. To free up disk space use Disk Cleanup.
- Install the latest drivers for all devices on your system, especially for the Chipset and Graphics card (GPU).
- Download and run the HVCIScan tool to check for incompatible drivers.
- Check with your hardware vendor for any BIOS updates.
- Remove nonessential external hardware, such as docks and USB devices.
- Disable the BitLocker or any other encryption (If enabled).
- Finally, before restarting your computer to install the update, disconnect from the network. (e.g. Unplug the Ethernet cable or disable the Wi-Fi) adapter).
* Notes:
1. To install version 24H2, 23H2 must be installed.
2. After following the instructions for each method, try updating your system again and only if the update fails again, proceed to the next method.
Method 1. Start the App Readiness service.
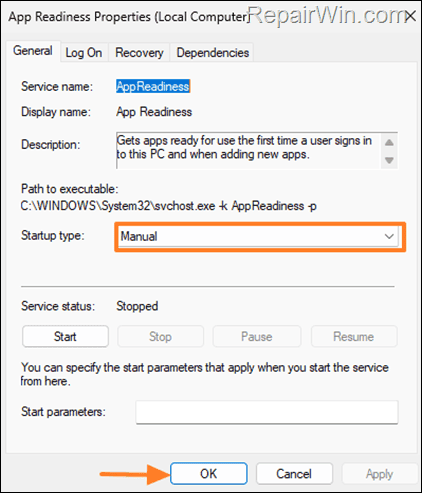
1. Go to Services (services.msc) and make sure the “App Readiness” service is not disabled and is running. If not, open its properties, set the “Startup type” to Manual, and Start the service.
2. Try updating your system again and if the installation fails again, continue reading below.

Method 2. Disable Windows Sandbox on Windows 11 Pro.*
* Note: Skip this step if you’re running Windows 11 Home.
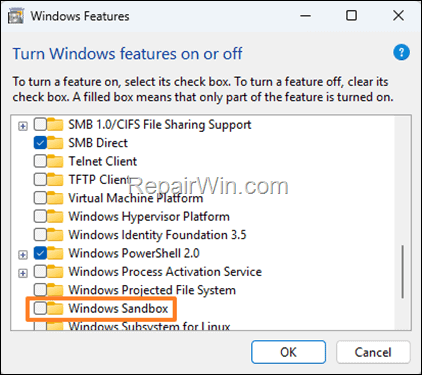
1. In Search, type “features” and then click on Turn Windows features on or off result.
2. Uncheck the Windows Sandbox and click OK.
3. Restart your PC and try to update again.

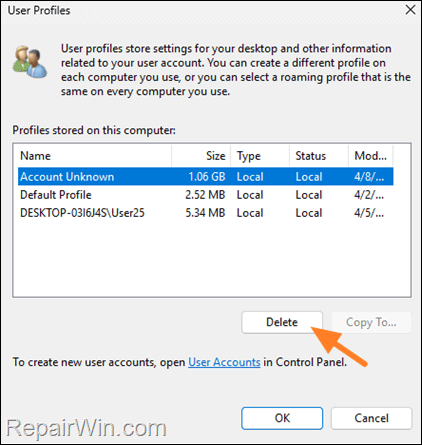
Method 3. Delete Unknown User Profiles.
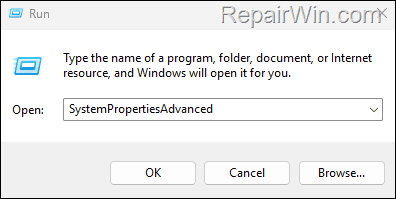
1. Press Win + R keys to open the RUN command box.
2. Type “SystemPropertiesAdvanced” and hit OK.

3. Under ‘User Profiles’ click Settings.
4. Here, select and delete the “Account Unknown” profile(s) and keep only the Default and the user(s) profile(s).
5. Restart the PC and try to update again.

Method 4. Free up space on System Reserved Partition.
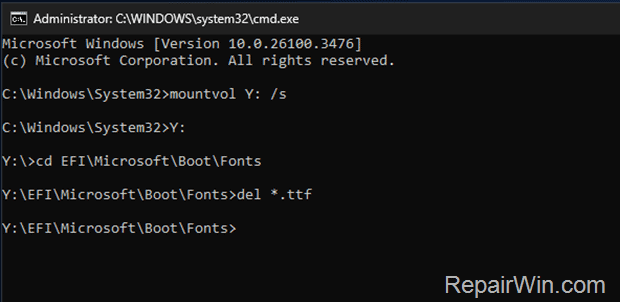
1. Open Command prompt as administrator and give the following commands:
- mountvol Y: /s
- Y:
- cd EFIMicrosoftBootFonts
- del *.ttf
2. Close the command prompt wind and try to update your system.

Method 5. Repair the System drive & the System Files.
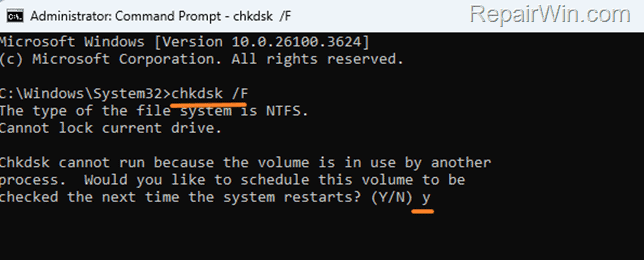
1. Open Command prompt as administrator and give the following command to check and repair errors on drive C:*
- chkdsk /F
* Note: When you’re prompted to schedule a check the next time the system restarts, press “Y“.

2. Now, restart your computer and let check disk to run.
3. After entering Windows, re-open Command prompt as administrator and give this command:
- DISM.exe /Online /Cleanup-image /Restorehealth


4. When the DISM operation is completed, type the following command and hit Enter:
- sfc /scannow


5. Now wait until the System File Checker repairs the Windows System Files.
6. When this done, restart your computer and try to install the Update.
Method 6. Upgrade Windows 11 to version 24H2 using the Installation Assistant.
1. Navigate to Windows 11 download page to download the Windows 11 Installation Assistant.
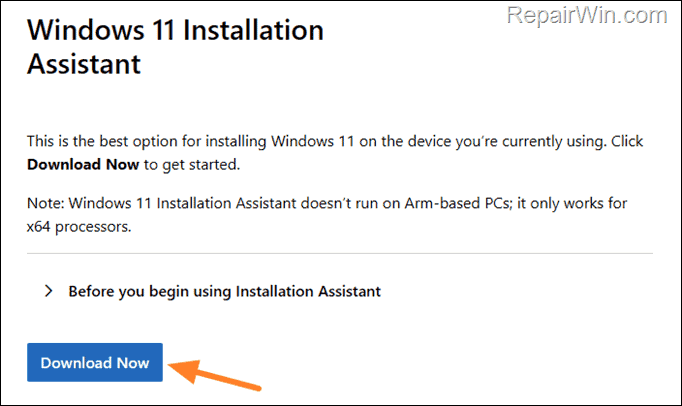

2. Then, open the “Windows11InstallationAssistant.exe” and continue to upgrade Windows.
Method 7. Upgrade to version 24H2 from ISO file.
Step 1. Download Windows 11 in a ISO File.
1. Navigate to Windows 11 download page and click Download Tool now to download Media Creation Tool.


2. Run the downloaded file file and Accept the License Terms at the first screen.
3. Leave the default settings for Language and Version and click Next.
4. On the “Choose which media to use” screen, select ISO file and click Next.


6. Finally, select to save the ‘Windows.iso’ file to your desktop an click Save.
7. The Media Creation Tool will now begin to download the Windows 11 in an ISO file.
8. When the download is completed, close the Media Creation Tool.
Step 2. Upgrade Windows 11 to v24H2 using the ISO file.
1. Disconnect your computer from the Internet, (or set it to “Airplane mode” if you own a laptop).
2. Disable or temporarily uninstall any third-party antivirus.
3. Then, right click on the “Windows.iso” file (on your desktop) and click Mount.
4. Double click at Setup application to start the upgrade.


5. Click Install on the first screen and then click Accept.
6. Finally, make sure that the Keep personal files and apps option is selected and click Install to repair and upgrade your system without losing your files.


Method 8. Reinstall Current version of Windows 11.
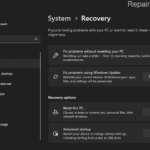
1. Go to Start > Settings > System > Recovery and click Reinstall now, next to “Fix problems using Windows update”.


2. Click OK, and then wait for Windows Update to download and install a repair version of Windows 11. When it does, and when prompted, restart your computer.
3. After restarting, go again to Windows Update center to install any other updates available and you’re done!
Method 9. Reset Windows 11.
Restoring Windows to its default state is another method to resolve Windows 11 v24H2 upgrade issues. For this task, read the instructions in this article: How to Reset Windows 11.
Method 10. Clean Install Windows 11.
The final method to fix problems in Windows 11 24H2 upgrade, is to perform a clean installation of Windows 11. For this task, read the instructions of method-1 in this article: How to Clean Install Windows 11.*
* Important: The clean installation means that all your files and settings will be lost during the installation process. So, proceed and backup all your important files and settings to another storage media before continue. (e.g. to an external USB drive).
That’s all folks! Please leave a comment in the comment section below or even better: like and share this blog post in the social networks to help spread the word about this.

- Author
- Recent Posts
- Windows 11 v24H2 installation fails? Here are the most effective methods to fix the issue. – April 15, 2025
- Latest Windows 11 Problems & Fixes (as of April 5, 2025) – April 6, 2025
- FIX: Windows Search exited without properly closing your Outlook *.OST or *.PST file (Solved) – April 3, 2025

