In this tutorial you’ll learn how to manually check for updates in Office 2019, 2016 and Office 2013. In all Office versions, there are two ways to install the available Office updates: Automatically and Manually.
How to Update Office 209/2016/2013/2010 Manually.
Method 1. How to Manually Check for Office Updates in Office 2019, 2016 and Office 2013.
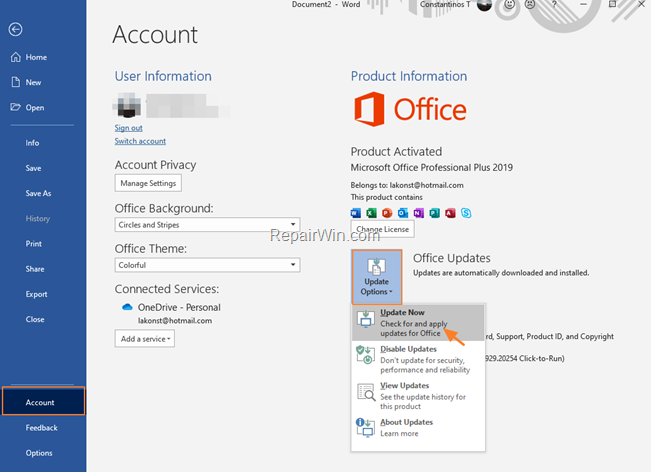
To manually check and install the available Office updates, in all Office versions:
1. Open any Office program (e.g. Word).
2. From File menu, choose Account. *
* Note: In Office 2010 choose Help.
3. Expand the Update options and click Update Now. *
* Note: If the ‘Update Options” are not available, follow the instructions at Method-2 below.
Method 2. How to Automatically Install Office Updates for Office 2019, 2016 and Office 2013.
If you want Windows to download and install the available Office updates automatically, navigate to Windows update settings and check the following setting:
- Receive updates for other Microsoft products when you update Windows (Windows 10)
- Give me updates for other Microsoft products when I update Windows (Windows 7)
To install Office updates automatically in Windows 10.
1. Go to Settings -> Update and Security -> Advanced options.
2. At Update options, drag the slider ‘Receive updates for other Microsoft products when you update Windows’ to ON.
3. Navigate to the previous screen, and click the Check for Updates button in you want to install the available Office updates immediately.
To install Office updates automatically in Windows 7.
1. Navigate to Control Panel -> Windows Update and click Change Settings.
2. Select the Give me updates for other Microsoft products when I update Windows checkbox and click Apply.
3. Click Check for updates to install all available Updates.
That’s all folks! Did it work for you?
Please leave a comment in the comment section below or even better: like and share this blog post in the social networks to help spread the word about this guide.


